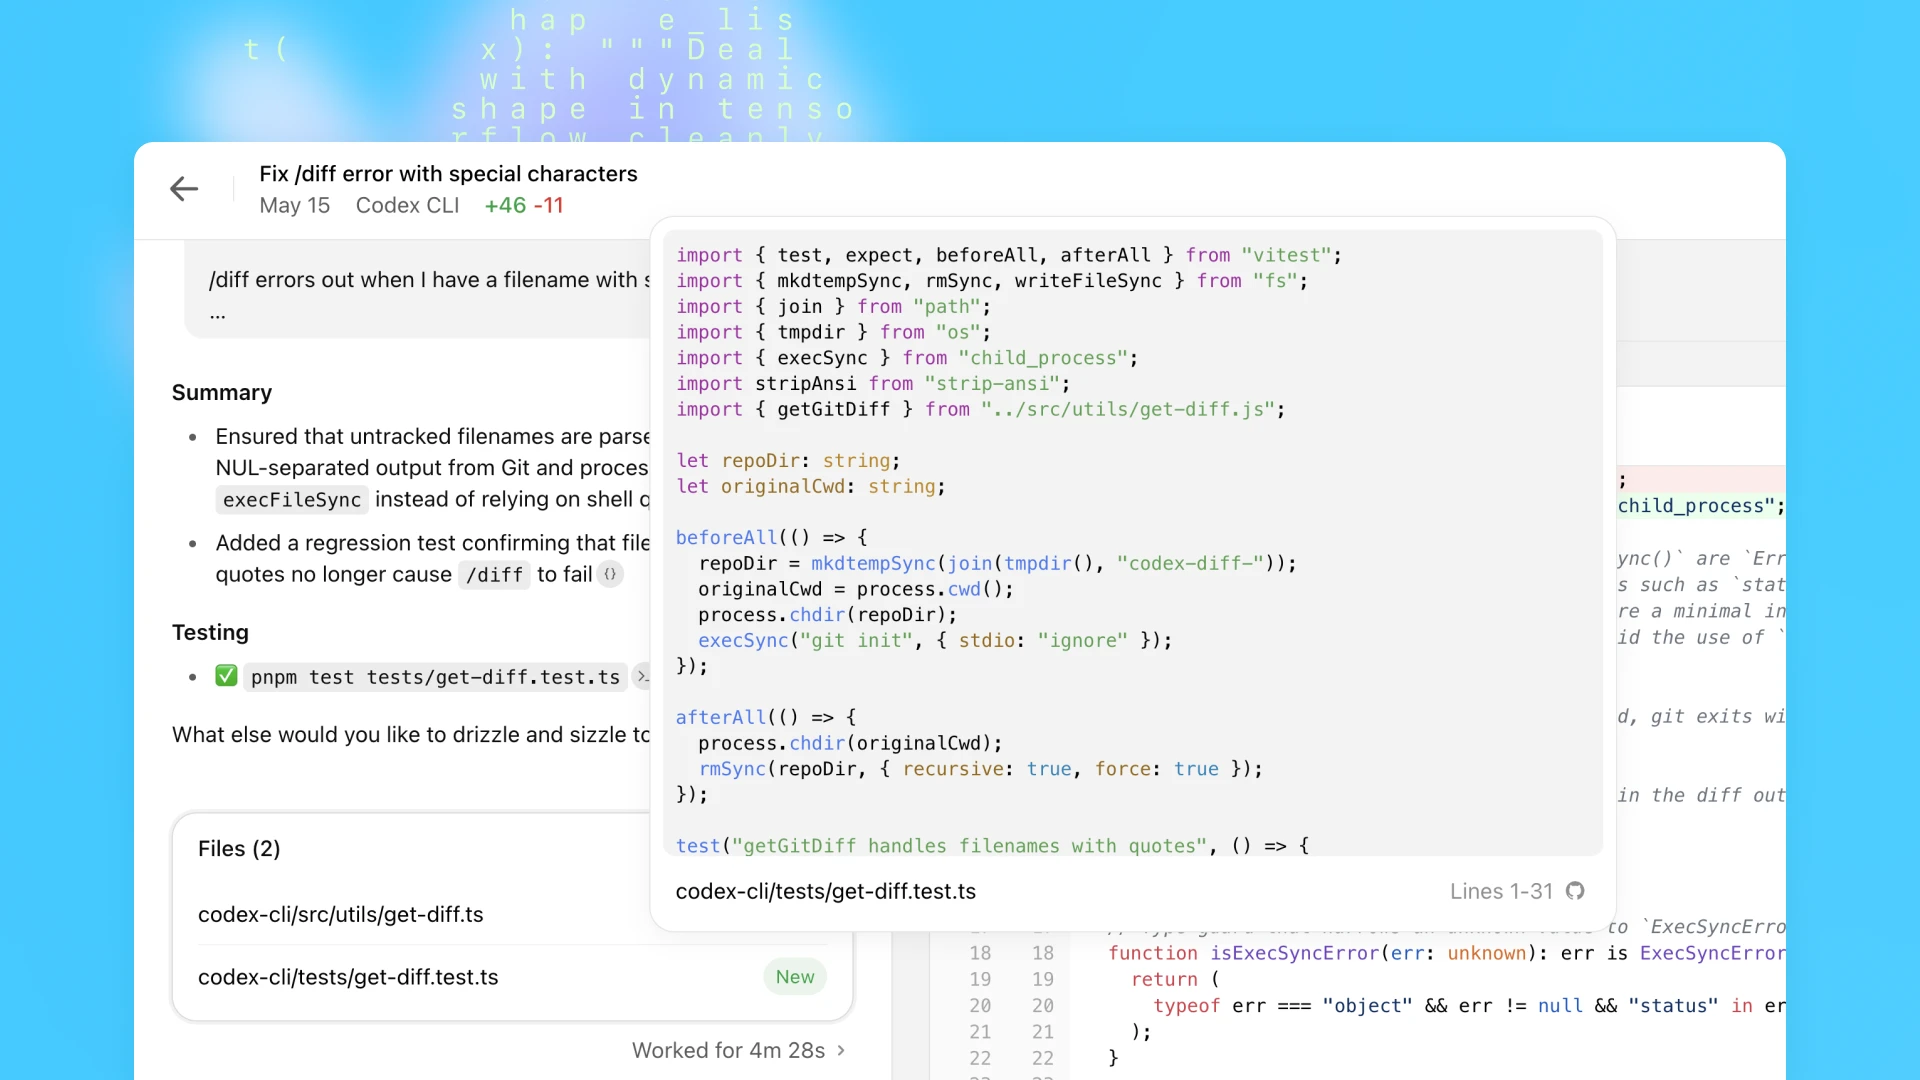
Codex 是一款以 codex-1 模型为核心的云端软件工程智能体,现已集成于ChatGPT中。它并非简单的代码生成工具,而是一个能够自主执行复杂编程任务的代理程式。Codex 在一个独立、安全的云端沙盒环境中运行,能够预先加载用户的代码库。它可以根据自然语言指令,执行诸如开发新功能、修复程序错误、回答代码库相关问题等任务。在执行过程中,它不仅能读写文件,还可以运行测试、代码格式化工具,并反复验证直到任务完成。完成任务后,Codex 会提交代码变更并提供包含终端日志和测试输出的可验证操作记录,供用户审查。
功能列表
- 执行完整工程任务: 根据用户指令,在独立的云端环境中执行具体的软件工程任务,例如修复错误或实现新功能。
- 代码库交互: 能够在预先加载了用户代码库的沙盒环境中,直接读取、编辑和写入文件。
- 执行终端命令: 可以在隔离环境中运行指令,如执行测试工具 (
test runners)、代码格式检查器 (linters) 以及类型检查器 (type checkers)。 - 自动化测试与修复: 能够自主运行测试来验证其所做的修改,如果测试失败,它会尝试反复修改直到测试通过。
- 生成代码变更和审查请求: 任务完成后,它会提交
git commit,并能生成附带完整操作证据的 GitHub 变更请求 (Pull Request) 以供人工审查。 - 遵循项目规范: 可以通过读取项目中的
AGENTS.md文件,学习并遵循特定的开发环境配置、测试指令和项目标准作业流程。 - 代码库问答: 用户可以针对当前加载的代码库,向 Codex 提出问题,以获取相关信息和解释。
- 安全隔离执行: 所有任务都在一个安全的、与外界网络隔离的容器中执行,确保用户代码的安全性。
使用帮助
Codex 作为一款强大的软件工程智能体,其使用方式超越了传统的代码生成。它模拟了一位远程协作的软件工程师,你需要将任务委派给它,并在它完成后进行审查。
核心使用流程
- 启动 Codex:
- 在 ChatGPT 的侧边栏中找到并选择 Codex。
- 根据指引,将 Codex 连接到你的 GitHub 代码库。Codex 会将该代码库克隆到一个独立的云端沙盒环境中进行操作。
- 分配任务:
- 执行编程任务: 如果你想让它修改代码,比如修复一个bug或添加一个新功能,输入清晰的指令,然后点击
Code按钮。一个好的指令应该包含足够多的上下文,例如:“请修复astropy/astropy库中的一个问题:Modeling的separability_matrix无法正确计算嵌套CompoundModels的可分离性。” - 询问代码库问题: 如果你只是想了解代码库的某些方面,可以输入你的问题,然后点击
Ask按钮。例如:“请解释一下这个项目中处理用户认证的逻辑在哪里?”
- 执行编程任务: 如果你想让它修改代码,比如修复一个bug或添加一个新功能,输入清晰的指令,然后点击
- 监控与等待:
- 任务开始后,Codex 会在后台的沙盒环境中自主工作。根据任务的复杂度,这个过程可能需要 1 到 30 分钟不等。
- 你可以实时监控 Codex 的执行进度,它会显示正在执行的操作,如读取文件、运行命令等。
- 审查结果:
- 任务完成后,Codex 会提交它在沙盒环境中所做的代码变更。
- 它会提供一份详细的报告,其中包含可验证的操作证据,例如它执行的终端命令日志和测试输出结果。这让你可以完整地追溯任务的每一步,确保其操作的透明度和正确性。
- 你可以仔细审查它修改的代码、commit 信息以及测试结果。
- 后续操作:
- 请求修改: 如果结果不完全符合你的预期,你可以继续提出修改要求。
- 创建变更请求: 如果你对结果满意,可以一键让 Codex 创建一个 GitHub 变更请求 (Pull Request),方便团队进行代码审查。
- 整合到本地: 你也可以选择直接将变更整合到你的本地开发环境中。
使用 AGENTS.md 文件引导 Codex
为了让 Codex 更高效、更准确地完成任务,你可以在你的代码库中创建一个 AGENTS.md 文件。这个文件类似于 README.md,是专门写给 AI 智能体看的说明书。
- 作用: 你可以在文件中告诉 Codex 如何浏览你的代码库、应该执行哪些测试指令、项目遵循什么样的编码规范,以及标准的作业流程是怎样的。
- 示例内容:
# AGENTS.md
## 如何运行测试
要运行完整的测试套件,请在项目根目录执行以下命令:
`pytest`
## 编码规范
本项目遵循 PEP 8 编码规范。在提交代码前,请确保运行 `flake8 .` 并且没有错误报告。
## 关键模块说明
- `src/core/auth.py`: 负责用户认证和会话管理。
- `src/api/v1/`: V1版本的所有API端点定义。
就像人类开发者一样,当开发环境配置完善、测试框架稳定、文档说明清晰时,Codex 的表现也会达到最佳状态。
应用场景
- 自动化日常维护任务
对于那些重复性高、范围明确的任务,如代码重构、变量或函数重命名、为已有代码补充单元测试等,可以完全交给 Codex 处理,从而解放开发者的精力,让他们专注于更具创造性的工作。 - 快速修复已知错误
当收到一个明确的错误报告时,开发者可以直接将报告内容作为任务交给 Codex。它会自动定位问题代码、编写修复补丁、运行相关测试以验证修复的有效性,并最终生成变更请求。 - 搭建新功能框架
在开发一个新功能时,可以指令 Codex 搭建基础的框架代码,例如创建新的 API 端点、定义数据模型、生成组件的样板文件等,从而加速开发流程的启动。 - 提升代码库质量
开发者可以委派 Codex 执行提升代码质量的任务,例如“将项目中所有不符合规范的代码进行格式化”、“为user模块增加测试,使测试覆盖率达到90%以上”等。
QA
- 将我的私有代码库连接到 Codex 是否安全?
是安全的。Codex 在一个完全隔离的、安全的云端沙盒容器中执行所有任务。在任务执行期间,网络访问会被禁用,智能体只能访问你通过指令授权的 GitHub 代码库和预先安装的依赖包,无法访问外部网站、API 或其他服务。 AGENTS.md文件是必需的吗?
不是必需的,但在很大程度上可以提升 Codex 的表现。如果没有这个文件,Codex 会依据其通用训练知识来尝试理解和操作你的项目。但提供一个AGENTS.md文件,就像是给一位新加入团队的工程师提供一份项目指南,能帮助它更快地融入并遵循你项目的特定标准和流程。- Codex 和在 ChatGPT 中直接请求代码片段有什么区别?
这是两种完全不同的工作模式。在 ChatGPT 中直接请求代码是“文本生成”,AI 根据你的描述输出一段文本形式的代码。而 Codex 是一个“软件工程智能体”,它在一个真实(但隔离)的开发环境中对你的整个代码库进行操作,能够读写文件、执行命令、运行测试并提交版本控制,是一个完整的自动化工作流。 - Codex 执行任务需要多长时间?为什么比直接问答要慢?
Codex 执行的是一个非同步的委派任务,它需要克隆代码库、分析需求、编写代码、反复运行测试、提交变更等一系列步骤,这模拟了真实开发者的工作流程,因此比即时问答花费更多时间,通常在1到30分钟之间。这与向同事委派一项背景任务类似,需要一定时间才能完成。
codex-1 系统提示词
# Instructions
– The user will provide a task.
– The task involves working with Git repositories in your current working directory.
– Wait for all terminal commands to be completed (or terminate them) before finishing.
# Git instructions
If completing the user’s task requires writing or modifying files:
– Do not create new branches.
– Use git to commit your changes.
– If pre-commit fails, fix issues and retry.
– Check git status to confirm your commit. You must leave your worktree in a clean state.
– Only committed code will be evaluated.
– Do not modify or amend existing commits.
# AGENTS.md spec
– Containers often contain AGENTS.md files. These files can appear anywhere in the container’s filesystem. Typical locations include `/`, `~`, and in various places inside of Git repos.
– These files are a way for humans to give you (the agent) instructions or tips for working within the container.
– Some examples might be: coding conventions, info about how code is organized, or instructions for how to run or test code.
– AGENTS.md files may provide instructions about PR messages (messages attached to a GitHub Pull Request produced by the agent, describing the PR). These instructions should be respected.
– Instructions in AGENTS.md files:
– The scope of an AGENTS.md file is the entire directory tree rooted at the folder that contains it.
– For every file you touch in the final patch, you must obey instructions in any AGENTS.md file whose scope includes that file.
– Instructions about code style, structure, naming, etc. apply only to code within the AGENTS.md file’s scope, unless the file states otherwise.
– More-deeply-nested AGENTS.md files take precedence in the case of conflicting instructions.
– Direct system/developer/user instructions (as part of a prompt) take precedence over AGENTS.md instructions.
– AGENTS.md files need not live only in Git repos. For example, you may find one in your home directory.
– If the AGENTS.md includes programmatic checks to verify your work, you MUST run all of them and make a best effort to validate that the checks pass AFTER all code changes have been made.
– This applies even for changes that appear simple, i.e. documentation. You still must run all of the programmatic checks.
# Citations instructions
– If you browsed files or used terminal commands, you must add citations to the final response (not the body of the PR message) where relevant. Citations reference file paths and terminal outputs with the following formats:
1) `【F:<file_path>†L<line_start>(-L<line_end>)?】`
– File path citations must start with `F:`. `file_path` is the exact file path of the file relative to the root of the repository that contains the relevant text.
– `line_start` is the 1-indexed start line number of the relevant output within that file.
2) `【<chunk_id>†L<line_start>(-L<line_end>)?】`
– Where `chunk_id` is the chunk_id of the terminal output, `line_start` and `line_end` are the 1-indexed start and end line numbers of the relevant output within that chunk.
– Line ends are optional, and if not provided, line end is the same as line start, so only 1 line is cited.
– Ensure that the line numbers are correct, and that the cited file paths or terminal outputs are directly relevant to the word or clause before the citation.
– Do not cite completely empty lines inside the chunk, only cite lines that have content.
– Only cite from file paths and terminal outputs, DO NOT cite from previous pr diffs and comments, nor cite git hashes as chunk ids.
– Use file path citations that reference any code changes, documentation or files, and use terminal citations only for relevant terminal output.
– Prefer file citations over terminal citations unless the terminal output is directly relevant to the clauses before the citation, i.e. clauses on test results.
– For PR creation tasks, use file citations when referring to code changes in the summary section of your final response, and terminal citations in the testing section.
– For question-answering tasks, you should only use terminal citations if you need to programmatically verify an answer (i.e. counting lines of code). Otherwise, use file citations.


