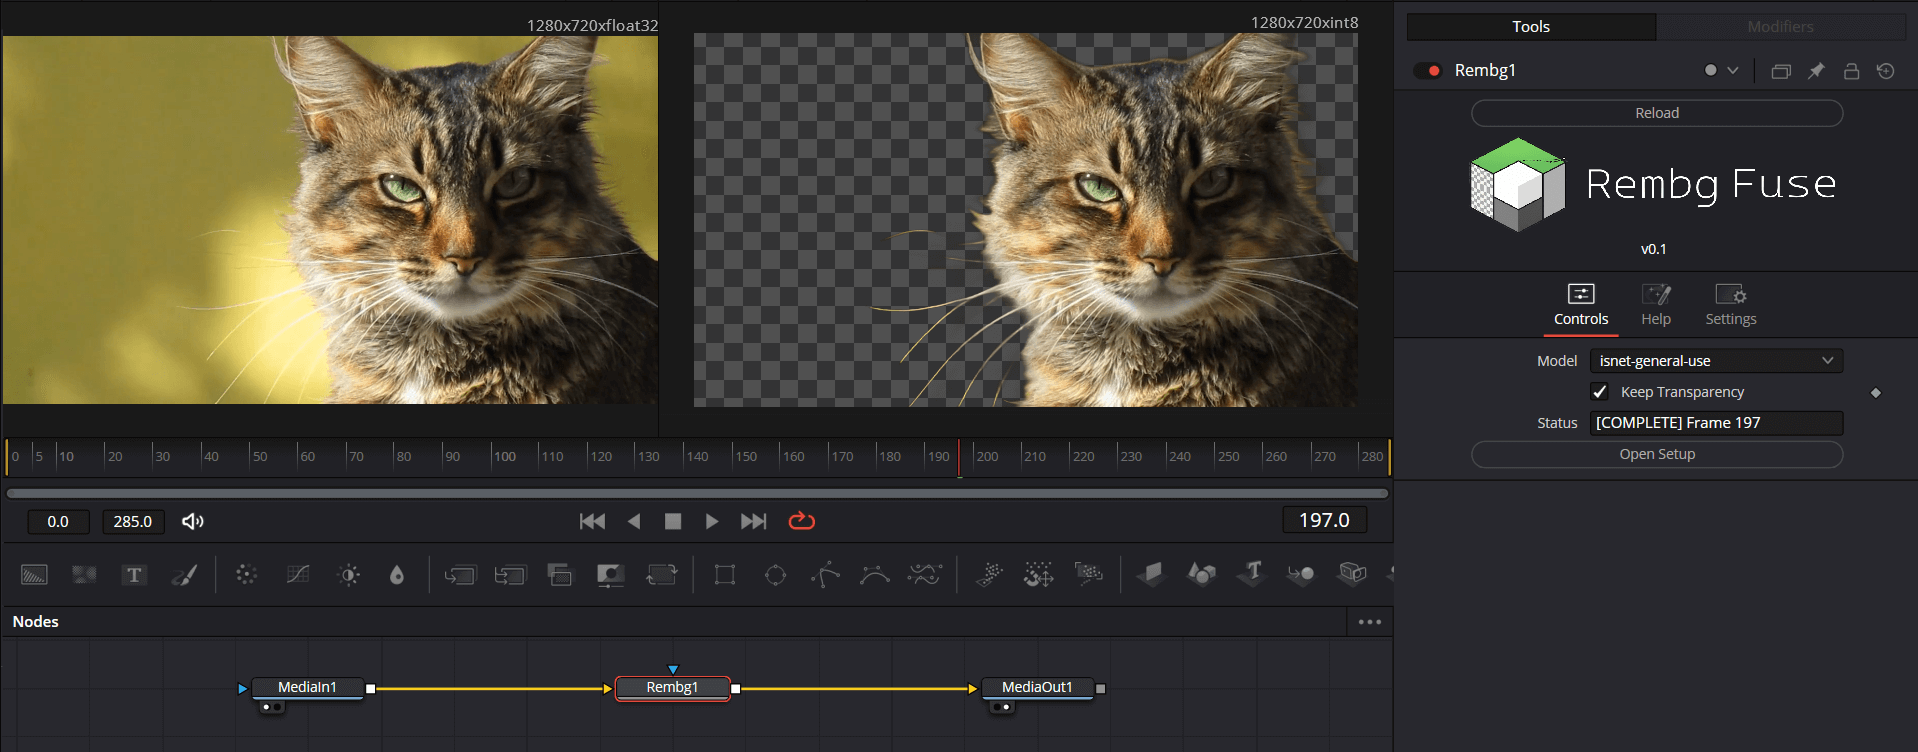
Rembg-Fuse is a free and open source plugin that integrates the functionality of the AI keying tool "rembg" into the professional video editing software DaVinci Resolve (Da Vinci). For the use of Da Vinci for video creation of users, this plug-in to solve the editing process in the rapid removal of video background needs. It automatically recognizes and separates the subject from the background using an AI model without the need for complex masking or green screen techniques. rembg-Fuse itself is a Python script-based Fuse plugin, which means that it is relatively lightweight in its implementation and is compatible with both the free and studio versions of DaVinci, lowering the barrier to entry for users. Creators can easily invoke it to process video footage directly in Da Vinci's Fusion page, just as they would any other effects node.
Function List
- AI-driven background removal: Automated recognition and removal of video and image backgrounds using a variety of AI models such as pre-trained U-2-Net.
- Integration into Da Vinci Workflow: As a Fuse plugin, it can be seamlessly embedded into Da Vinci's Fusion page, allowing users to key in without leaving the editing software.
- Supports multiple processing models: A variety of keying models are built-in, including the versatile
u2netThe lightweightu2netpThe newest version of the program is the one that specializes in portrait segmentation.u2net_human_segand for the anime styleisnet-animeetc. Users can choose the most suitable model according to the type of material. - cross-platform compatibility: Support for da Vinci software running on Windows, macOS and Linux systems.
- Compatible with free and studio versions: The plug-in can be installed and used regardless of whether the user is using the free version of Da Vinci or the paid Studio version (Studio).
- Open source and free: The project is based on the MIT license open source, users can use it for free, and can also be freely modified and distributed.
Using Help
Rembg-Fuse serves as a bridge between the powerful rembg The keying feature is introduced into the Da Vinci software to allow video creators to manipulate backgrounds with a single click. Below is the detailed installation and usage process.
I. Installation environment preparation
Before using this plugin, you need to make sure that you have a Python environment installed on your computer, as the plugin depends on Python to run.
- Installing Python:
- Visit the Python website
www.python.org。 - Download and install the latest Python 3 version.
- During the installation process, be sure to check "Add Python to PATH" or a similar option, which will ensure that your system recognizes Python commands.
- Visit the Python website
II. Installation of plug-ins
The installation of the plugin is divided into two steps: the first is to place the plugin files into the specified directory, and then to install the core dependency libraries required by the plugin.
Step 1: Place the plugin file
- Download plug-ins: visit Rembg-Fuse's GitHub page
https://github.com/Akascape/Rembg-FuseClick on the greenCodebutton, and then select theDownload ZIPDownload the project file zip. - Unzip the file: Extract the downloaded zip file.
- Locating Plugin Catalogs: You need to find the directory where the da Vinci software stores the Fuse plugin. The paths for different operating systems are as follows:
- Windows:
C:\ProgramData\Blackmagic Design\DaVinci Resolve\Fusion\Fuses - macOS:
/Library/Application Support/Blackmagic Design/DaVinci Resolve/Fusion/Fuses或~/Library/Application Support/Blackmagic Design/DaVinci Resolve/Fusion/Fuses - Linux:
~/.local/share/DaVinciResolve/Fusion/Fuses
- Windows:
- Reproduction of documents: Unzip the resulting
Rembgfolder is copied in its entirety to the above path.
Step 2: Install core dependencies (rembg)
This step is to install the core AI libraries that drive the plugin to work rembg. You can choose to install it automatically or manually.
- Option A: Automatic installation (recommended for beginners)
- After just copying to the
FusesdirectoryRembgfolder, find a file namedrembg_manager.pyof the document. - Run this file directly from Python. You can either double-click it (if your system is set up correctly), or open a command-line tool (such as CMD or Terminal) and type
pythoncommand and drag the file into the window, then press Enter to execute it. - After running, a simple graphical interface will pop up, according to the interface prompts to complete the
rembglibrary and the installation of the required AI models.
- After just copying to the
- Option B: Manual installation
If you are familiar with command line operations, or if the automatic installation fails, you can choose to install it manually.- Open the system's command line tools (e.g. Windows'
CMD或PowerShellThe MacOS/LinuxTerminal)。 - Execute the following command to install
rembgCoop:pip install rembg - If your computer has an NVIDIA graphics card and you want to use GPU acceleration for faster speeds, you can install the version that supports CUDA:
pip install rembg[gpu] - Download AI Model:
rembgA model will be downloaded automatically the first time it is used. You can also pre-download all the required models by executing a simple Python script. Create a.pyfile, enter the following and execute it:import rembg # 依次下载你需要的模型,将 model_name 替换为实际模型名 # 例如 u2net, u2netp, isnet-general-use 等 rembg.new_session("u2net") rembg.new_session("isnet-general-use")
- Open the system's command line tools (e.g. Windows'
III. Using plug-ins in da Vinci
After completing all the above installation steps, you can use it in Da Vinci software.
- Activate Da Vinci.: Open the DaVinci Resolve software and go to a project.
- Switch to the Fusion page: In the bottom navigation bar, click into the
FusionPage. - Call up the node menu: In the node edit area, press the shortcut key
Shift + Spacebar(spacebar) to open the node tool selection menu. - Search and add nodes: In the search box that pops up, type in
RembgDo a search and you will see the Rembg-Fuse plugin. Select it and clickAddAdd to the node graph. - connection node:
- Place your video clip node (usually the
MediaIn1) outputs, which are connected to theRembgThe input of the node. - 将
RembgThe output of the node, connected to the final output node (MediaOut1)。 - At this point, you can see the processed screen in the player window.
- Place your video clip node (usually the
- Adjustment parameters:
- decide upon a candidate
RembgAfter the node, the right side of theInspector(The (Inspector) panel displays the plug-in's setup options. - The most important options are
Model(Models), you can select different AI models to process the picture from the drop-down menu. For example, to process a portrait selectu2net_human_segIt may be possible to get cleaner edges. When dealing with generic objects, theu2net或isnet-general-useIt's a good choice. - After selecting the model, the plug-in will automatically start processing, the processing speed depends on your computer performance and the complexity of the selected model.
- decide upon a candidate
With the above steps, you will be able to easily realize high-quality automatic keying in your own video editing process.
application scenario
- Quickly create product demonstration videos
For e-commerce or social media marketers who need to shoot showcase videos for their products. With Rembg-Fuse you can quickly remove the background of the shoot without building a physical green screen and replace it with a solid color background or a more attractive dynamic scene to make the product subject stand out. - Character interviews and online course creation
When producing interview videos or online educational content, creators can separate their images from cluttered home or office environments and superimpose them over a speech, software interface, or virtual studio backdrop to enhance the video's professional feel and information density. - Visual Effects (VFX) Compositing
In the production of short films or personal video projects, when it is necessary to place the filmed characters or objects into the virtual scene, Rembg-Fuse can be used as a pre-processing tool to quickly generate background-free material for more complex visual effects compositing in post-production. - Social Media Content Creation
For short video bloggers and content creators, this plugin can greatly simplify the creative process. They can easily put themselves in front of any desired background and create more interesting and creative video content without the need for specialized filming equipment and locations.
QA
- What's the difference between this plugin and professional green screen keying?
Rembg-Fuse is based on AI algorithms for subject recognition, with the advantage that there is no need for pre-preparation (e.g. building and illuminating a green screen), and any video footage can be processed directly. It works well in most cases, but may not work as well as carefully staged green screen keying for very fine edges (e.g. hair) or scenes where the subject is too close in color to the background. Green screen keying has sharper edges under ideal conditions, but the upfront investment and requirements are higher. - Why do I feel laggy or slow when processing videos?
AI keying is a computationally intensive task, and the processing speed depends largely on the performance of your computer's hardware, especially the CPU and GPU.If you're not using the GPU-accelerated version (rembg[gpu]), or your graphics card performance is weak, the processing speed will be slower. It is recommended to enable the Render Cache feature in Da Vinci to allow the software to pre-process clips in the background for smooth playback. - Are all types of videos suitable for this plugin?
This plugin works best on videos where the subject has a clear outline and is somewhat distinguishable from the background. If the subject in the video is moving too fast resulting in a blurred image, or if the subject is very similar to the background in color or texture, the AI model may not recognize it accurately, resulting in blemishes or flickering on the edges of the keying. - Does this plugin require an internet connection to use?
An internet connection is required for the initial installation and download of the AI models. Once the model files have been downloaded to your local computer, the daily operation of the plugin is completely offline and does not require an internet connection.


