
Oomol is an AI programmable workflow platform that offers a desktop application called Oomol Studio. The core of this platform is a visualization that allows users to create automated processes by dragging and dropping functional nodes like building blocks. These nodes can be code snippets (supporting Python and Node.js), API services, or the platform's built-in Large Language Model (LLM) modules.Oomol provides a unified development environment for programming and data processing, and users don't need to install and configure Python or Node.js environments on their own computers because the platform solves the problem of environment consistency through container technology. the issue of environment consistency. In this way, the workflows created can be seamlessly run and shared on any device with Oomol installed. The platform is suitable not only for developers and data scientists who need to work with data, but also for non-professional developers such as content creators to automate repetitive tasks such as video subtitling, image compression, etc., with the main goal of helping users to quickly turn their ideas into executable automated products.
Function List
- Visual workflow building: Provides a graphical interface to build automated task processes by dragging and dropping nodes with different functions and connecting them.
- Built-in programming environment: Use the built-in, container-based Python and Node.js development environments directly without local installation.
- Professional Code Editor: Integrate a VSCode-based code editor that supports code auto-completion, syntax highlighting and log viewing.
- data visualization:: Support for the use of
pandas和plotlyand other libraries to process data and generate and present charts directly within the platform. - Built-in AI module: The platform has a variety of built-in Large Language Model (LLM) modules that can be directly invoked to simplify AI application development.
- community sharing: Users can share complete workflows or individual functional modules they have created with the community, and can also directly use the results shared by others in the community.
- multimedia processing: Support wrapping video processing libraries (e.g., FFmpeg) as function nodes to facilitate automation of audio and video tasks for content creators.
- Structured and unstructured data processing:: Ability to flexibly structure processes to handle different data types including tabular data and multimedia files such as audio, video, and PDF.
Using Help
Oomol Studio helps users connect code snippets and API services through intuitive visual interactions to quickly transform ideas into real-world applications. The following is a detailed introduction of the usage flow and function operation.
1. Install Oomol Studio
First, you need to download the application for your operating system from the official Oomol website.
- Visit the official website: Open the official Oomol website in your browser
https://oomol.com/。 - Download the installation package: Find the "Download for Windows" button on the home page and click download. Currently the platform only supports Windows x64.
- Installation of applications: Once the download is complete, double-click on the installation package and follow the on-screen instructions to complete the installation.
2. Overview of the interface
After launching Oomol Studio, you will be presented with a main interface consisting of different areas, which resembles the layout of many integrated development environments (IDEs).
- Left Node List: On the left side of the interface is the core functional area where all available nodes are displayed. Nodes are the basic units that make up workflows, such as "read file", "execute Python code", "call API", etc. You can drag nodes from here to the center canvas. You can drag nodes from here to the central canvas.
- Central Canvas Area: This is your workspace where you will build your automated workflow by dragging and dropping and connecting nodes.
- Right parameter configuration area: When you select a node on the canvas, the right side of the interface displays detailed parameter configuration options for that node. You can set the node's input data, adjust the code, configure the API key, etc. here.
- Bottom Output and Logging Area: After running the workflow, you can see real-time log messages, code execution results, or generated visualization charts at the bottom of the interface.
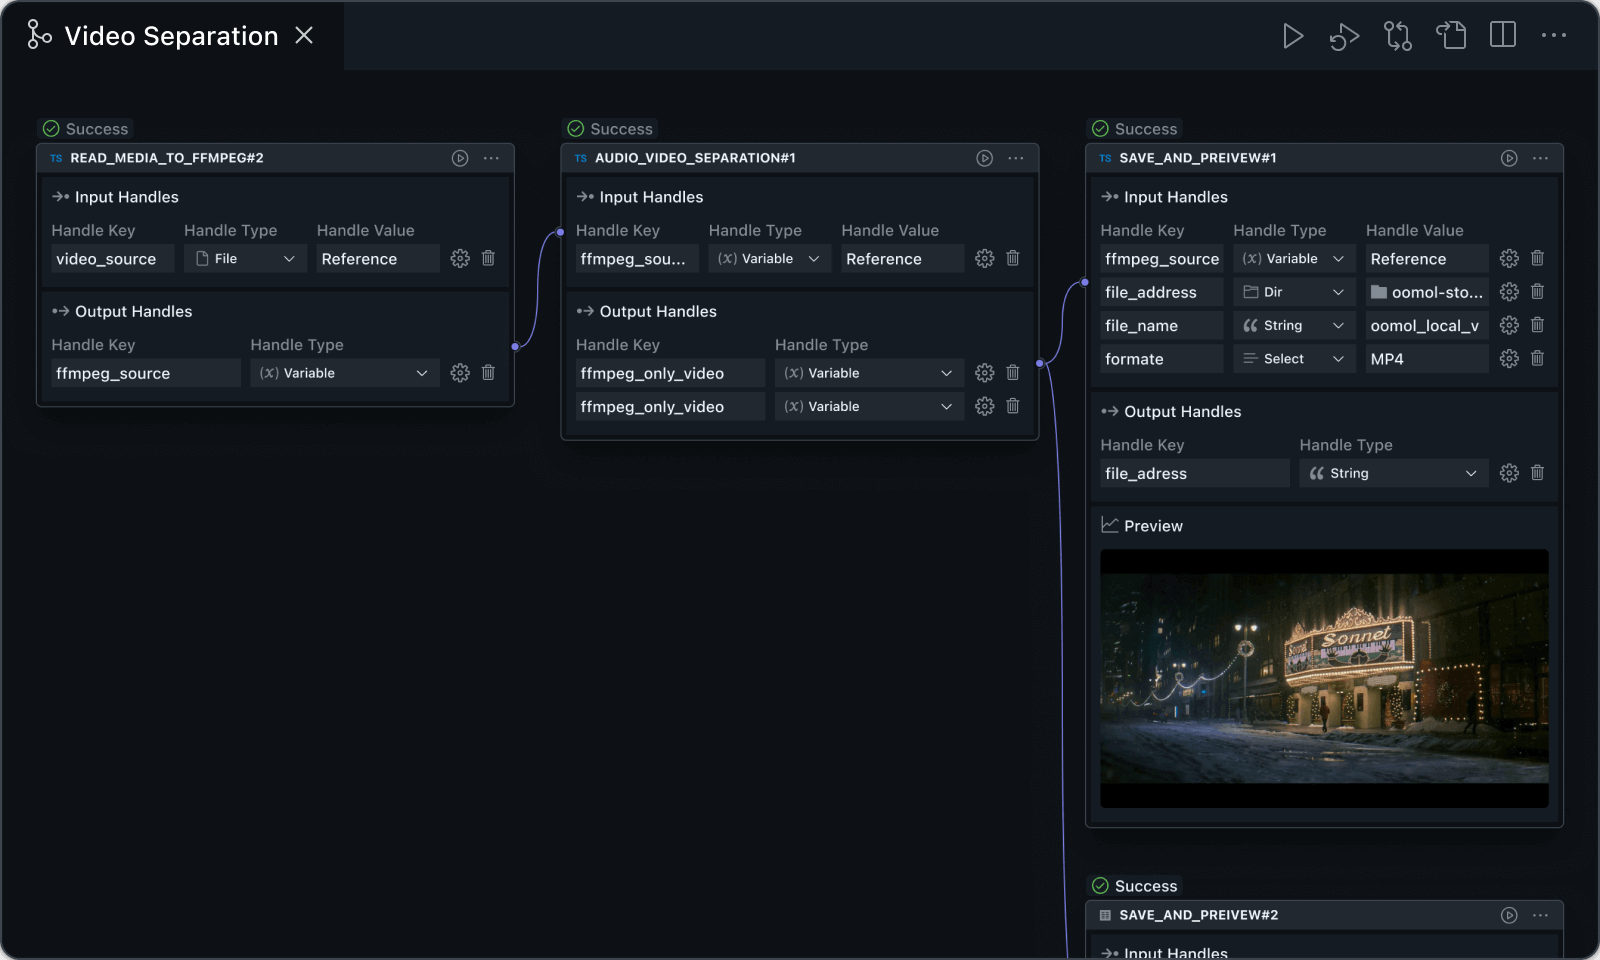
3. Creating the first workflow: automatic video captioning
Below is a practical example of how to use Oomol to create an automated workflow for adding translated subtitles to videos.
Step 1: Project preparation and conceptualization
Our goal is to implement an automated process: input a local video file, the workflow automatically recognizes the speech in the video, converts it to text, then translates the text into the specified language, and finally adds the translated subtitles to the original video.
Step 2: Build the workflow
- New construction projects: Create a new workflow project in Oomol Studio.
- Add "Read Video" node: From the list of nodes on the left, find a node for processing files, or a specialized video processing node, and drag it onto the canvas. In the parameter configuration area on the right, set the node to point to the path of the local video file you want to process.
- Add "Speech Recognition" node: Find and drag in a Speech-to-Text node from the node list, e.g.
Whispernode. Connect the output of the Read Video node (representing the video file) to theWhisperThe input to the node. This indicates that the video file will be used as input for speech recognition. - Add "Text Translation" node: Next, drag in a built-in LLM module or API call node for translation. Place the
WhisperThe output of the node (recognized text) is connected to the input of the translation node. In the right parameter area, you can configure the target language for translation, for example from English to Chinese. - Add "Subtitle Generation and Composition" node: Finally, drag in a multimedia processing node, for example
FFmpegNode. This node takes two inputs: the original video file and the translated subtitle text. Therefore, you need to connect the output of the initial "Read Video" node and the output of the "Text Translation" node to both thisFFmpegnode's input. The inputs to theFFmpegThe parameter area of the node you need to configure to perform the "Add Subtitle" operation. - Add "Save File" node: Add a node for saving the file at the end of the workflow by placing the
FFmpegThe output of the node (the processed video) is connected to this node, and the path and filename for saving are set.
Step 3: Operation and Commissioning
- Starting a workflow: Click the "Run" button at the top of the interface, and Oomol will start from the first node and perform each operation in the order you connected it.
- View Log: During execution, you can see the real-time output and status of each node in the log area at the bottom. If something goes wrong, the logs will provide detailed error messages to help you quickly locate the problem. For example, it could be an invalid API key or an incorrect file path.
- Preview results: Some nodes support previewing of results. For example, a data processing node may show the generated graphs directly in the bottom area, making it easy for you to check whether the intermediate results are as expected.
4. Exploring community work streams
If you're not sure how to start from scratch, look to the community for inspiration.
- Access to the community: Find the "Communities" or "Workflow Communities" portal within the Oomol app or on the official website.
- Finding and UsingOomol Studio: There are various ready-made workflows shared by other users in the community, such as "PDF Document Content Extraction", "Stock Data Analysis and Backtesting", "Manga Translation", etc. You can download these projects directly and open them in Oomol Studio to see how others have built them. You can directly download these projects and open them in Oomol Studio to see how others have built them. You can also build on these existing workflows and modify them to meet your own specific needs.
application scenario
- Data Science and Analytics
Users can build workflows to automatically fetch data from databases or APIs, use the built-in Python environment for data cleaning and processing, and finally utilize theplotlyThe visualization reports are generated from libraries such as The whole process is completed in one stop without switching between different software. - Content creation automation
Video bloggers can create a workflow that automatically adds multilingual subtitles to new videos. The flow recognizes video speech, calls the translation API, and uses theFFmpegCompressing subtitles into the video greatly improves the efficiency of content distribution. - Development and Test Assistance
Developers can utilize Oomol to connect to various internal API services and build automated API testing processes. By configuring different input parameters, you can batch test the stability and correctness of APIs and generate test reports. - Personal Information Processing
Regular users can create a workflow to organize their personal files. For example, automatically compress all images in a specified folder, or convert downloaded PDF eBooks into a machine-readable format and extract key information for archiving.
QA
- Do I need to install my own Python or Node.js environment to use Oomol?
No. Oomol has a unified Python and Node.js development environment built in using container technology, so users don't need to do any local installation or configuration. This ensures that workflows run the same way on any device, eliminating the "works on my computer" dependency. - Does Oomol support working with video and audio files?
Yes, Oomol supports multimedia processing. Users can add multimedia processing to Oomol by encapsulating functions such asFFmpegSuch specialized processing libraries to create custom function nodes to enable transcoding, editing, subtitling and other complex operations on audio and video files in the workflow. - Can users with no programming knowledge at all use Oomol?
Can be used. For users who don't know how to program, they can build workflows by dragging and dropping modules already encapsulated in the community to achieve tasks such as file compression, PDF processing, and so on. However, to achieve more complex and customized features, writing small amounts of code (e.g. Python scripts) will enable the platform to reach its greater potential. - Can others see my code in workflows that I share in the community?
Yes. Oomol's community sharing is source-based, similar to open source communities like GitHub. When you share a workflow, others can view it and build on it. This open sharing approach is designed to foster collaboration and innovation among users.