1.モデル紹介
Qwen2-VLがリリースされてから5ヶ月間、多くの開発者がQwen2-VLの視覚言語モデルの上に新しいモデルを構築し、Qwenチームに貴重なフィードバックを提供してくれました。この間、Qwen チームは、より有用な視覚言語モデルの構築に注力してきました。本日、Qwenチームは、Qwenファミリーの最新メンバーであるQwen2.5-VLを発表します。
主な強化点
- 物事を視覚的に理解する:Qwen 2.5-VLは、花、鳥、魚、昆虫などの一般的なオブジェクトを認識できるだけでなく、画像内のテキスト、チャート、アイコン、グラフ、レイアウトの分析にも精通しています。
- Agenticity:Qwen2.5-VLは、コンピュータや携帯電話で使用できる推論・動的コマンドツールの機能を持ち、直接ビジュアルエージェントの役割を果たします。
- 長時間のビデオを理解し、イベントをキャプチャ:Qwen 2.5-VLは、1時間以上のビデオを理解することができ、今回は関連するビデオクリップをピンポイントでキャプチャする新しい機能を備えています。
- Qwen2.5-VLは、バウンディングボックスやポイントを生成することで、画像内のオブジェクトの位置を正確に特定し、座標や属性の安定したJSON出力を提供します。
- 構造化出力の生成:請求書、フォーム、表などのスキャンデータに対して、Qwen 2.5-VLは、財務、ビジネス、その他の分野での使用に有益な、コンテンツの構造化出力をサポートします。
モデル・アーキテクチャ:
- ビデオ理解のためのダイナミックな解像度とフレームレートのトレーニング:
動的FPSサンプリングを採用することで、動的解像度を時間次元に拡張し、モデルは様々なサンプルレートのビデオを理解できるようになりました。これに対応して、QwenチームはmRoPEを更新し、時間次元におけるIDおよび絶対時間アライメントを追加した。これにより、モデルは時間的順序と速度を学習し、最終的に特定の瞬間をピンポイントで特定する能力を獲得した。
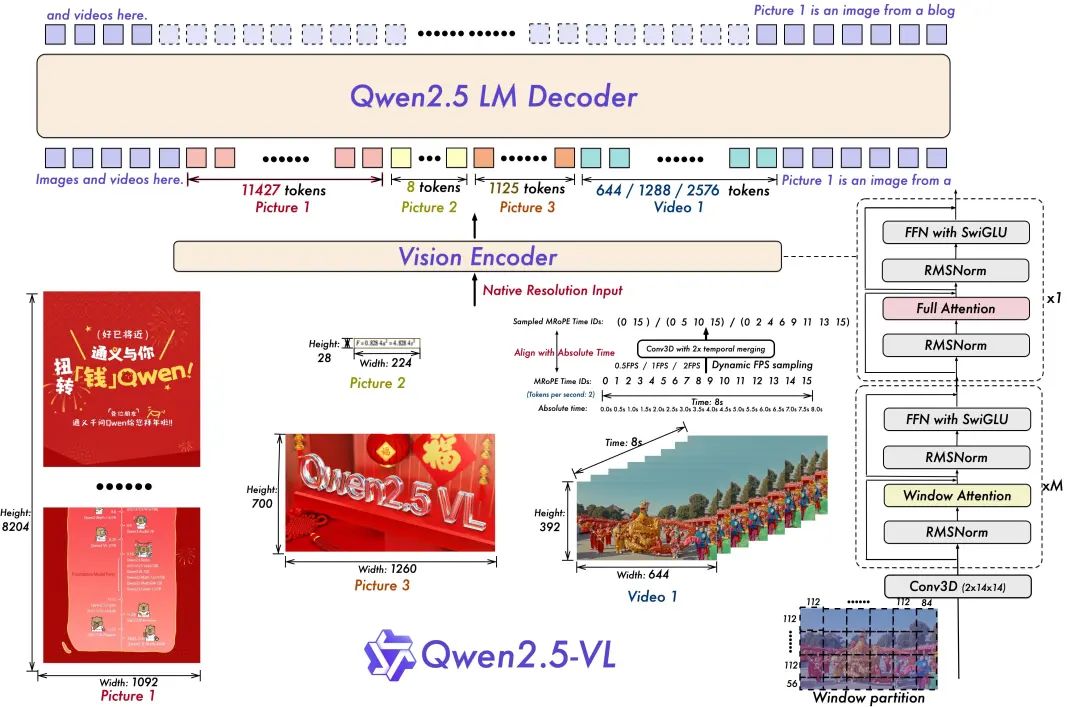
- 合理的で効率的なビジュアル・コーダー
ViTのアーキテクチャは、SwiGLUとRMSNormによってさらに最適化され、Qwen 2.5 LLMの構造に合わせている。
このオープンソースには3つのモデルがあり、パラメータは30億、70億、720億である。このレポには、コマンドで調整された720億のモデルが含まれています。 Qwen2.5-VL モデル
モデル・アンサンブル
https://www.modelscope.cn/collections/Qwen25-VL-58fbb5d31f1d47
モデリング経験:
https://chat.qwenlm.ai/
テックブログ
https://qwenlm.github.io/blog/qwen2.5-vl/
コード・アドレス
https://github.com/QwenLM/Qwen2.5-VL
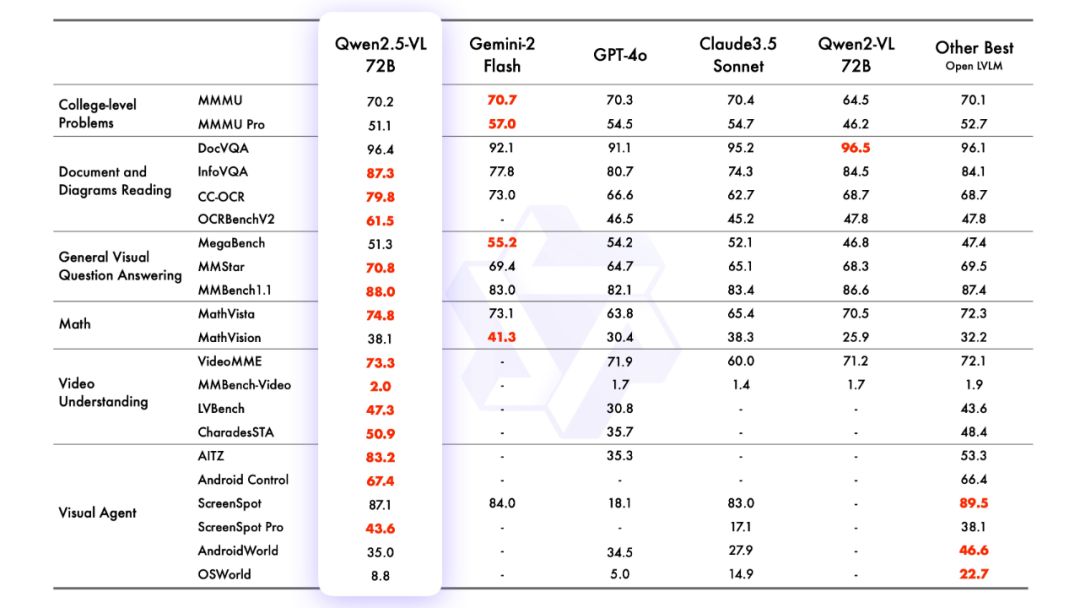
2.モデリング効果
モデリング評価
3.モデル化された推論
変圧器を使った推論
Qwen2.5-VLのコードは最新のトランスフォーマーにあり、コマンドを使ってソースからビルドすることを推奨します:
pip install git+https://github.com/huggingface/transformersAPIと同じように、さまざまな種類の視覚的入力を簡単に扱うためのツールキットが提供されている。これには、base64、URL、インターリーブ画像や動画が含まれる。以下のコマンドでインストールできる:
pip install qwen-vl-utils[decord]==0.0.8コードについての推論:
from transformers import Qwen2_5_VLForConditionalGeneration, AutoTokenizer, AutoProcessor
from qwen_vl_utils import process_vision_info
from modelscope import snapshot_download

# Download and load the model
model_dir = snapshot_download("Qwen/Qwen2.5-VL-3B-Instruct")

# Default: Load the model on the available device(s)
model = Qwen2_5_VLForConditionalGeneration.from_pretrained(
model_dir, torch_dtype="auto", device_map="auto"
)

# Optional: Enable flash_attention_2 for better acceleration and memory saving
# model = Qwen2_5_VLForConditionalGeneration.from_pretrained(
# "Qwen/Qwen2.5-VL-3B-Instruct",
# torch_dtype=torch.bfloat16,
# attn_implementation="flash_attention_2",
# device_map="auto",
# )

# Load the default processor
processor = AutoProcessor.from_pretrained(model_dir)

# Optional: Set custom min and max pixels for visual token range
# min_pixels = 256 * 28 * 28
# max_pixels = 1280 * 28 * 28
# processor = AutoProcessor.from_pretrained(
# "Qwen/Qwen2.5-VL-3B-Instruct", min_pixels=min_pixels, max_pixels=max_pixels
# )

# Define input messages
messages = [
{
"role": "user",
"content": [
{
"type": "image",
"image": "https://qianwen-res.oss-cn-beijing.aliyuncs.com/Qwen-VL/assets/demo.jpeg",
},
{"type": "text", "text": "Describe this image."},
],
}
]

# Prepare inputs for inference
text = processor.apply_chat_template(messages, tokenize=False, add_generation_prompt=True)
image_inputs, video_inputs = process_vision_info(messages)
inputs = processor(
text=[text],
images=image_inputs,
videos=video_inputs,
padding=True,
return_tensors="pt",
)
inputs = inputs.to("cuda")

# Inference: Generate output
generated_ids = model.generate(**inputs, max_new_tokens=128)
generated_ids_trimmed = [
out_ids[len(in_ids):] for in_ids, out_ids in zip(inputs.input_ids, generated_ids)
]
output_text = processor.batch_decode(
generated_ids_trimmed, skip_special_tokens=True, clean_up_tokenization_spaces=False
)

# Print the generated output
print(output_text)
Magic Hitch API-Inferenceを使用して直接呼び出されます。
また、Magic MatchプラットフォームのAPI-Inferenceは、Qwen2.5-VLシリーズのモデルを初めてサポートする。Magic Matchのユーザーは、APIコールを通じて直接利用することができます。API-Inferenceの具体的な使用方法は、モデルのページ(例:https://www.modelscope.cn/models/Qwen/Qwen2.5-VL-72B-Instruct)で確認できます:
またはAPI-Inferenceのドキュメントを参照:
https://www.modelscope.cn/docs/model-service/API-Inference/intro
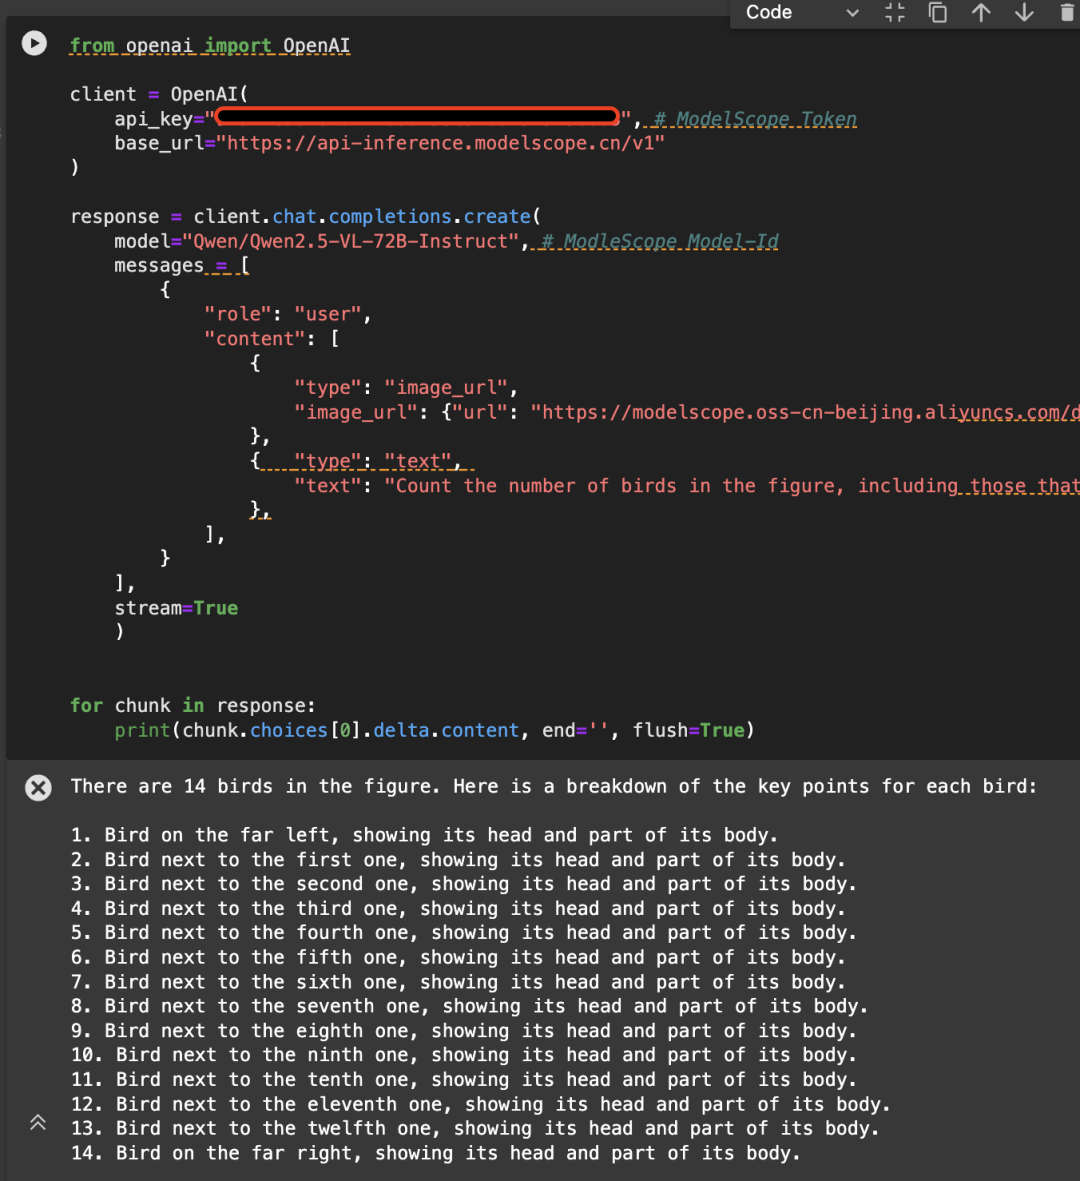
Qwen/Qwen2.5-VL-72B-Instructモデルを使用してAPIを呼び出す例を以下の画像に示す:

from openai import OpenAI

# Initialize the OpenAI client
client = OpenAI(
api_key="<MODELSCOPE_SDK_TOKEN>", # ModelScope Token
base_url="https://api-inference.modelscope.cn/v1"
)

# Create a chat completion request
response = client.chat.completions.create(
model="Qwen/Qwen2.5-VL-72B-Instruct", # ModelScope Model-Id
messages=[
{
"role": "user",
"content": [
{
"type": "image_url",
"image_url": {
"url": "https://modelscope.oss-cn-beijing.aliyuncs.com/demo/images/bird-vl.jpg"
}
},
{
"type": "text",
"text": (
"Count the number of birds in the figure, including those that "
"are only showing their heads. To ensure accuracy, first detect "
"their key points, then give the total number."
)
},
],
}
],
stream=True
)

# Stream the response
for chunk in response:
print(chunk.choices[0].delta.content, end='', flush=True)
4.モデルの微調整
Qwen/Qwen2.5-VL-7B-Instructのファインチューニングにおけるms-swiftの利用を紹介します。ms-swiftは、ラージモデルとマルチモーダルラージモデルのファインチューニングデプロイメントフレームワークが公式に提供するマジックライドコミュニティです。ms-swiftのオープンソースアドレスです:
https://github.com/modelscope/ms-swift
ここでは、実行可能な微調整のデモを示し、自己定義データセットのフォーマットを示す。
微調整を始める前に、環境が整っていることを確認してください。
git clone https://github.com/modelscope/ms-swift.git
cd ms-swift
pip install -e .
画像OCR微調整スクリプトは以下の通り:
MAX_PIXELS=1003520 \
CUDA_VISIBLE_DEVICES=0 \
swift sft \
    --model Qwen/Qwen2.5-VL-7B-Instruct \
    --dataset AI-ModelScope/LaTeX_OCR:human_handwrite#20000 \
    --train_type lora \
    --torch_dtype bfloat16 \
    --num_train_epochs 1 \
    --per_device_train_batch_size 1 \
    --per_device_eval_batch_size 1 \
    --learning_rate 1e-4 \
    --lora_rank 8 \
    --lora_alpha 32 \
    --target_modules all-linear \
    --freeze_vit true \
    --gradient_accumulation_steps 16 \
    --eval_steps 50 \
    --save_steps 50 \
    --save_total_limit 5 \
    --logging_steps 5 \
    --max_length 2048 \
    --output_dir output \
    --warmup_ratio 0.05 \
    --dataloader_num_workers 4
トレーニングビデオのメモリリソース:

ビデオの微調整スクリプトは以下の通り:
# VIDEO_MAX_PIXELS等参数含义可以查看:
# https://swift.readthedocs.io/zh-cn/latest/Instruction/%E5%91%BD%E4%BB%A4%E8%A1%8C%E5%8F%82%E6%95%B0.html#id18

nproc_per_node=2
CUDA_VISIBLE_DEVICES=0,1 \
NPROC_PER_NODE=$nproc_per_node \
VIDEO_MAX_PIXELS=100352 \
FPS_MAX_FRAMES=24 \
swift sft \
    --model Qwen/Qwen2.5-VL-7B-Instruct \
    --dataset swift/VideoChatGPT:all \
    --train_type lora \
    --torch_dtype bfloat16 \
    --num_train_epochs 1 \
    --per_device_train_batch_size 1 \
    --per_device_eval_batch_size 1 \
    --learning_rate 1e-4 \
    --lora_rank 8 \
    --lora_alpha 32 \
    --target_modules all-linear \
    --freeze_vit true \
    --gradient_accumulation_steps $(expr 16 / $nproc_per_node) \
    --eval_steps 50 \
    --save_steps 50 \
    --save_total_limit 5 \
    --logging_steps 5 \
    --max_length 2048 \
    --output_dir output \
    --warmup_ratio 0.05 \
    --dataloader_num_workers 4 \
    --deepspeed zero2
トレーニングビデオのメモリリソース:

カスタム・データセットの書式は以下の通りである(システム・フィールドはオプション):
{"messages": [{"role": "user", "content": "浙江的省会在哪?"}, {"role": "assistant", "content": "浙江的省会在杭州。"}]}
{"messages": [{"role": "user", "content": "<image><image>两张图片有什么区别"}, {"role": "assistant", "content": "前一张是小猫,后一张是小狗"}], "images": ["/xxx/x.jpg", "xxx/x.png"]}
{"messages": [{"role": "system", "content": "你是个有用无害的助手"}, {"role": "user", "content": "<video>视频中是什么"}, {"role": "assistant", "content": "视频中是一只小狗在草地上奔跑"}], "videos": ["/xxx/x.mp4"]}
接地タスクの微調整スクリプトは以下の通り:
CUDA_VISIBLE_DEVICES=0 \
MAX_PIXELS=1003520 \
swift sft \
    --model Qwen/Qwen2.5-VL-7B-Instruct \
    --dataset 'AI-ModelScope/coco#20000' \
    --train_type lora \
    --torch_dtype bfloat16 \
    --num_train_epochs 1 \
    --per_device_train_batch_size 1 \
    --per_device_eval_batch_size 1 \
    --learning_rate 1e-4 \
    --lora_rank 8 \
    --lora_alpha 32 \
    --target_modules all-linear \
    --freeze_vit true \
    --gradient_accumulation_steps 16 \
    --eval_steps 100 \
    --save_steps 100 \
    --save_total_limit 2 \
    --logging_steps 5 \
    --max_length 2048 \
    --output_dir output \
    --warmup_ratio 0.05 \
    --dataloader_num_workers 4 \
    --dataset_num_proc 4
トレーニングビデオのメモリリソース:

グラウンディング・タスクのカスタム・データセットのフォーマットは以下の通り:
{"messages": [{"role": "system", "content": "You are a helpful assistant."}, {"role": "user", "content": "<image>描述图像"}, {"role": "assistant", "content": "<ref-object><bbox>和<ref-object><bbox>正在沙滩上玩耍"}], "images": ["/xxx/x.jpg"], "objects": {"ref": ["一只狗", "一个女人"], "bbox": [[331.5, 761.4, 853.5, 1594.8], [676.5, 685.8, 1099.5, 1427.4]]}}
{"messages": [{"role": "system", "content": "You are a helpful assistant."}, {"role": "user", "content": "<image>找到图像中的<ref-object>"}, {"role": "assistant", "content": "<bbox><bbox>"}], "images": ["/xxx/x.jpg"], "objects": {"ref": ["羊"], "bbox": [[90.9, 160.8, 135, 212.8], [360.9, 480.8, 495, 532.8]]}}
トレーニングが完了したら、トレーニングで得られた検証セットに対して、以下のコマンドを使って推論を行う。
ここで `-adapters` は、トレーニングによって生成された最後のチェックポイントフォルダに置き換える必要があります。 adaptersフォルダにはトレーニング用のパラメータファイルが格納されているので、`-model`を追加で指定する必要はない:
CUDA_VISIBLE_DEVICES=0swift infer--adapters output/vx-xxx/checkpoint-xxx--stream false--max_batch_size 1--load_data_args true--max_new_tokens 2048
モデルを ModelScope にプッシュします:
CUDA_VISIBLE_DEVICES=0swift export--adapters output/vx-xxx/checkpoint-xxx--push_to_hub true--hub_model_id '<your-model-id>'--hub_token '<your-sdk-token>'