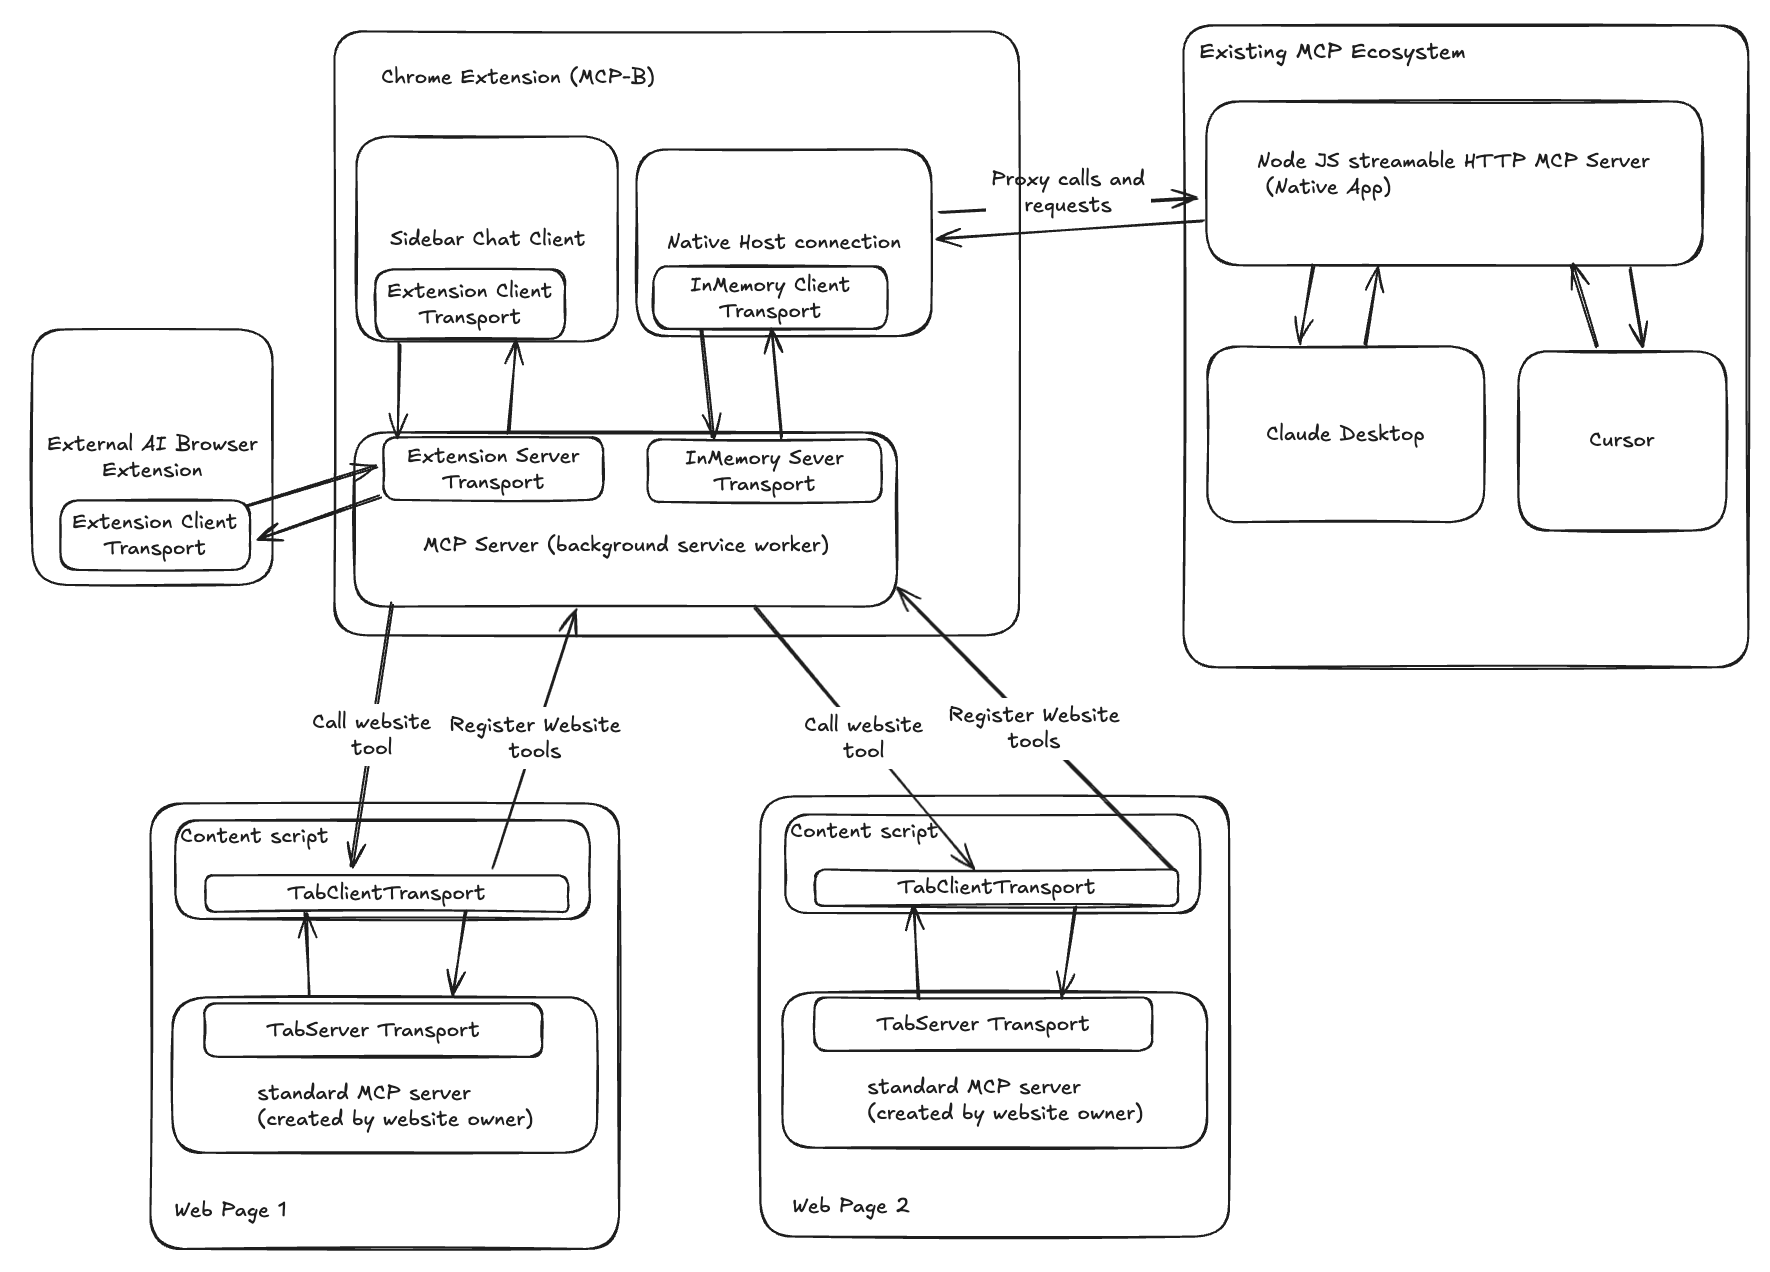
WebMCP is an open-source project that aims to embed Model Context Protocol (MCP) servers directly into web pages, allowing AI assistants to manipulate web content through the browser. It solves the problem of traditional MCP WebMCP leverages the browser's existing authentication mechanisms, such as cookies or sessions, to give AI assistants direct access to web data with user privileges. The project is developed in TypeScript, managed under Turborepo and PNPM, and follows the MIT license. Developers can run the MCP server in a web page or browser extension with simple installation and configuration. webMCP is suitable for developers who want to simplify the interaction between AI and web pages, especially in scenarios that require collaboration across web pages.
Function List
- Running the MCP server in a web page directly utilizes the browser authentication mechanism.
- Support for AI assistants to interact with web data through the registration tool without the need to configure additional API keys.
- Provides a browser extension that aggregates MCP tools from multiple web pages to simplify cross-page operations.
- Developed in TypeScript, it supports modular development and rapid iteration.
- Optimize task management and PNPM dependency management with Turborepo to improve development efficiency.
- Automatic reloading of extensions allows developers to preview the effects of code changes in real time.
- Provides a simple command line interface to quickly launch development environments or run web pages/extensions individually.
Using Help
Installation process
To use WebMCP, you need to install Node.js and PNPM package management tools. The following are detailed installation and configuration steps:
- Cloning Project Warehouse
Open a terminal and run the following command to clone the WebMCP repository:git clone https://github.com/MiguelsPizza/WebMCP.gitOnce the cloning is complete, go to the project directory:
cd MCP-B - Installation of dependencies
Use PNPM to install the required dependencies for the project:pnpm installPNPM automatically downloads and configures the packages needed for the project, ensuring that the development environment is ready.
- Starting the development environment
Run the following command to start the development server:pnpm devThis command launches the development environment for both the web application and the browser extension. It can be used if you only want to start one part separately:
- Starts the extension only:
pnpm --filter extension dev - Launch the web application only:
pnpm --filter web dev
- Starts the extension only:
- Browser extension settings
WebMCP provides a browser extension that needs to be manually loaded into a browser (e.g. Chrome). The procedure is as follows:- Run the extended development command (see above).
- Open the browser extension management page (Chrome:
chrome://extensions/)。 - Enable "Developer Mode", click "Load Unpacked Extension", select the
extensionFolder. - When the extension is loaded, code changes are automatically detected and reloaded.
Functional operation flow
1. Running the MCP server
The core functionality of WebMCP is the embedding of MCP servers into web pages. Developers can introduce WebMCP's React hook to register the tool. For example, create a to-do list app:
import { McpServerProvider, useMcpServer } from '@mcp-b/mcp-react-hooks';
function TodoApp() {
const { registerTool } = useMcpServer();
const [todos, setTodos] = useState([]);
registerTool('addTodo', { text: z.string() }, async ({ text }) => {
const newTodo = { id: Date.now(), text, done: false };
setTodos((prev) => [...prev, newTodo]);
return { content: [{ type: 'text', text: `Added: ${text}` }] };
});
return <div>{/* 网页组件 */}</div>;
}
- Operating Instructions:
- utilization
<McpServerProvider>Wrap the application components to ensure that the MCP server initializes. - pass (a bill or inspection etc)
useMcpServerHook registration tools (such asaddTodo), defines the input format and logic of the tool. - AI Assistant can be called
addTodotool to add to-do lists directly through your browser.
- utilization
2. Use of browser extensions
The WebMCP browser extension serves as a bridge between the MCP server and the AI Assistant in a web page. After installing the extension:
- Open any WebMCP-enabled page and the extension will automatically detect MCP tools on the page.
- The extension displays all the available tools for opening web pages, which the AI Assistant can call from the extension.
- Example of operation: In WebMCP-enabled to-do pages, the AI assistant can be invoked via the extension
addTodotool to add tasks and return results.
3. Authentication and security
WebMCP utilizes the browser's existing authentication mechanisms (e.g., cookies or OAuth sessions) without the need for additional configuration of API keys. the MCP server runs in the browser's secure sandbox, ensuring:
- AI Assistant operates only with the privileges of the current user.
- Data interactions are authenticated through the browser to prevent unauthorized access.
- The developer needs to ensure that the authentication mechanism (e.g., session or token) of the web page is valid for the tool to function properly.
4. Commissioning and development
- real time debugging: Use
pnpm devAfter starting the development environment, the extension automatically reloads the code changes and developers can view the logs through the browser developer tools. - Contribute code: refer to the project in the
CONTRIBUTING.mddocumentation, understanding of code submission specifications and prioritized development areas. - Question Feedback: If you encounter a problem, you can file an issue in the GitHub repository with the details of the problem.
caveat
- Ensure that the Node.js version is the latest stable version, v18 or above is recommended.
- PNPM needs to be installed globally and can be run
npm install -g pnpm。 - During development, maintain an internet connection to ensure that dependencies are downloaded and extensions are loaded properly.
application scenario
- Web Developers Integrate AI Assistants
Developers wishing to embed AI assistants in web applications to automate tasks such as filling out forms and extracting data, WebMCP provides a simple interface that allows AI to manipulate web content directly without complex configuration. - Browser extension developers
Extension developers can use WebMCP to build tools for cross-page collaboration. For example, aggregating to-do data from multiple web pages to unify the management of tasks. - In-house tool optimization
On-premises web applications can integrate AI assistants through WebMCP to streamline employee operations. For example, automatically organizing customer data in a CRM system. - Education and Research
Researchers can use WebMCP to test scenarios where AI interacts with web pages and explore the possibilities of AI applications in a browser environment.
QA
- What browsers does WebMCP support?
The WebMCP extension currently supports Chrome and may be extended to other browsers such as Firefox in the future. - Do I need to configure additional servers?
Not required.WebMCP embeds the MCP server into a web page and utilizes browser authentication without the need to configure a separate server. - How to ensure data security?
WebMCP runs in the browser sandbox and only uses the current user's authentication rights. Developers need to ensure that the authentication mechanism on the web page itself is secure. - Are non-technical users supported?
WebMCP is mainly for developers. Non-technical users rely on WebMCP-enabled pages or extensions, which are relatively simple to use.


