Balancing server performance, network quality and cost is a common challenge for many developers and service deployers. Highly configured servers tend to be expensive, and the high cost of servers with quality network lines, such as CN2 GIA, is prohibitive for many projects with limited budgets.
In this article, we will introduce a cost-effective architectural solution: using a server with optimized routes as a front-end reverse proxy, dedicated to accelerating the back-end of the large bandwidth, high configuration, but the network route of the ordinary business servers. This combination of strategies is designed to achieve an access experience close to that of an expensive "all-in-one" server at a much lower cost.
🚀 Network wiring: the core difference between normal and optimized
🐢 Regular Line VPS
Most standard virtual private servers (VPS) are connected to a carrier's regular backbone network, such as Telecom 163, Unicom 4837, or Mobile CMI, which carry huge amounts of public Internet traffic, and whose international outlets and interprovincial nodes are prone to congestion during peak hours such as nighttime, resulting in higher access latency and higher packet loss rates.

Of course, the main advantage of a regular line VPS is its cost-effectiveness. Without the cost of expensive dedicated lines, users are able to get machines with higher CPU, RAM, and storage configurations at a lower price.
🚀 Optimized Line VPS
Optimized routes use carrier-provided boutique networks such as Telecom CN2 GIA, Unicom 9929 and Mobile CMIN2, which are often described as "boutique" because they provide higher-priority international connectivity with more dedicated bandwidth to avoid congestion on public backbones. As a result, latency and stability are far superior to regular lines, even during peak network hours.
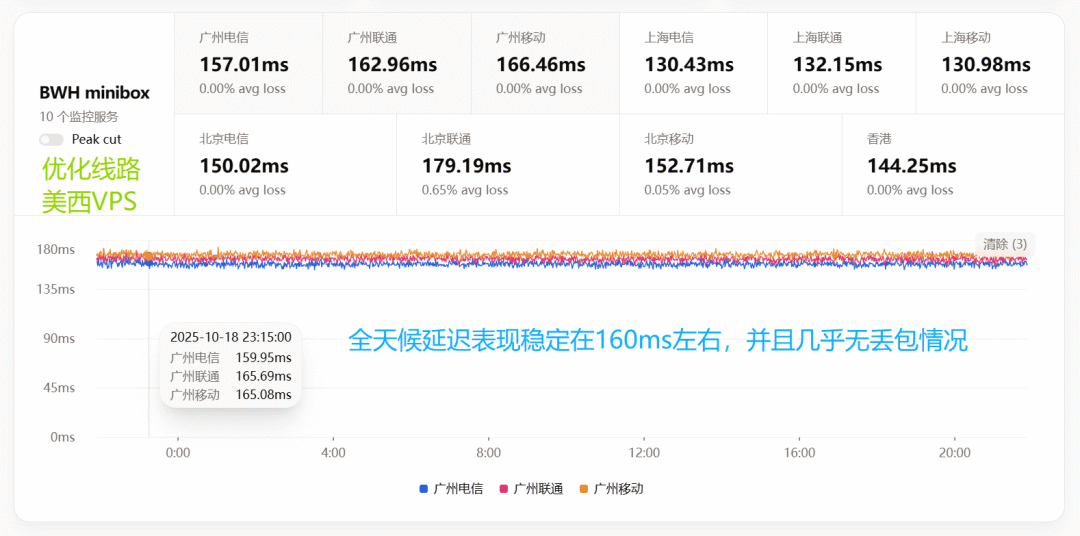
The price of this superior performance is high, resulting in optimized VPS prices that are often several times higher than regular VPS with the same configuration. Moreover, in order to control the cost, most of the optimized line products on the market are not highly configured.
💡 Architecture Analysis: How Reverse Proxies Achieve Acceleration and Gain
The logic of this solution is straightforward: combine the advantages of both servers to achieve a balance between performance and cost.
- Back-end business servers: Choose a well-configured, affordable, general-purpose VPS to run computationally intensive tasks such as websites, databases, or applications.
- front-end proxy serverOptimized line VPS with excellent network quality is chosen to only receive user requests and forward them to the back-end, and then send the back-end response back to the user through the optimized line at high speed.
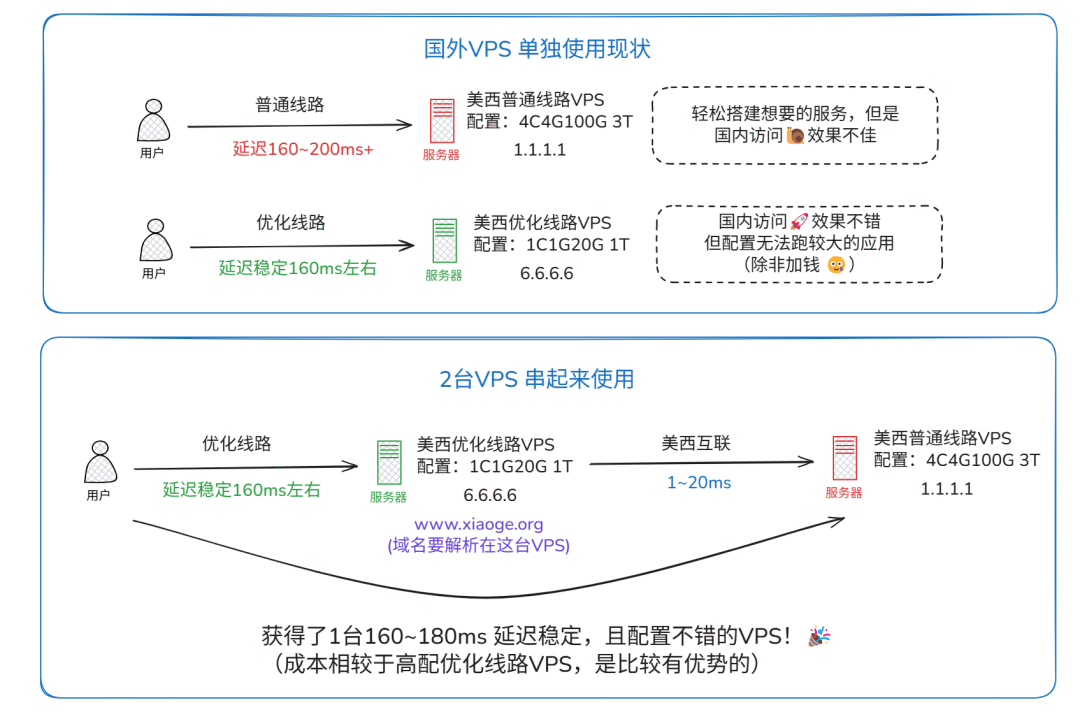
In this way, all data exchanges for end users pass through stable, high-speed, optimized lines, while computational tasks are handled by lower-cost servers.
In addition to network acceleration, this architecture brings additional security benefits. The reverse proxy hides the real IP address of the back-end business server, effectively avoiding direct attacks. It also facilitates centralized management of SSL/TLS certificates, deployment of Web Application Firewalls (WAFs), and implementation of load balancing.
📋 Deployment Practice: Building a Reverse Proxy with Nginx Proxy Manager
There are a variety of tools on the market to implement reverse proxies, including direct configuration of the Nginx 或 Caddy, or use a server management panel that integrates relevant features, such as the Pagoda panel and the 1Panel。
This tutorial will take Nginx Proxy Manager This is an example of a demonstration. This is a web interface that provides a visualization of the Nginx management tool that greatly simplifies the configuration process. Deployment environments are organized in Debian 12 system as an example.
🐋 Step 1: Install Docker and Docker Compose
utilization Docker is deployed Nginx Proxy Manager The quickest way.
First, perform Docker The official script completes the installation.
bash <(curl -fsSL https://get.docker.com)
Next, install the Docker ComposeIt is used to manage multiple containers Docker Applications.
sudo curl -L "https://github.com/docker/compose/releases/download/v2.29.1/docker-compose-$(uname -s)-$(uname -m)" -o /usr/local/bin/docker-compose
sudo chmod +x /usr/local/bin/docker-compose
sudo ln -s /usr/local/bin/docker-compose /usr/bin/docker-compose
docker-compose --version
After successful installation, you should be able to see the version number information.

📝 Step 2: Create and Configure the Yaml File
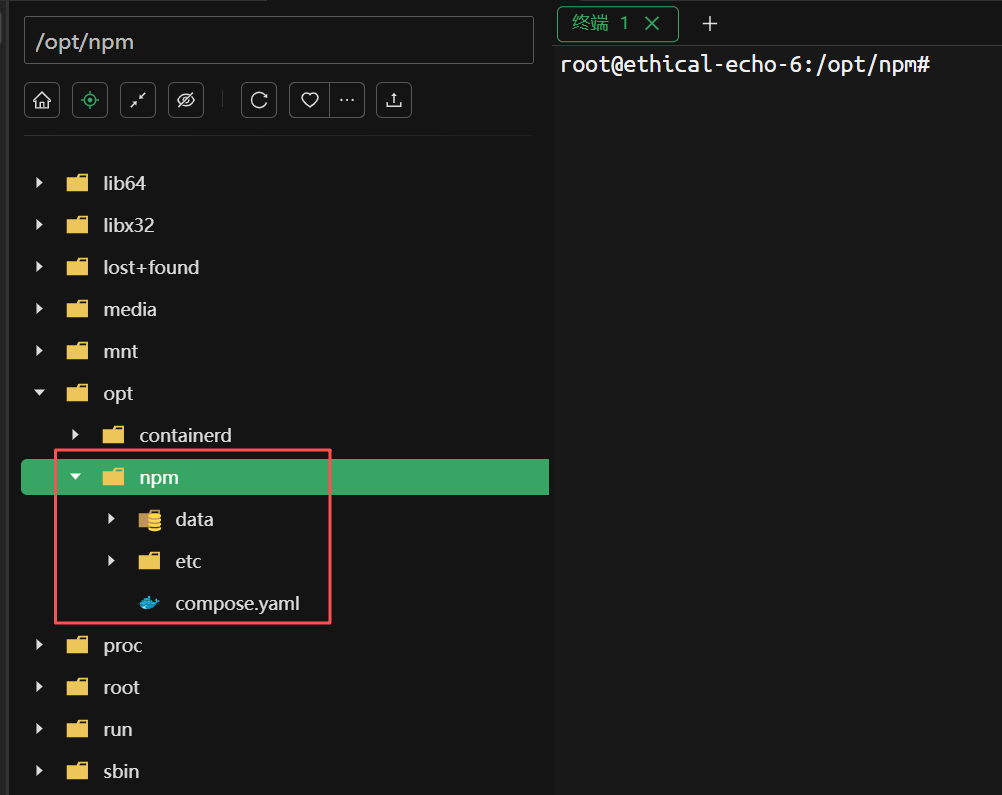
为 Nginx Proxy Manager Create a dedicated working directory.
mkdir -p /opt/npm
cd /opt/npm
In this directory create a compose.yaml Documentation.
nano /opt/npm/compose.yaml
Paste the following into the file. Be sure to modify the INITIAL_ADMIN_EMAIL 和 INITIAL_ADMIN_PASSWORD values, which will be used as credentials for your first login.
services:
nginx-proxy-manager:
container_name: nginx-proxy-manager
image: chishin/nginx-proxy-manager-zh:latest # 此为汉化版镜像,官方版为 jc21/nginx-proxy-manager:latest
restart: always
ports:
- '81:81'  # Web管理界面的访问端口,可按需修改
- '80:80'  # HTTP 端口
- '443:443' # HTTPS 端口
environment:
INITIAL_ADMIN_EMAIL: my@example.com      # 登录邮箱账号
INITIAL_ADMIN_PASSWORD: mypassword1      # 登录密码
volumes:
- ./data:/data
- ./etc/letsencrypt:/etc/letsencrypt
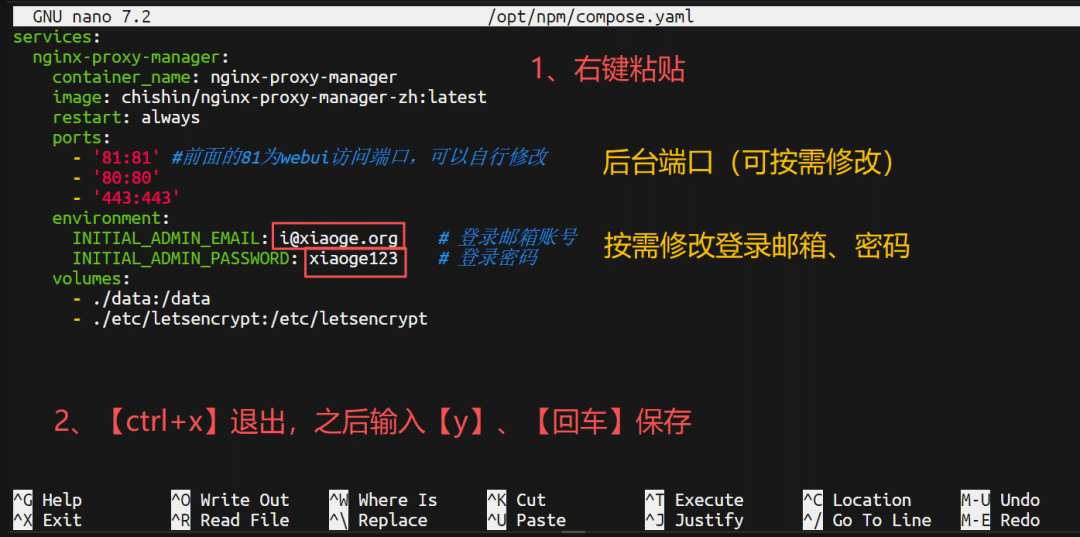
Save and exit the editor.
🏎️ Step 3: Start the container
在 /opt/npm directory, execute the following command to start the service.
docker compose up -d

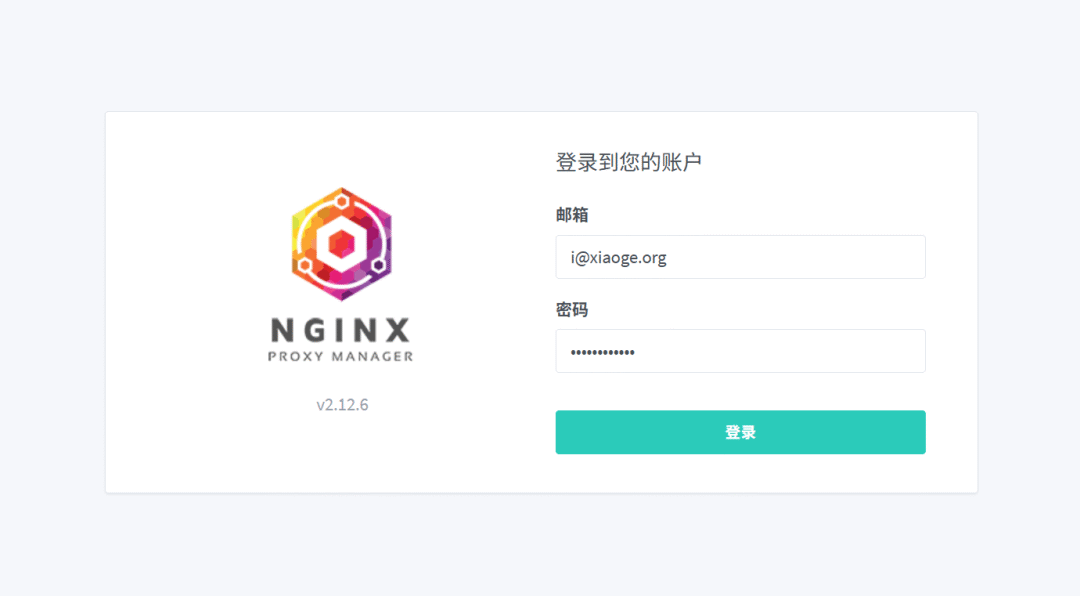
After the container has started, access it via a browser http://<代理服务器IP>:81 can be opened Nginx Proxy Manager of the login screen.
🌐 Step 4: Set up reverse proxy rules
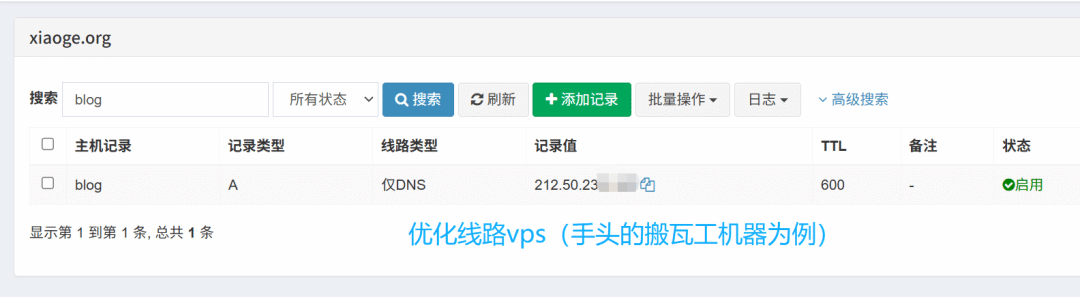
Before proceeding with this step, make sure that the domain name to be proxied is resolved to the IP address of this optimized line VPS.
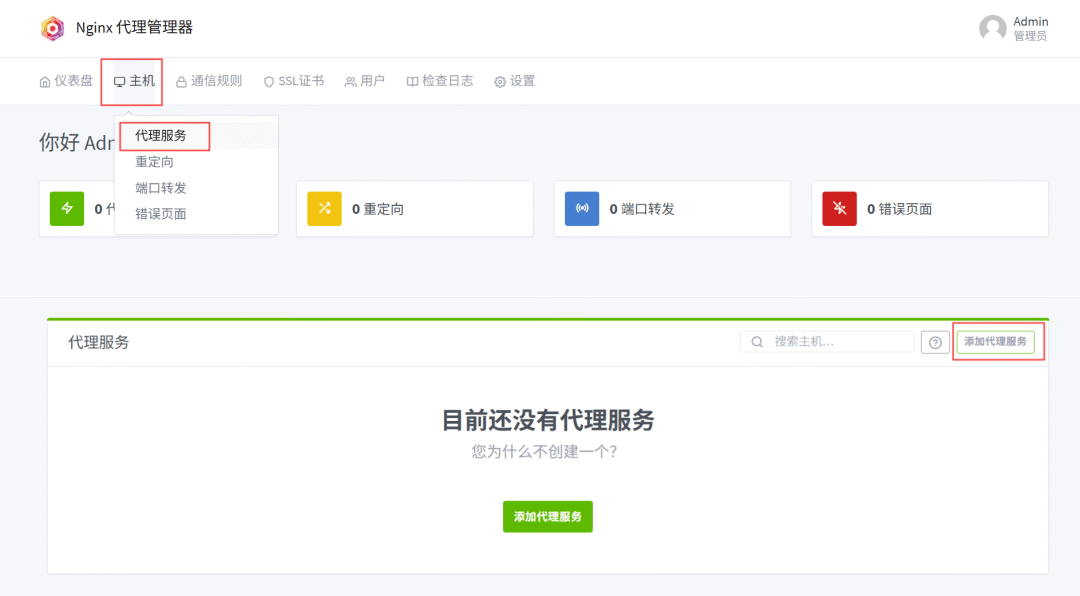
Once logged in, navigate to "Hosts" -> "Proxy Hosts" and click "Add Proxy Host".
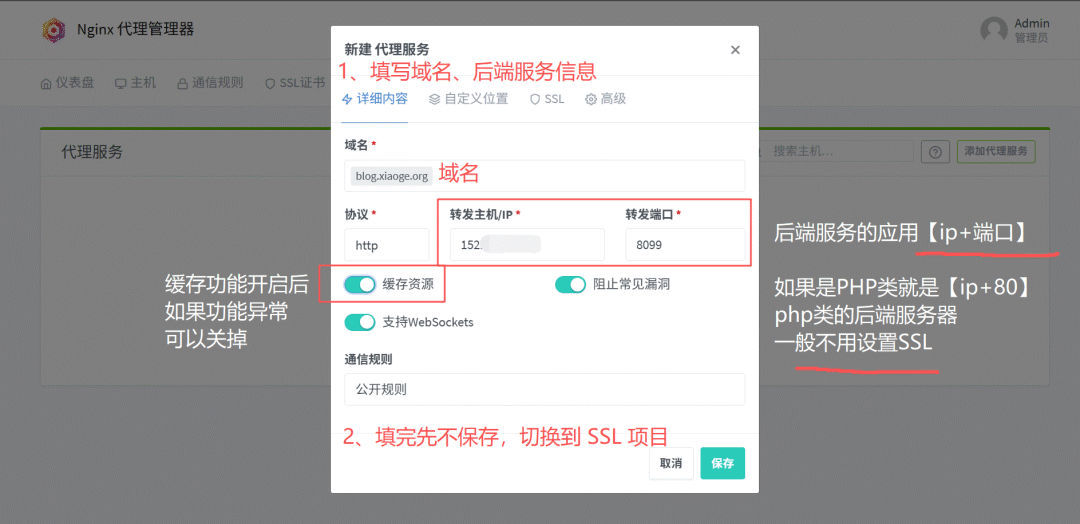
Fill in the information in the pop-up window:
- domain name: Fill in the domain name you want to accelerate access to.
- programmatic: Fill in
http或httpsThe default setting is SSL, depending on whether your back-end server is configured with SSL or not. - Forwarding hostname/IP: Enter the IP address of the back-end business server.
- forwarding port: Fill in the port of the back-end web service (usually 80).
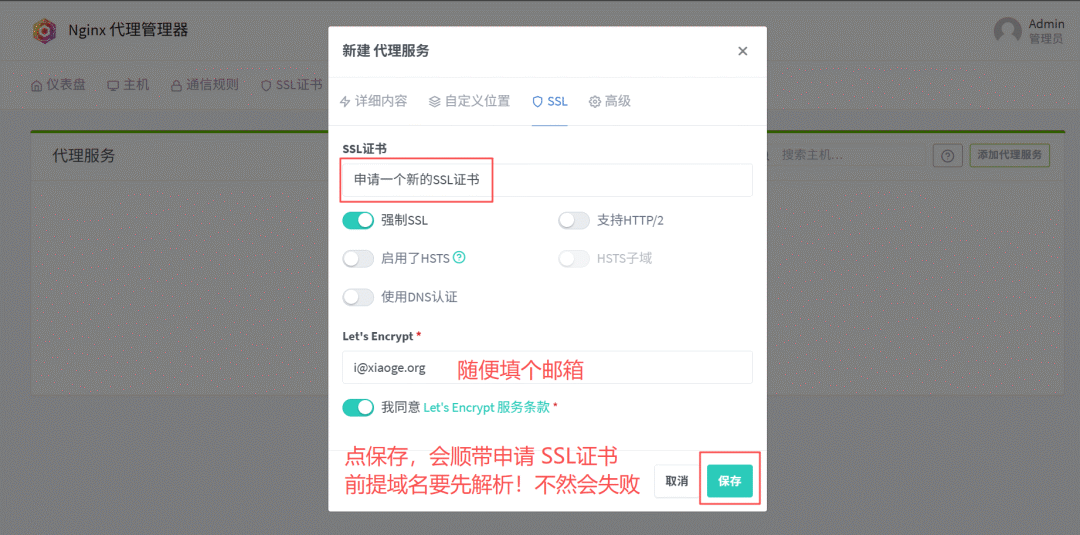
Next, switch to the "SSL" tab, select "Request a new SSL Certificate" and check the "Force SSL" and "HTTP/2 Support" options, then save. and "HTTP/2 Support" options, and then save.Nginx Proxy Manager will be automatically passed through the Let's Encrypt Apply for and configure an SSL certificate.
After the configuration is complete, the proxy rule takes effect immediately.
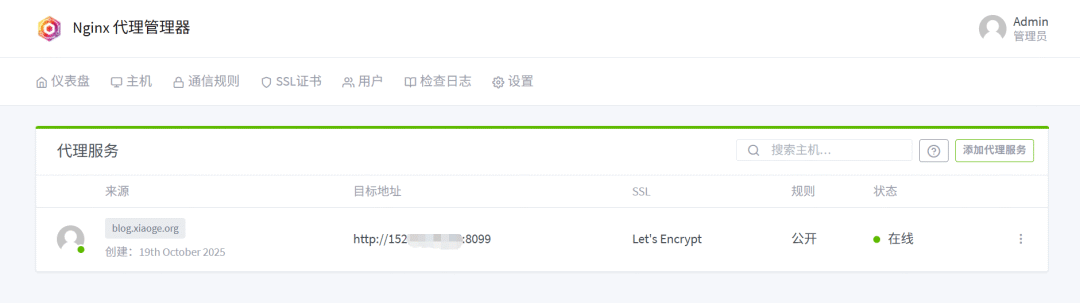
Now, access your website through your domain name and experience the speed boost that comes with optimized lines.
📊 Effectiveness Comparison and Analysis
To quantify the acceleration effect, we conducted a set of comparison tests during the evening rush hour (23:30). The test environment is as follows:
- local network: Guangdong Telecom 100Mbps broadband.
- Source Station Service: A regular line VPS located in the United States, deployed with a 3MB large image containing the
HaloBlog.
Scenario 1: Direct access to the source site

The main body of the page loaded in 2.33 seconds, but the image resources took 10.35 seconds to fully load. This fully exposes the bottleneck of ordinary international lines during peak hours.
Scenario 2: Reverse Proxy via Optimized Line (no caching enabled)
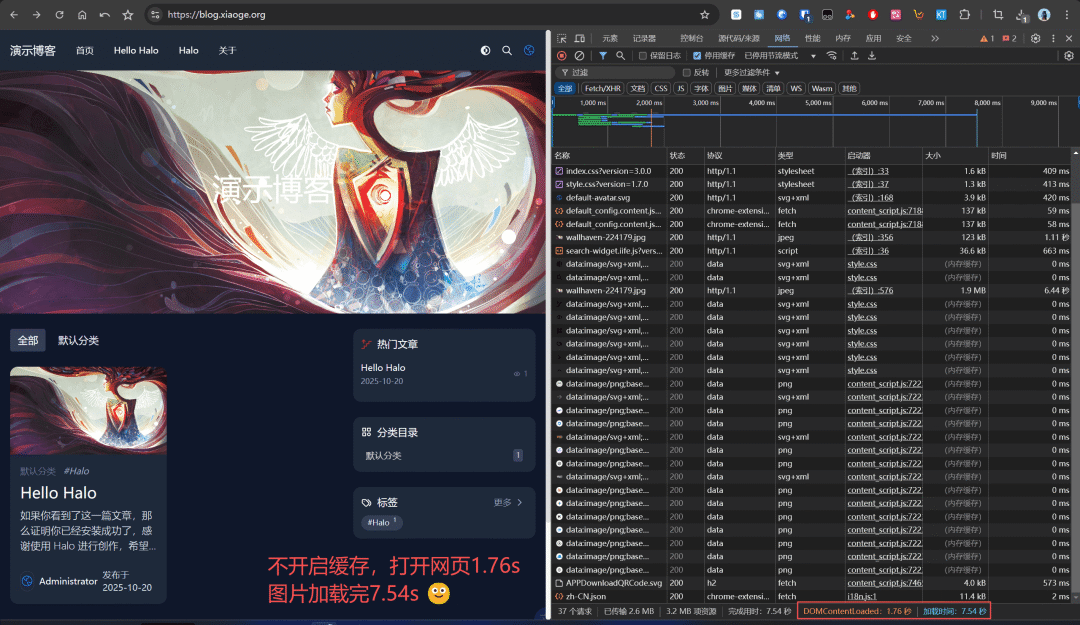
Page load time was reduced to 1.76 seconds and image load time to 7.54 seconds. Even without caching, the user experience was significantly improved just by optimizing the line transfer of data.
Scenario 3: Reverse Proxy by Optimizing the Line (Turning on Caching)
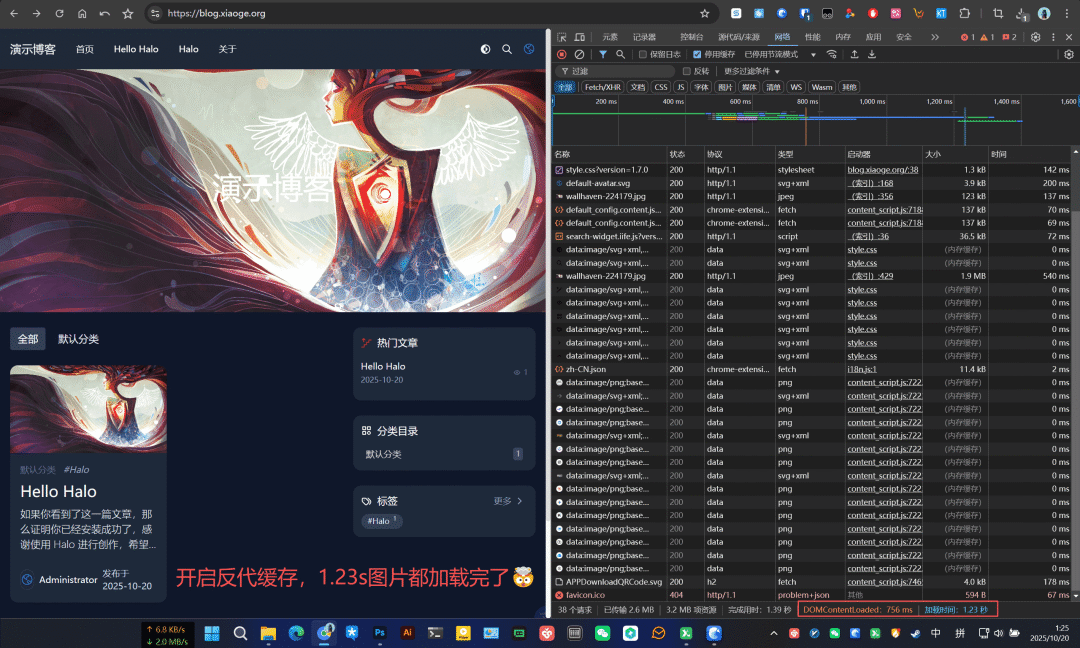
Pages open in 0.756 seconds and images finish loading in 1.23 seconds. The performance improvement is huge. This is because the reverse proxy server caches static resources such as images, and when the user requests them again, the proxy server returns a cached copy directly without having to fetch them from the remote source, thus achieving millisecond responses.
⭐ Reverse proxy settings for other panels
For those who are already using pagoda panels or 1Panel Reverse proxying is just as easy for users of tools such as the These panels usually have reverse proxy functionality built into the Site or Application management, and provide more granular caching policies and custom rule configurations.
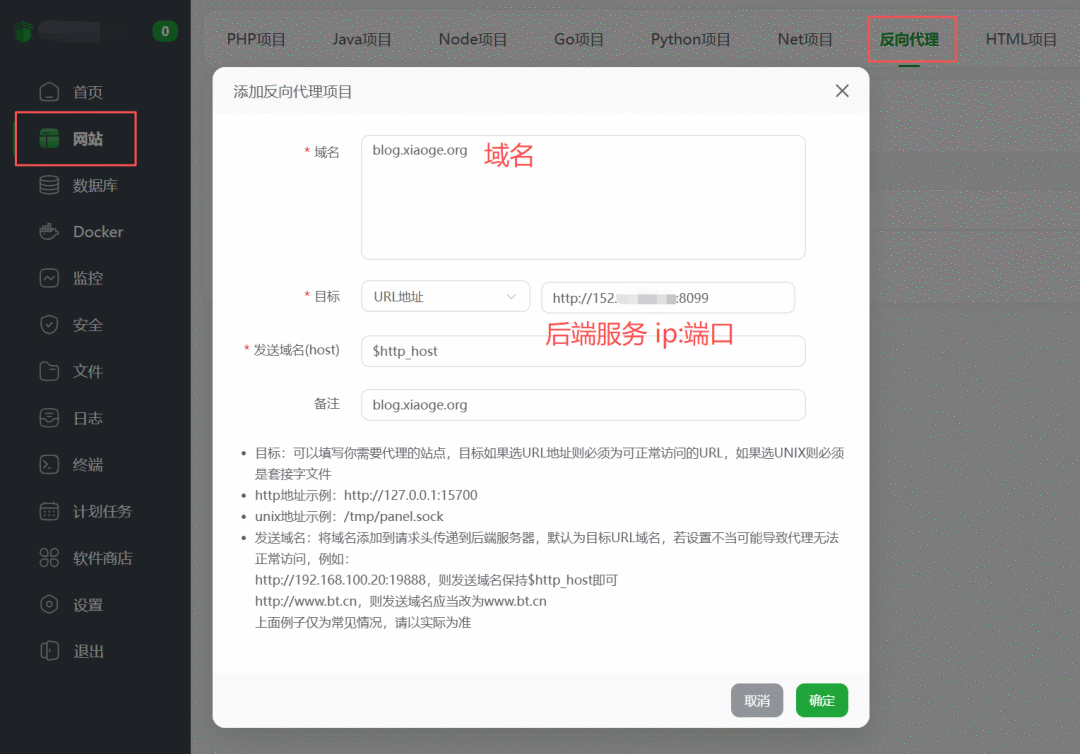
Example of a pagoda panel.
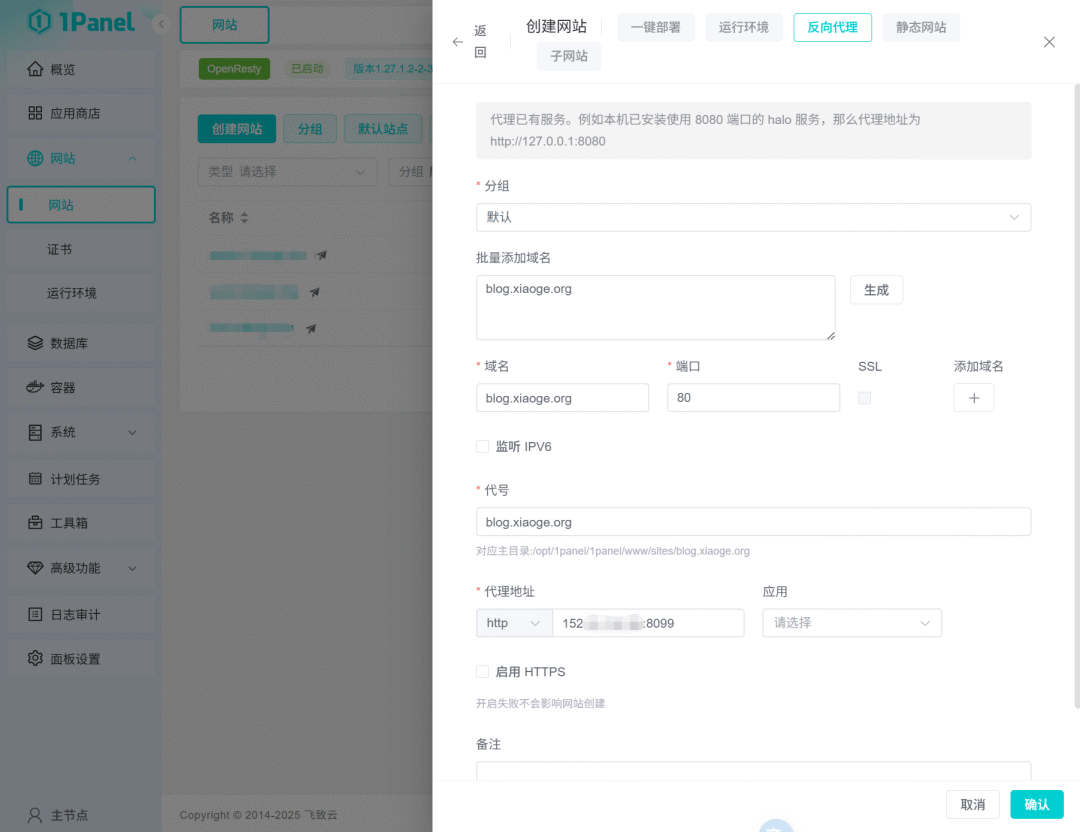
1Panel Example.
💾 Backup and Recovery of Container Data
on the basis of Docker One of the advantages of deployment is its ease of migration. To back up Nginx Proxy Manager All you need to do to configure the /opt/npm Just pack the entire catalog.
When restoring on a new server, simply unzip the directory and run again the docker compose up -d command to restore all services and configurations.
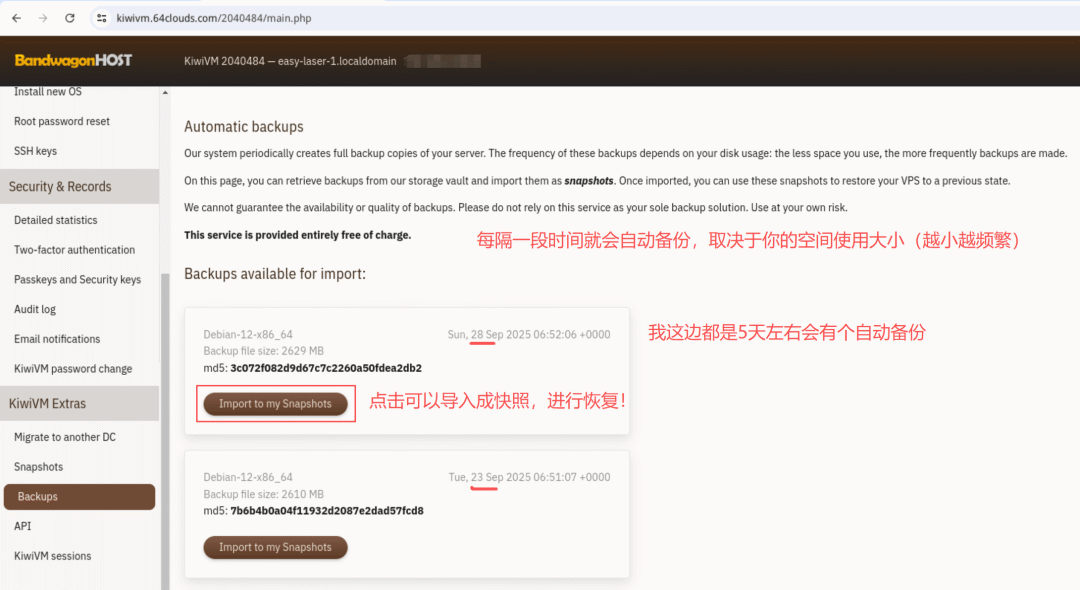
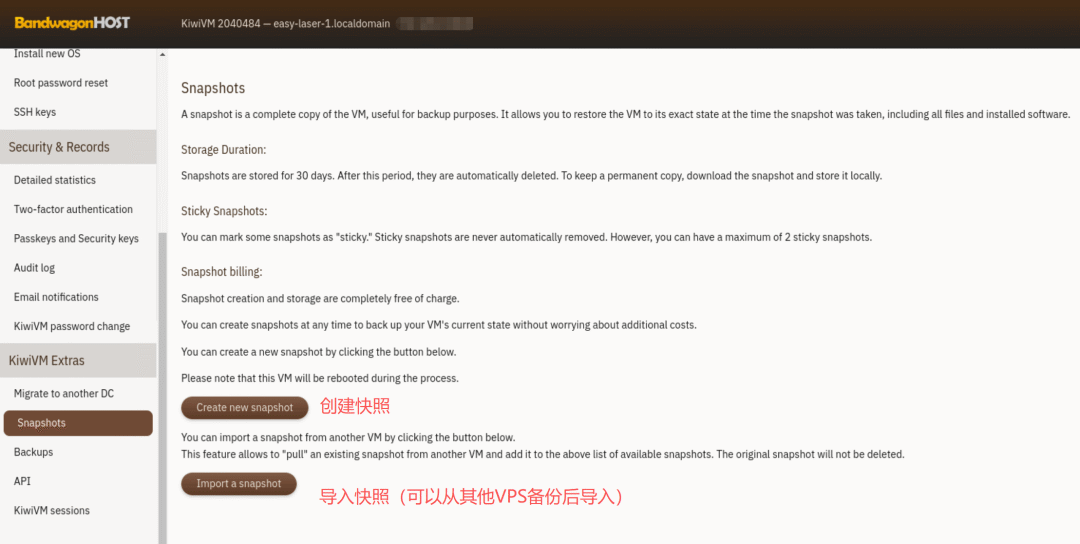
Many cloud providers also offer host snapshots or automated backups, which is a more hassle-free disaster recovery solution for reverse proxy services that don't require frequent configuration changes.