
Are you experiencing any of these troubles?"Manually copying and pasting data is too time-consuming and inefficient.".;"I want to collect web page data in bulk, but I don't know how to write code.".;"Tried other crawler tools, but they are too complicated and costly to learn.".;"I'm worried that the crawler will be banned from the site and I don't know how to deal with it."The
Don't worry! Today I'm going to teach you how to use Automa This artifact makes data crawling easy and efficient!
1. Automa: your no-code data collection assistant
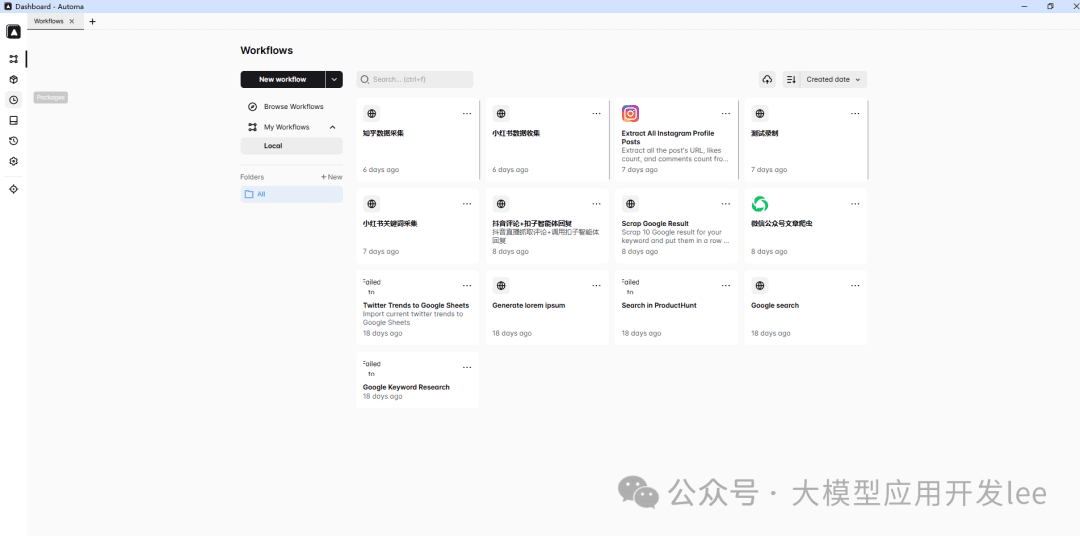
Automa plugin interface overview
Automa is a powerful automation plugin for Chrome. It helps you to"Automate web browsing, batch data collection, export data to various formats, and set up timed tasks.The
Most importantly:"No need to write code at all, just do it through the visual interface!"
2. From Beginner to Master: Three Steps to Data Crawling
Step 1: Installation and basic setup
在 Chrome 商店搜索”Automa”并安装,点击浏览器右上角的 Automa 图标,然后创建新的工作流。
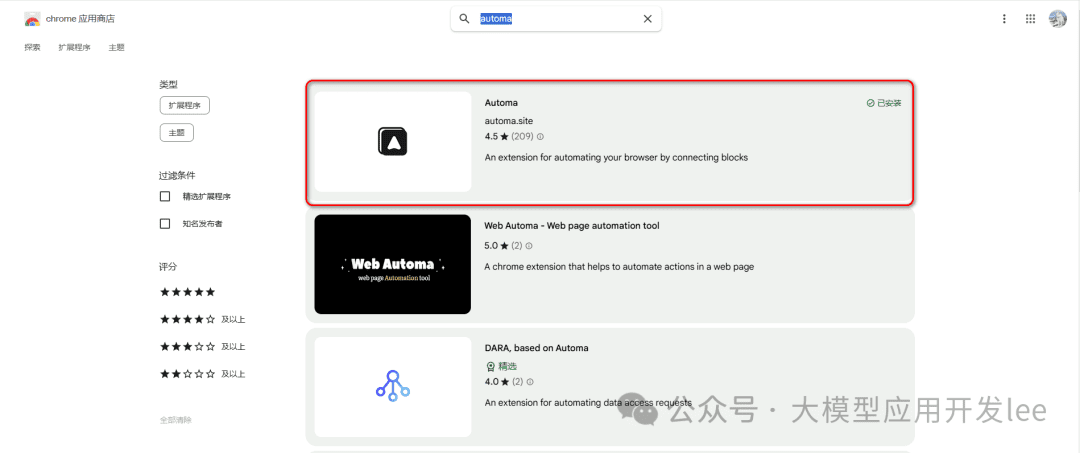
Chrome Store Installation Screen
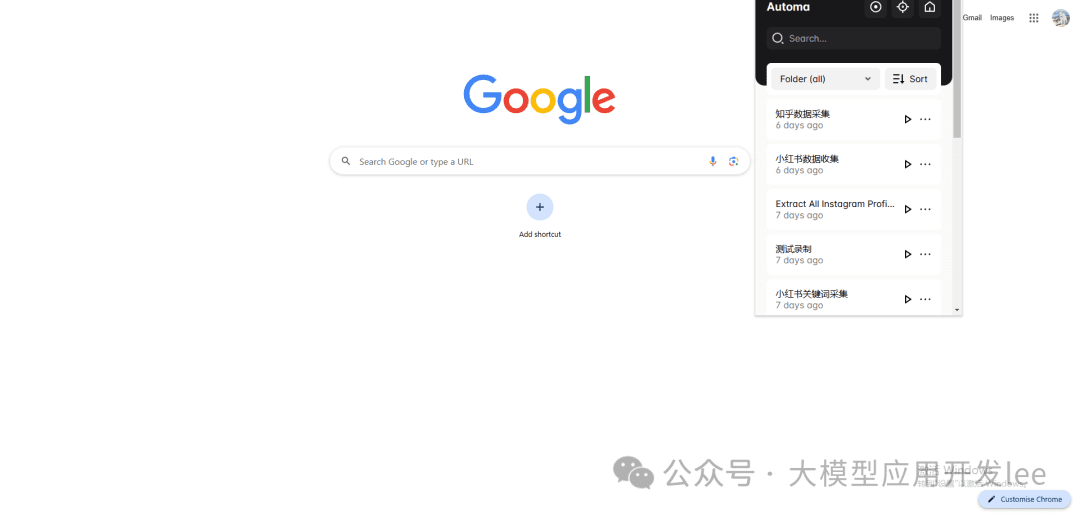
Automa plugin location
Workflow creation screen
Step 2: Design the workflow
Take crawling e-commerce product data as an example."Core Steps"Included:"Setting the start page, adding a looping block to handle paging, extracting product information, and finally exporting data".The
Step 3: Run and Optimize
In order to ensure the stability and efficiency of data collection"You need to set a reasonable delay time to wait for the page to finish loading".. At the same time."Add an error handling mechanism to prevent unintended interruptions."The
3. Practical case: small sweet potato hot post data collection
Automa core concept note
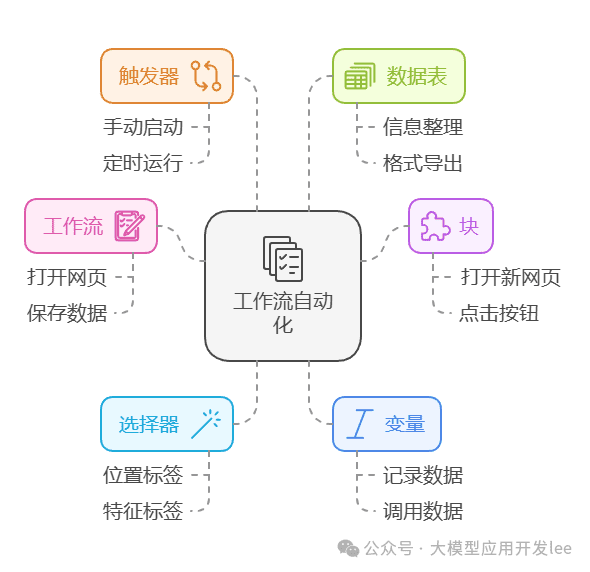
Before we get down to the nitty-gritty, let's go over a few core concepts of Automa:
- Workflow (Workflow): Container for the overall task flow
- Block: Each specific functional module
- Selector: A tool for positioning web elements.
- Variable: Stores temporary data.
- Trigger: The condition that initiates a workflow.
- Table: A form for collecting and organizing data.
Overview of Workflow Automation Basics
Case Study
Let's look at how to use Automa to collect hot notes data using Little Sweet Potato Hot Notes data collection as an example. At its core, it mimics the process of collecting it manually ourselves, and then using Automa to automate it.
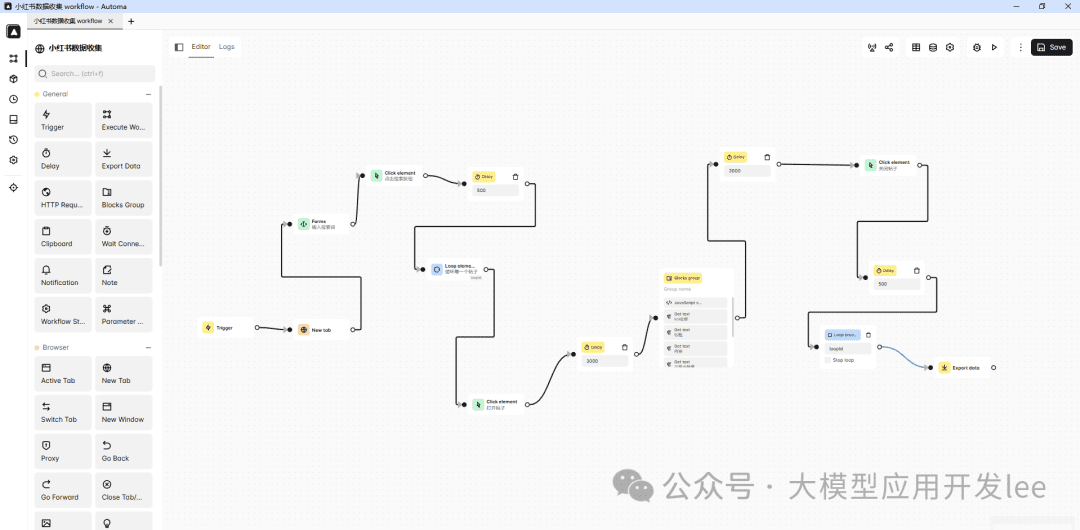
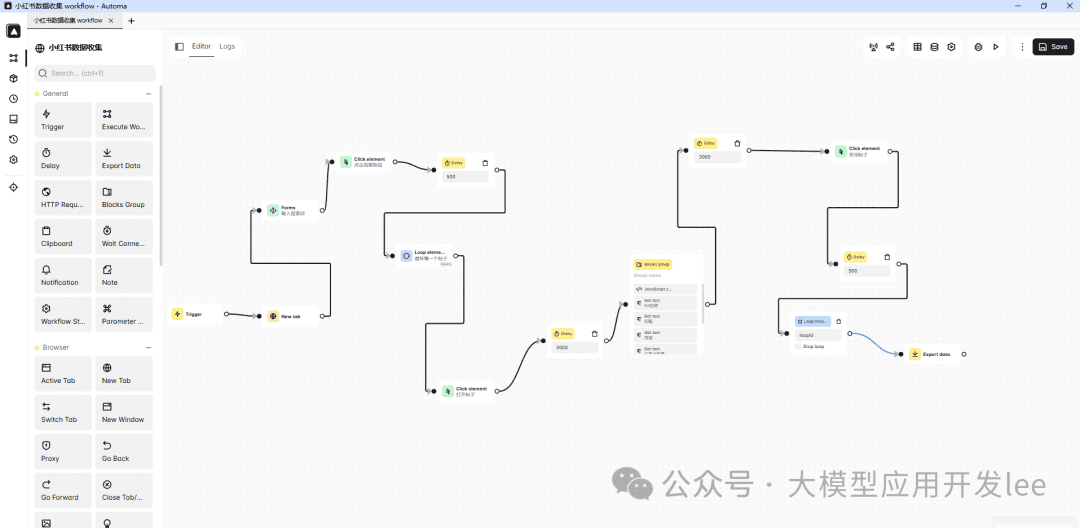
Little Red Book Data Collection Process
First, let's see how to use Automa to collect Little Red Book data. The whole process is divided into the following steps.
Create workflows and configure triggers
创建一个名为”小红书数据收集”的工作流。在触发器(Trigger)中添加一个名为”key_word”的参数,用于输入要搜索的关键词。这个参数的默认值设为”独立开发者”。
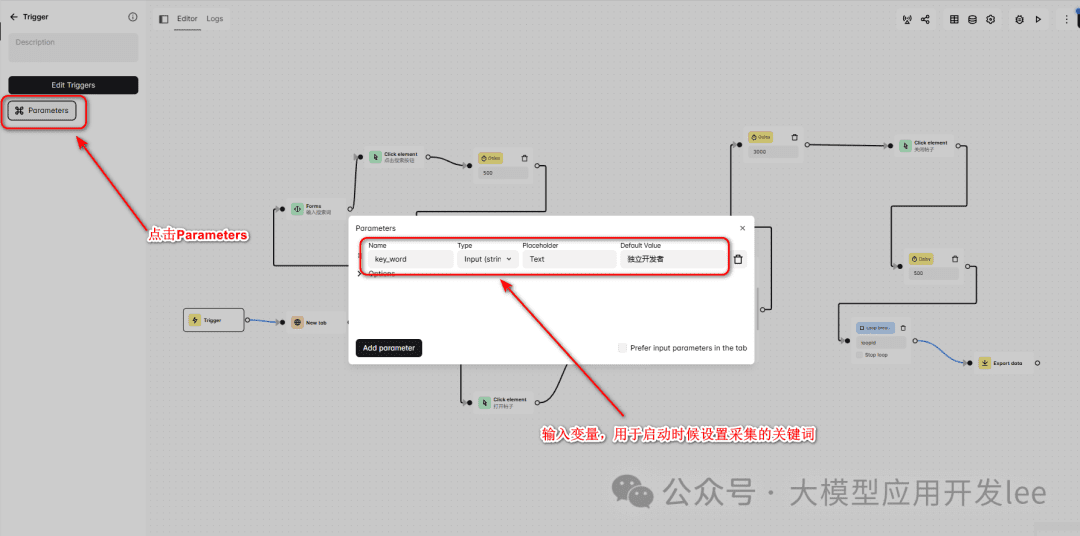
Trigger Configuration
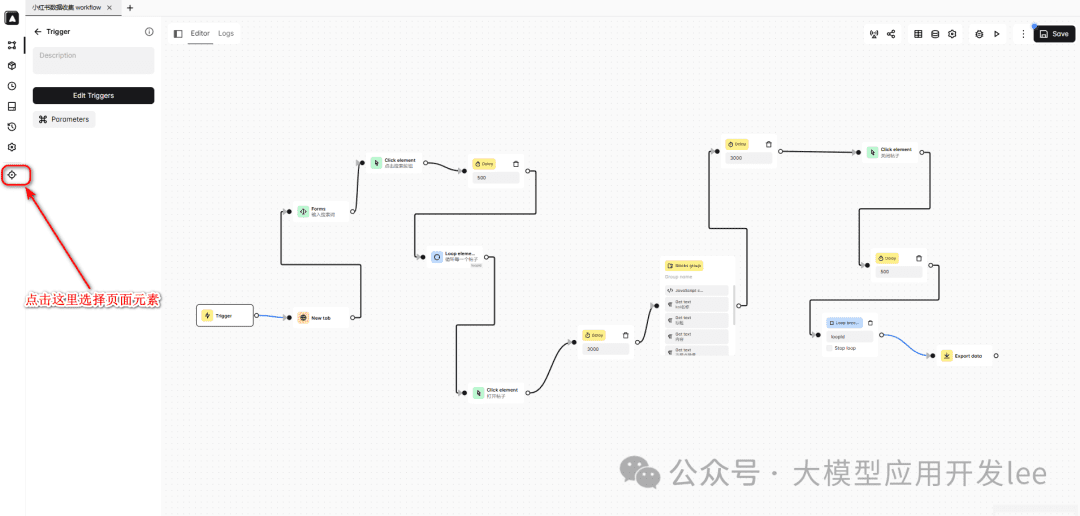
Open the target page and search
使用”新建标签页”(New Tab)块打开小红书首页(https://www.xiaohongshu.com/explore)。然后使用表单(Forms)块来定位搜索框。
How to select to elements
- Find the following icon in the dashboard sidebar to access the page to select the element
Get Selector
- Select the element on the capture page and click the copy button in the upper right corner
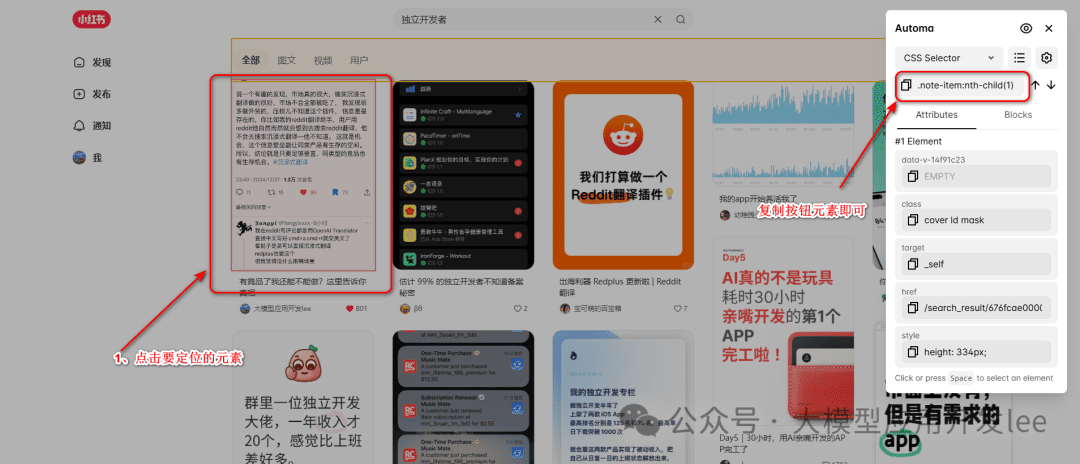
Copy Selector
- Paste the elements selected in the previous step into Automa's Css Selcetor
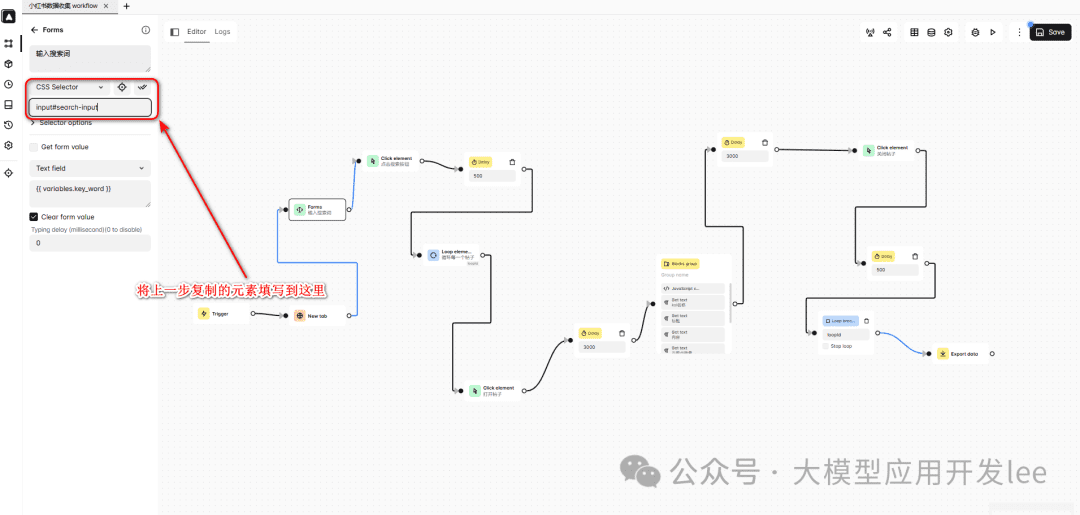
Paste Selector
Cyclic data collection
Iterate through the list of notes using the Loop Elements block. We need to get the selector for the list of notes:
- On the notes list page, right-click on any of the note covers
- 用 Automa 选择器获取工具获取选择器”.note-item .cover”
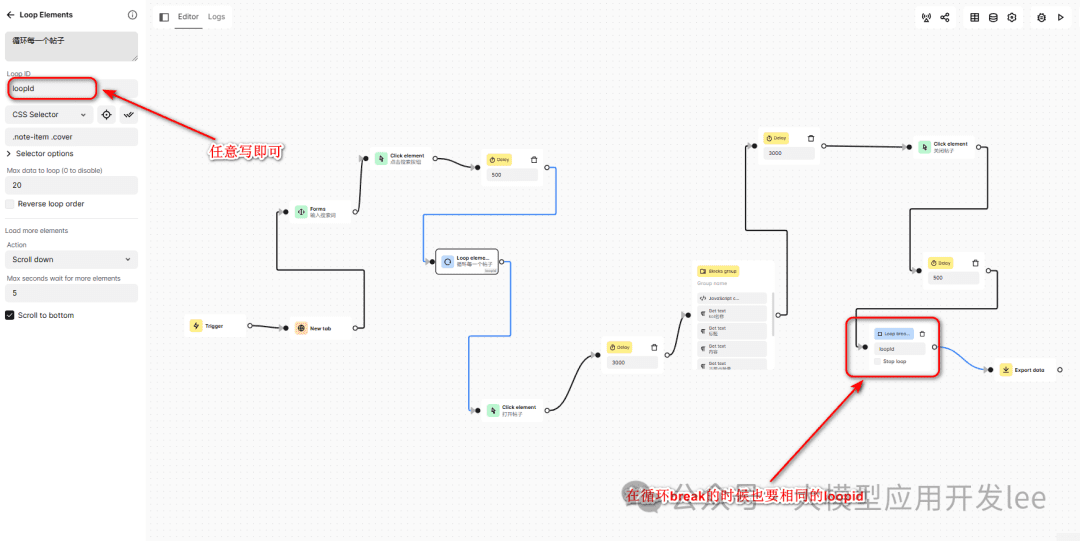
cyclic configuration
Open the post and get the details
In the loop, we need to click on each note to go to the detail page. The following points need to be noted here.
- "Wait for page to load."使用”等待元素”(Wait Element)块,确保页面完全加载:
- "Click on the cover of the note."使用”点击元素”(Click Element)块,点击每个笔记封面:
- "Wait for details page to load"使用”等待元素”(Wait Element)块,确保详情页面完全加载:
Open Element Schematic
The data selector acquisition method collected in each loop:
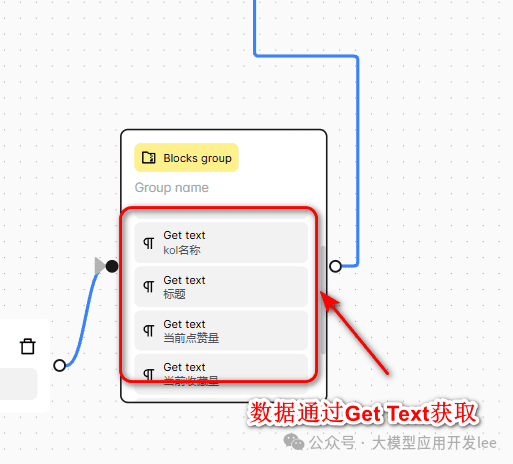
- KOL 名称: 右键点击作者名称 > 检查 > 复制选择器 “a.name”
- 笔记标题: 选择器 “div#detail-title”
- 笔记内容: 选择器 “#detail-desc > .note-text > span”
- Interactive data.
- 点赞数: “.left > .like-wrapper > .count”
- 收藏数: “#note-page-collect-board-guide > .count”
- 评论数: “.chat-wrapper > .count”
Selector Example
Export data
Finally, use the Export Data block to export the collected data in CSV format.
tip
- If the selector is not accurate, try using XPath
- Add an appropriate delay to wait for the page to load
- Regularly check for selector failure
- It is recommended that no more than 20 pieces of data be collected at a time
- Control the frequency of collection, do not collect frequently
The whole workflow can stably complete the data collection task through reasonable delay control and selector positioning. At the same time, through the parameterized configuration, it is convenient to adjust the acquisition keywords according to different needs.
4. Frequently asked questions and solutions
Dynamic Selector Explained
We often need to use dynamic selectors when collecting multiple similar elements. Let's learn it through a practical example.
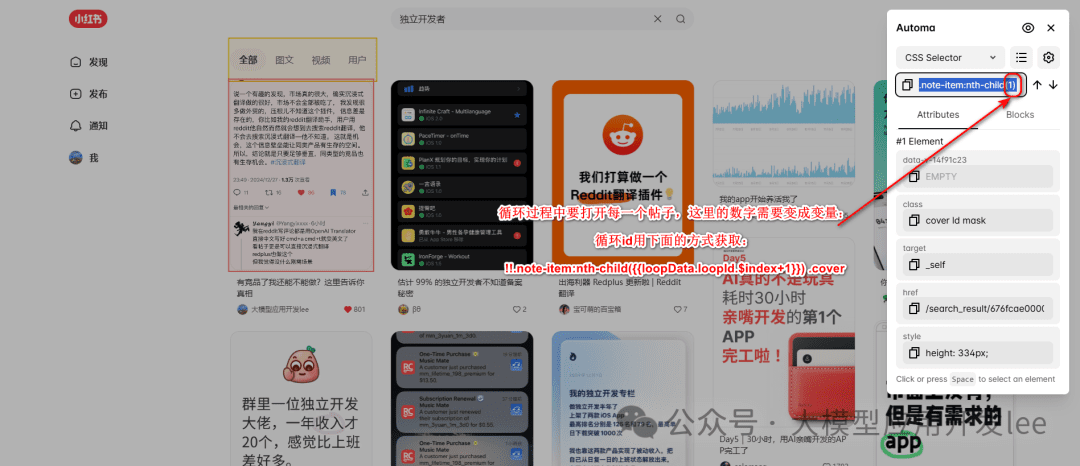
Take this selector as an example.
!!.note-item:nth-child({{loopData.loopId.$index+1}}) .cover
This selector looks complicated, so let's break it down step by step.
!! The prefix is Automa's special syntax for using JavaScript selectors instead of CSS selectors, allowing us to use more flexible selection methods.
.note-item选择 class 为”note-item”的元素,这通常是列表中的每个帖子容器。
:nth-child()is a CSS sub-element selector, used to select sub-elements at a specific location, with numbers or expressions inside the parentheses.
{{loopData.loopId.$index+1}}hit the nail on the head{{}}is Automa's variable syntax, andloopData.loopId.$indexis the current index in the loop (starting from 0), the+1it's because:nth-childStart counting from 1.
.coverSelect the final target element, in this case the cover image of the post.
Configure the loop block like this.
{
  selector: "!!.note-item:nth-child({{loopData.loopId.$index+1}}) .cover",
  timeout: 5000
}
Why is it written this way? Because it enables dynamic positioning: the
- 1st cycle.
.note-item:nth-child(1) .cover - 2nd cycle.
.note-item:nth-child(2) .cover - 3rd cycle.
.note-item:nth-child(3) .cover - 以此类推…
This avoids the problem of fixed selectors: the
/* 错误写法 */
.note-item .cover  // 会选中所有cover元素

/* 正确写法 */
!!.note-item:nth-child({{loopData.loopId.$index+1}}) .cover  // 精确选择当前循环的元素
If you are not sure if the selector is correct, you can test it in the browser console at.
// 假设当前是第3次循环
document.querySelector('.note-item:nth-child(3) .cover')
Automa's logging feature can also be used: the
{
  type: "log",
  message: "当前选择器: .note-item:nth-child({{loopData.loopId.$index+1}}) .cover"
}
Through this dynamic selector approach, we can accurately locate the target element in each loop to avoid selecting the wrong element and improve the stability and accuracy of the workflow. Selector writing is one of the most critical parts of data collection, the reasonable use of dynamic selectors can make your workflow more robust and reliable.