Kitten-TTS-Server is an open source project that provides lightweight KittenTTS The model provides a server with enhanced functionality. Users can build a text-to-speech (TTS) service themselves with this project. The core strengths of this project are that it builds on the original model by adding an intuitive Web UI, long text processing for audiobooks, and GPU acceleration for significant performance improvements. The server's underlying model is very small, less than 25MB, but generates realistic and natural-sounding human voices. The project has simplified the process of installing and running the model by providing a fully functional server that is easy to use for users without a background of specialized knowledge. The server comes with 8 built-in preset voices (4 male, 4 female) and supports deployment via Docker, greatly reducing the complexity of configuration and maintenance.
Function List
- lightweight model: The core uses the KittenTTS ONNX model, which is less than 25MB in size and has a low resource footprint.
- GPU acceleration: through optimized
onnxruntime-gpuPipeline and I/O binding technology with full support for NVIDIA (CUDA) acceleration for dramatically faster speech generation. - Long Text and Audiobook Generation: The ability to automatically process long texts by intelligently breaking sentences, chunking and then seamlessly splicing the audio is perfect for generating complete audiobooks.
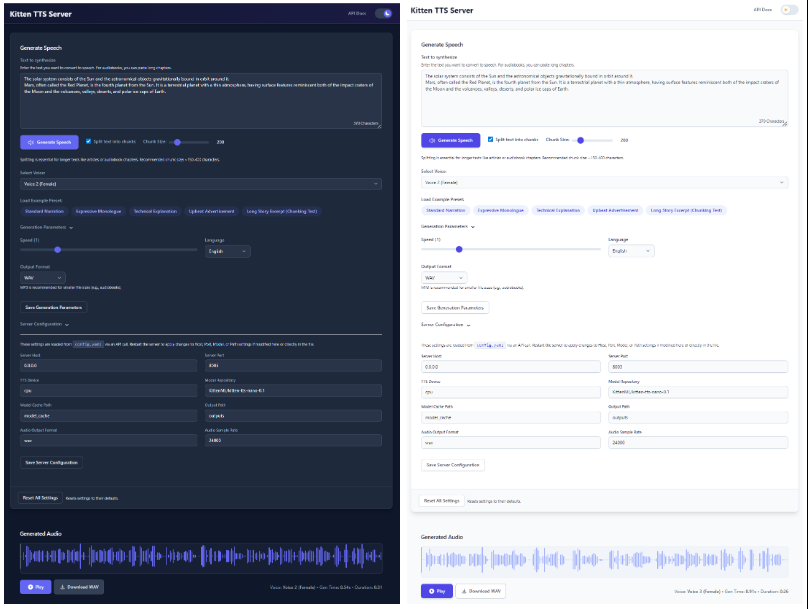
- Modernized web interfaceThe program provides an intuitive Web UI that allows users to enter text, select speech, adjust speech rate, and see waveforms of the generated audio in real time, all directly in the browser.
- Built-in multiple voices: Integrates the 8 voices (4 male and 4 female) that come with the KittenTTS model and can be selected directly from the interface.
- Dual API Interface: Provides a fully functional
/ttsinterface and an OpenAI TTS API structure compatible with the/v1/audio/speechinterfaces for easy integration into existing workflows. - Simple configuration: All the settings are accessed through a single
config.yamlDocumentation is managed. - state memory: The web interface remembers the last used text, voice and related settings to simplify the operation process.
- Docker SupportDocker Compose: Provides pre-configured Docker Compose files for CPU and GPU environments, enabling one-click containerized deployments.
Using Help
The Kitten-TTS-Server project provides a clear installation and usage process to ensure that users can smoothly get it up and running on their own hardware.
System environment preparation
Before installation, you need to prepare the following environment:
- operating system: Windows 10/11 (64-bit) or Linux (Debian/Ubuntu recommended).
- Python: 3.10 or later.
- Git: Used to clone project code from GitHub.
- eSpeak NG: This is a required dependency for text phonetization.
- Windows: Download and install from the eSpeak NG release page
espeak-ng-X.XX-x64.msi. The command line terminal needs to be restarted after installation. - Linux: Run the command in the terminal
sudo apt install espeak-ng。
- Windows: Download and install from the eSpeak NG release page
- (GPU acceleration optional):
- A CUDA-enabled NVIDIA graphics card.
- (Linux only): Requires installation of
libsndfile1和ffmpeg. This can be done with the commandsudo apt install libsndfile1 ffmpegto install.
Installation steps
The entire installation process is designed to be "one-click", with different installation paths depending on your hardware.
Step 1: Clone the code repository
Open your terminal (PowerShell on Windows, Bash on Linux) and run the following command:
git clone https://github.com/devnen/Kitten-TTS-Server.git
cd Kitten-TTS-Server
Step 2: Create and Activate a Python Virtual Environment
To avoid conflicts with dependent libraries from other projects, it is highly recommended to create a separate virtual environment.
- Windows (PowerShell):
python -m venv venv .\venv\Scripts\activate - Linux (Bash):
python3 -m venv venv
source venv/bin/activate
After successful activation, your command line prompt will be preceded by (venv) Words.
Step 3: Install Python dependencies
Depending on whether your computer is equipped with an NVIDIA graphics card or not, choose one of the following ways to install.
- Option 1: CPU-only installation (easiest)
This works for all computers.pip install --upgrade pip pip install -r requirements.txt - Option 2: Installation with NVIDIA GPU (more performance)
This approach installs all the necessary CUDA libraries to allow the program to run on the graphics card.pip install --upgrade pip # 安装支持GPU的ONNX Runtime pip install onnxruntime-gpu # 安装支持CUDA的PyTorch,它会一并安装onnxruntime-gpu所需的驱动文件 pip install torch torchaudio --index-url https://download.pytorch.org/whl/cu121 # 安装其余的依赖 pip install -r requirements-nvidia.txtOnce the installation is complete, you can run the following command to verify that PyTorch recognizes your graphics card correctly:
python -c "import torch; print(f'CUDA available: {torch.cuda.is_available()}')"If the output is
CUDA available: TrueThis means that the GPU environment has been configured successfully.
Operations Server
take note of: The first time you start the server, it will automatically download the KittenTTS model file from Hugging Face, which is about 25MB in size. This process only needs to be done once, and subsequent launches will be very fast.
- Make sure you have activated the virtual environment (command line preceded by the
(venv))。 - Run the server in a terminal:
python server.py - When the server starts, it automatically opens the web interface in your default browser.
- Web interface address.
http://localhost:8005 - API Documentation Address.
http://localhost:8005/docs
- Web interface address.
To stop the server, simply press in the terminal window where the server is running CTRL+C。
Docker Installation Methods
If you are familiar with Docker, you can use Docker Compose for deployment, which is simpler and allows for better management of applications.
- environmental preparation:
- Install Docker and Docker Compose.
- (GPU users) Install NVIDIA Container Toolkit.
- Clone Code Repository (If not done before).
git clone https://github.com/devnen/Kitten-TTS-Server.git cd Kitten-TTS-Server - Launch Container (Choose commands based on your hardware).
- NVIDIA GPU Users:
docker compose up -d --build - CPU users only:
docker compose -f docker-compose-cpu.yml up -d --build
- NVIDIA GPU Users:
- Access and management:
- Web Interface.
http://localhost:8005 - View Journal.
docker compose logs -f - Stopping containers.
docker compose down
- Web Interface.
Function Operation
- Generate normal speech:
- Start the server and open the
http://localhost:8005。 - Enter the text you want to convert in the text box.
- Select a favorite sound from the drop-down menu.
- You can drag the slider to adjust the speed of speech.
- Click on the "Generate Speech" button and the audio will play automatically with a download link.
- Start the server and open the
- Generate audiobooks:
- Copy the entire book or a chapter in plain text.
- Paste it into the text box of the web page.
- Make sure that the "Split text into chunks" option is checked.
- To make pauses more natural, it is recommended to set a Chunk Size between 300 and 500 characters.
- Click the "Generate Speech" button, the server will automatically slice the long text, generate speech, and finally stitch it into a complete audio file for you to download.
application scenario
- Production of audiobooks
For users or content creators who like to listen to books, you can use this tool to convert eBooks, long articles or web novels into audiobooks. Its long text processing feature can automatically do the slicing and splicing to generate complete audio files. - Personal Voice Assistants
Developers can integrate its APIs into their applications to add voice announcements to their apps, such as reading out news, weather forecasts, or notification messages. - Video Content Dubbing
Self-media creators can use it to generate a voice-over or narration when making videos. It's more efficient and less costly than live recordings, and you can change the copy and regenerate the voiceover at any time. - Learning Aids
Language learners can enter words or sentences and generate standardized pronunciation for follow-along imitation. Learning materials can also be converted to audio for listening while commuting or exercising.
QA
- How does this program differ from using the KittenTTS model directly?
This project is a "serviced" wrapper around the KittenTTS model, which solves the problems of complex environment configuration, lack of user interface, inability to handle long text, and lack of GPU acceleration when using the model directly. It solves the problems of complex environment configuration, lack of user interface, inability to handle long text, and lack of support for GPU acceleration when using the model directly.Kitten-TTS-Server provides an out-of-the-box web interface and API services, making it easy for the average user to use. - What should I do if I encounter eSpeak-related errors during installation?
This is the most common problem. Please make sure that you have installed eSpeak NG correctly for your operating system and that you have restarted the command line terminal after installation. If the problem persists, check that eSpeak NG is installed in a standard path on your system. - How do I verify that GPU acceleration is in effect?
First, make sure you have installed all the dependencies the way they are for NVIDIA GPUs. Then, you can run thepython -c "import torch; print(torch.cuda.is_available())"command, if it returnsTrue, indicating that the environment is configured correctly. When the server is running, you can also configure the environment via the Task Manager or thenvidia-smicommand to view the GPU usage. - What should I do if the server starts up with the message "The port is occupied"?
This means that there is already another program on your computer occupying port 8005. You can modify theconfig.yamlfile, which willserver.portto another unoccupied port number (e.g.8006), and then restart the server.