DispatchMail is an open source AI email assistant that runs on a local computer and helps users manage their email. The project was designed with the idea of having AI act as a collaborative partner for humans to work together on emails. It does this by connecting to the user's email account (Gmail is currently supported) and monitoring and processing emails based on prompts (prompts) set by the user.DispatchMail's core functionality is to utilize AI (currently through the OpenAI API) to automate tasks such as sorting, archiving, and generating drafts of emails. It provides a web interface running locally where users can manage emails and review AI-generated drafts and instructions. All data is stored in a local SQLite database, ensuring user privacy and data security. The project is currently in an early alpha prototype stage and is aimed at developers who wish to experiment and modify it, and welcomes feedback and contributions from the community.
Function List
- AI Mail Processing: Automatically process emails based on user-defined instructions by connecting to OpenAI.
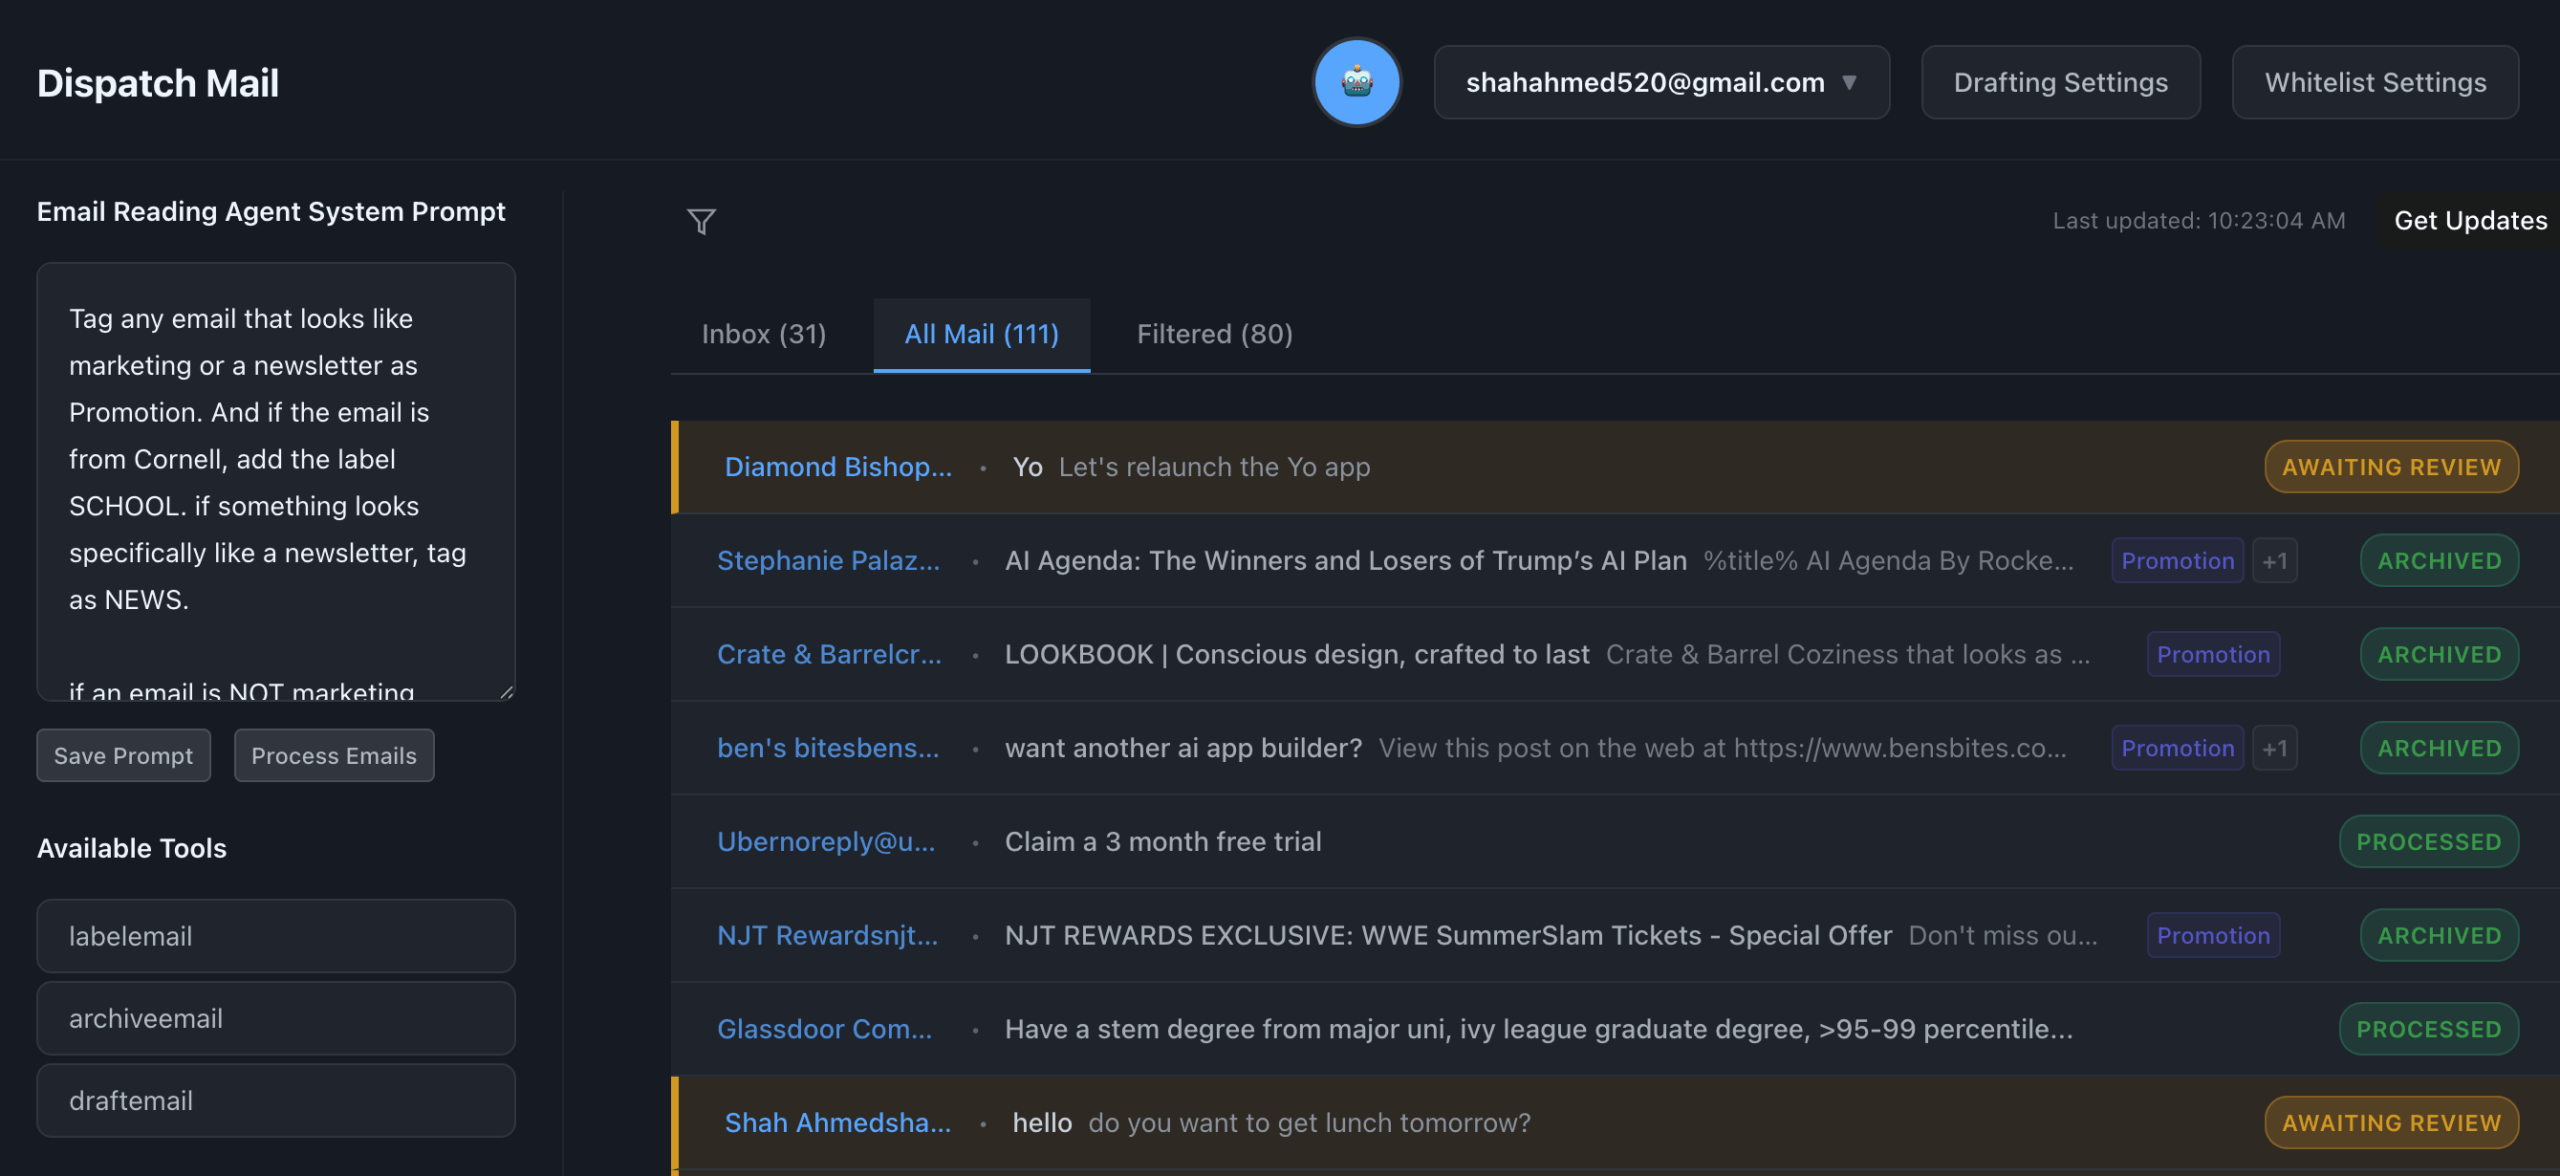
- Local Web Interface: Provides a locally running web application to manage inboxes, drafts, and AI commands.
- Mail Filtering Rules: Users can customize whitelisting rules to precisely control the range of emails the AI can access and process, and the rules can be based on sender, subject keywords, or natural language descriptions.
- Automatic generation of drafts: AI can automatically compose drafts of email responses based on instructions.
- Automated mail processing:: Ability to automatically label or archive messages.
- Local data storage: Users' email content, credentials, and configurations are stored locally in a SQLite database and do not rely on cloud services.
- Sender in-depth analysis: In-depth background information on the sender can be researched using a large language model.
Using Help
DispatchMail is an early prototype project for developers and requires some technical background to successfully install and run. Below are detailed steps for installation and usage.
preliminary
Before starting the installation, make sure your system meets the following conditions:
- Python: Version 3.8 or higher is required.
- Node.js: Version 16 or higher is required to run the web interface.
- Gmail account: Your Gmail account must have two-step verification (2FA) turned on.
- OpenAI API key: You will need an OpenAI account and to generate API keys, as AI functionality depends on this.
Installation process
- Cloning Codebase:
Open a terminal (command line tool) and usegitcommand to clone the project code from GitHub to your local computer.git clone https://github.com/dbish/DispatchMail.git cd DispatchMail - Run the installation script:
The project provides a convenient installation scriptsetup.pyIt will do most of the setup work automatically.python setup.pyThis script performs the following actions:
- Install all Python backend dependencies.
- Initialize the local SQLite database (
dmail.db)。 - Create a sample configuration file.
- Guides you through the basic setup of your account.
- Configuration credentials:
- Configuring OpenAI API Keys: Find and open the file
web-app/api/credentials.py, fill in your OpenAI API key.OPENAI_API_KEY = 'your-openai-api-key' - Configuring Gmail Application Passwords: With 2FA enabled, you can't use your Gmail login password directly. You need to generate a special "Application Password" for DispatchMail.
- Visit your Google Account security page: https://support.google.com/mail/answer/185833
- In the "Application Passwords" section, select "Mail" as the application, select "Other (custom name)" as the device, and then name it (e.g. "DispatchMail").
- Google will generate a 16-digit password, please copy it immediately and keep it safe. This password will be used in subsequent account setups.
- Configuring OpenAI API Keys: Find and open the file
Starting services
DispatchMail consists of a backend API and a frontend interface, and you need to start them separately.
- Option A: Use a startup script (recommended)
The program provides astart.pyscript that can start all the required services at once.python start.py - Option B: Start the service manually
If you want better control or debugging, you can start it manually. You need to open two terminal windows.- Terminal 1: Launching the Backend API
cd web-app
python api/api.py
By default, the back-end API will run on the
http://localhost:5000。 - Terminal 2: Launching the front-end interface
cd web-app
npm run dev
The front-end development server will run
http://localhost:5173。
- Terminal 1: Launching the Backend API
Usage
- Setting up a mailbox account:
After the service has started, open thehttp://localhost:5173. You'll see a settings screen where you enter your Gmail address, IMAP server address (imap.gmail.com) and the 16-digit app password you just generated. - Configuring Mail Filtering Rules:
In the Settings area of the web interface, you can configure a whitelist that determines which emails can be processed by the AI. This prevents the AI from processing all emails and protects your privacy. You can set rules based on the sender's address, keywords in the subject of the email, or using natural language (e.g., "Process only emails from coworkers"). - Customized AI Prompts (Prompt):
This is the most central part of DispatchMail. You need to tell the AI how to analyze and process your email.- Reading Prompt: Instruct the AI how to read and understand the content of the email. For example, you can ask the AI to determine the urgency of the email, summarize the main points of the email, or extract the tasks in the email.
- Draft Prompt: Instruct the AI on how to generate a draft response for you. For example, "If the email is a meeting invitation, generate a polite reply accepting the invitation".
- Processing Mail:
Once the setup is complete, the system will automatically fetch new emails from your Gmail account. Emails that meet the whitelist rules will be sent to OpenAI for processing. After processing, you can see the label, summary or draft reply generated by AI in the web interface. You can review, modify and send these drafts.
application scenario
- Automatic mail categorization and summarization
For users who receive a large number of emails every day, you can configure DispatchMail to read all new emails, automatically add tags based on the content (e.g., project name, sender relationship), and generate one-sentence summaries for long emails to help users quickly understand the core content of emails and decide on the priority of processing. - Initial response automation
For customer support or sales teams, rules can be set to allow the AI to automatically respond to common customer inquiries. For example, when receiving an email about product pricing, the AI can automatically generate a draft email with a link to the price list based on a preset draft prompt word, waiting for manual review and then send it with one click. - Tasks and information extraction
Researchers or students can use DispatchMail to monitor subscribed academic notification emails. AI commands can be set to request it to extract key information from the emails such as deadline date, conference venue, thesis topic, etc. and organize them into a fixed format for users to record them uniformly. - AI experimentation platform as a developer
For developers who want to learn and explore AI Agent applications, DispatchMail provides a complete local runtime environment. Developers can directly modify theagent.pydocumentation, trying out different language models, adapting the Chain-of-thought for AI, or integrating new tools, using it as an ideal testing ground for AI application development.
QA
- Is this program free?
The DispatchMail project itself is open source and free. However, it relies on OpenAI's API to provide AI functionality, so you'll need to pay the costs incurred by using the OpenAI API. - Is my email data safe?
One of the great features of the program is that all data is stored in a SQLite database on your local computer, including the content of your emails and account credentials. The data is not uploaded to any third-party cloud server, thus ensuring privacy and security. However, you need to be careful to protect the locally storedcredentials.pyfiles and database files. - Why do I need to use the "app password" instead of my Gmail password?
This is because your Gmail account has two-step verification (2FA) turned on, which is a security measure. App passwords are one-time passwords that Google provides to users who need to sign in to their accounts in unofficial apps, which gives apps access to your data without you having to reveal your master password, thus increasing security. - What stage is the project currently at? Can it be used in a daily production environment?
The project is currently in an early Alpha prototype stage. It is designed primarily for developers who like to toss things around, and the functionality may be unstable and not recommended for direct use in a significant production environment.