Foreword: Building Cost-Effective AI Image Generation and Editing Workflows
lit. ten thousand questions on general principles (idiom); fig. a long list of questions and answers Qwen-Image As an open source text-generated graphical model, it has gained widespread attention for its excellent ability in complex text rendering, especially Chinese character generation. Compared with mainstream models, it can accurately embed multi-line and multi-paragraph text content in images, providing new possibilities for poster design, content creation and other scenarios.
However, despite the fact that the models themselves are open source, the cost of invoking such services through commercial platforms is often substantial. For example, plug-in services provided by some platforms can cost as much as $0.25 per image to generate after the free quota is depleted, which is a significant overhead for users who need to generate large quantities or iterate frequently.
In this paper, we will explore an alternative that aims to utilize Dify Application Orchestration Platform,ModelScope(Magic Match Community) Qwen-Image plug-in and the Tencent Cloud Object Storage (COS), to build an image generation and editing intelligence (Agent) that is both powerful and cost-effective. The final result is as follows: the agent not only generates images based on text, but also modifies the generated images in subsequent dialogues.
Preparation for system setup
Before starting the build, the following key components and services need to be ready. The core of the entire system is Dify platform Qwen Text2Image & Image2Image Plug-ins.
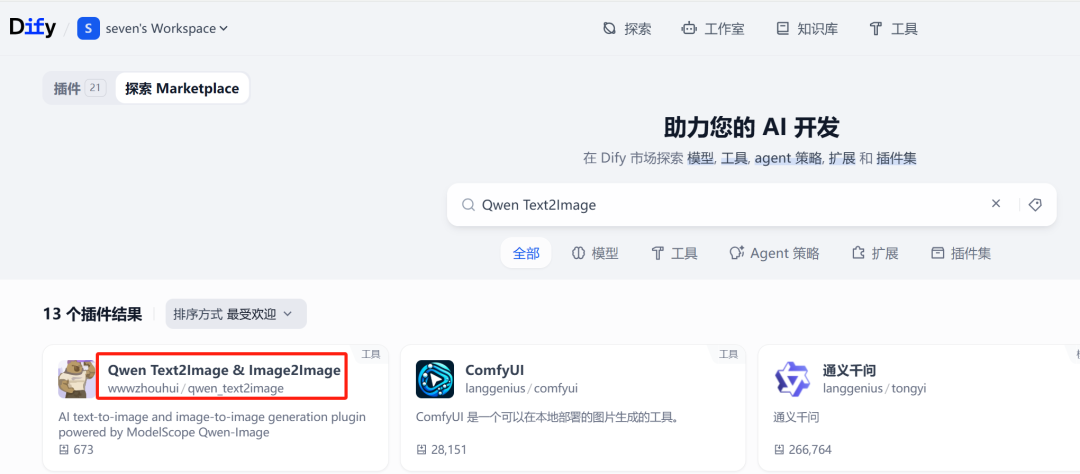
1. Dify Plugin Marketplace and Qwen-Image Plugin
Dify is an open source LLM Application development platform that allows users to orchestrate and create applications through a visualization interface AI Application. First, it is necessary to add the Dify in the plugin marketplace to find and download Qwen Text2Image & Image2Image Plug-ins.
2. ModelScope community access credentials
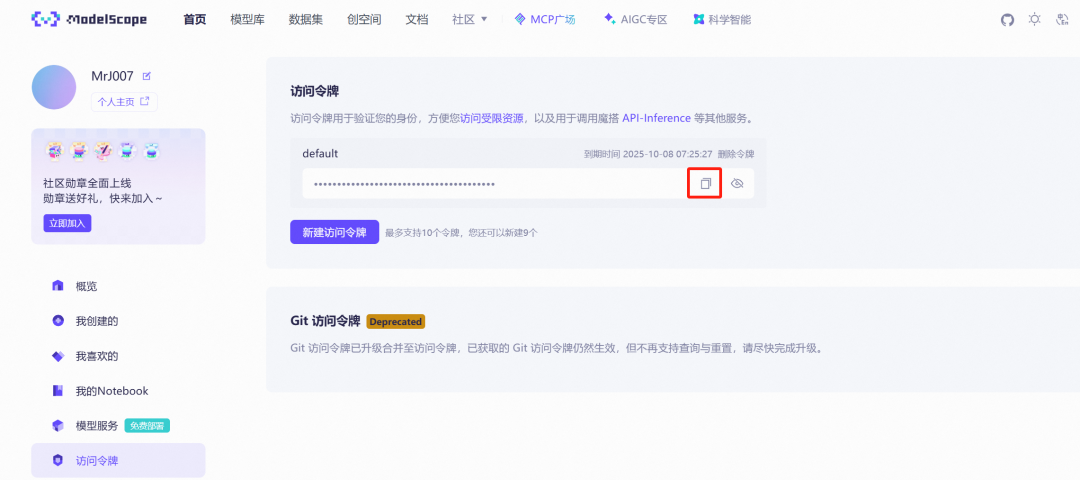
ModelScope(Magic Hitch Community) is a modeling open source community under Alibaba that provides a large number of pre-trained models and API service. To use the Dify upper Qwen-Image plugin, which requires a ModelScope community-based API Key as access credentials.
It can be done from the ModelScope Get the personal center on the official website API Key:https://modelscope.cn/my/myaccesstoken
3. Tencent Cloud Object Storage (COS)
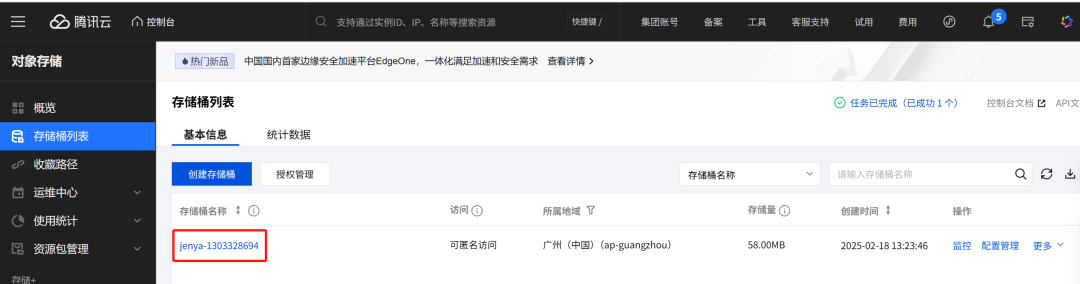
Qwen-Image The image editing (image to image) function requires that the original image entered must be accessible via the public network. URL Address. To solve this problem, cloud storage services can be utilized. In this paper, Tencent Cloud Object Storage (COS) to store the generated images and generate public links for them.
Need to create a Tencent Cloud COS Bucket for subsequent image uploads. The configuration process is not described here, just make sure the Bucket has public read access.
Access Address:https://console.cloud.tencent.com/cos/bucket
4. API services for image uploads
in order to incorporate Dify Images generated in workflow uploaded to Tencent Cloud COS, an intermediate service is needed to act as a bridge. This service receives Dify Sends the image file, performs an upload operation, and then returns the image's public network URL。
It is possible to use FastAPI Quickly build such an interface service. Here are the core Python Code:
Safety Warning: The following sample code directly hardcodes the secret_id 和 secret_keyThis poses a significant safety risk. In a production environment, themust neverDo so. It is highly recommended to use environment variables, configuration files, or specialized key management services to store and recall these sensitive credentials.
import requests
import json
import base64
from PIL import Image
import io
import os
import sys
from qcloud_cos import CosConfig, CosS3Client
import datetime
import random
from fastapi import FastAPI, UploadFile, File
from pydantic import BaseModel
# --- 配置信息 ---
# 临时文件存储路径
output_path = "D:\\tmp\\zz"
# 腾讯云 COS 配置
region = "ap-guangzhou"
secret_id = "AKIDnRsFUYKwfNvHQQFsIj9WpwpWzEG5hAUi"  # 替换为你的 SecretId
secret_key = "5xb1EF9*******ydFi1MYWHpMpBbtx"  # 替换为你的 SecretKey
bucket = "jenya-130****694"  # 替换为你的 Bucket 名称
app = FastAPI()
class GenerateImageRequest(BaseModel):
prompt: str
def generate_timestamp_filename(extension='png'):
"""根据时间戳和随机数生成唯一文件名"""
timestamp = datetime.datetime.now().strftime("%Y%m%d%H%M%S")
random_number = random.randint(1000, 9999)
filename = f"{timestamp}_{random_number}.{extension}"
return filename
def base64_to_image(base64_string, output_dir):
"""将 Base64 字符串解码并保存为图片文件"""
filename = generate_timestamp_filename()
output_filepath = os.path.join(output_dir, filename)
image_data = base64.b64decode(base64_string)
image = Image.open(io.BytesIO(image_data))
image.save(output_filepath)
print(f"图片已保存到 {output_filepath}")
return filename, output_filepath
def image_to_base64(image_data: bytes) -> str:
"""将图片文件流转换为 Base64 编码的字符串"""
return base64.b64encode(image_data).decode('utf-8')
def upload_to_cos(file_name, base_path):
"""上传本地文件到腾讯云 COS"""
config = CosConfig(Region=region, SecretId=secret_id, SecretKey=secret_key)
client = CosS3Client(config)
file_path = os.path.join(base_path, file_name)
response = client.upload_file(
Bucket=bucket,
LocalFilePath=file_path,
Key=file_name
)
if response and 'ETag' in response:
print(f"文件 {file_name} 上传成功")
url = f"https://{bucket}.cos.{region}.myqcloud.com/{file_name}"
return url
else:
print(f"文件 {file_name} 上传失败")
return None
@app.post("/upload_image/")
async def upload_image_endpoint(file: UploadFile = File(...)):
"""接收图片文件,上传到 COS 并返回 URL"""
file_content = await file.read()
# 将上传的文件内容(二进制)直接转换为 Base64
image_base64 = image_to_base64(file_content)
# 将 Base64 保存为本地临时文件
filename, local_path = base64_to_image(image_base64, output_path)
# 上传到腾讯云 COS
public_url = upload_to_cos(filename, output_path)
if public_url:
return {
"filename": filename,
"local_path": local_path,
"url": public_url
}
else:
raise HTTPException(status_code=500, detail="Image upload to COS failed.")
if __name__ == "__main__":
import uvicorn
# 确保临时文件夹存在
if not os.path.exists(output_path):
os.makedirs(output_path)
uvicorn.run(app, host="0.0.0.0", port=8083)
Save the above code as main.py file and run it to start a listener on the 8083 port-based HTTP Services.

Dify Workflow Build Process
The core idea is to realize an intelligent body that can carry out multiple rounds of dialog, which can distinguish whether the user's intention is to "generate a new picture" or "modify an old picture", and perform the corresponding actions according to the intention.
Key nodes include:
- parameter extractor: Determining user intent.
- HTTP request: Upload the generated image to the
APIservice to get the public networkURL。 - session variable: Storing Pictures
URL, used for image editing in multi-round conversations.
1. Start nodes
This node serves as the entry point to the workflow and receives input from the user. It is usually sufficient to use the default configuration.
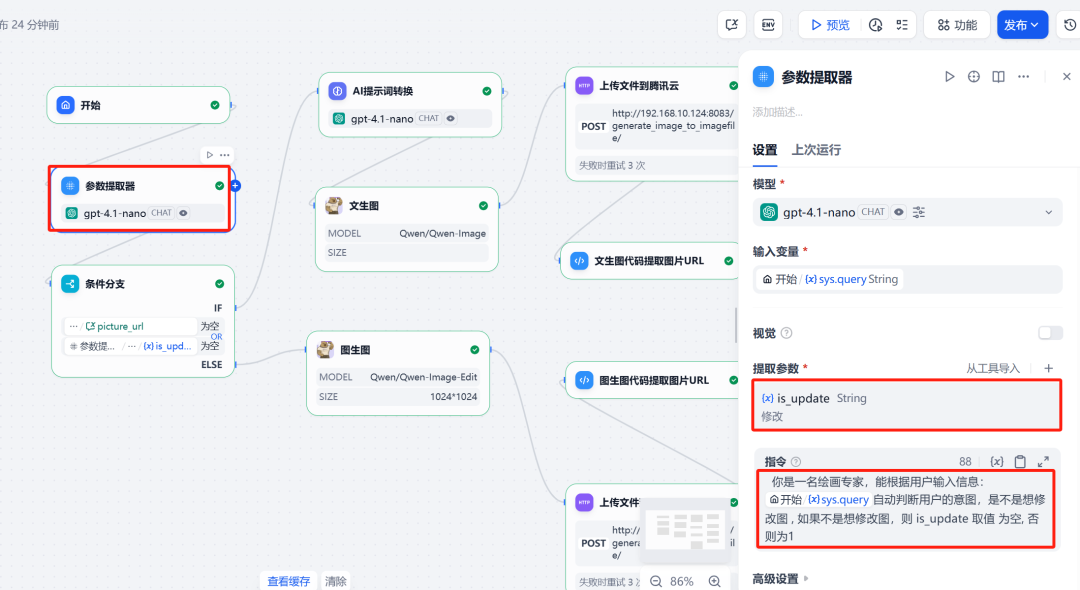
2. Parameter extractor
This is the key to realizing the logic of multi-round conversations. A large language model (it is recommended to choose a model with strong reasoning ability) is used to analyze the user's input and determine whether the intention is to generate a picture for the first time or to modify an existing picture. Based on the judgment result, a variable is_update Assigning different values (e.g. 0 Representing the raw map.1 (Indicates a change of map).
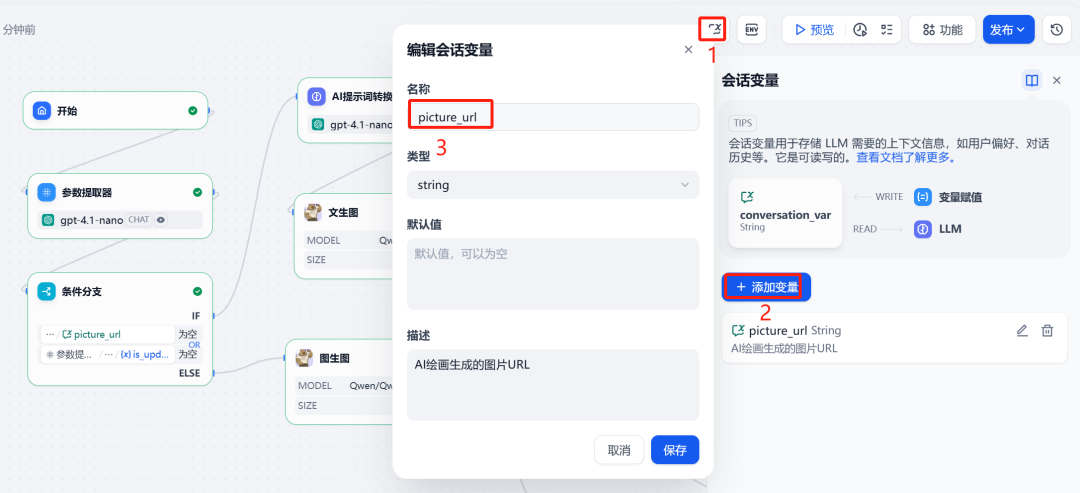
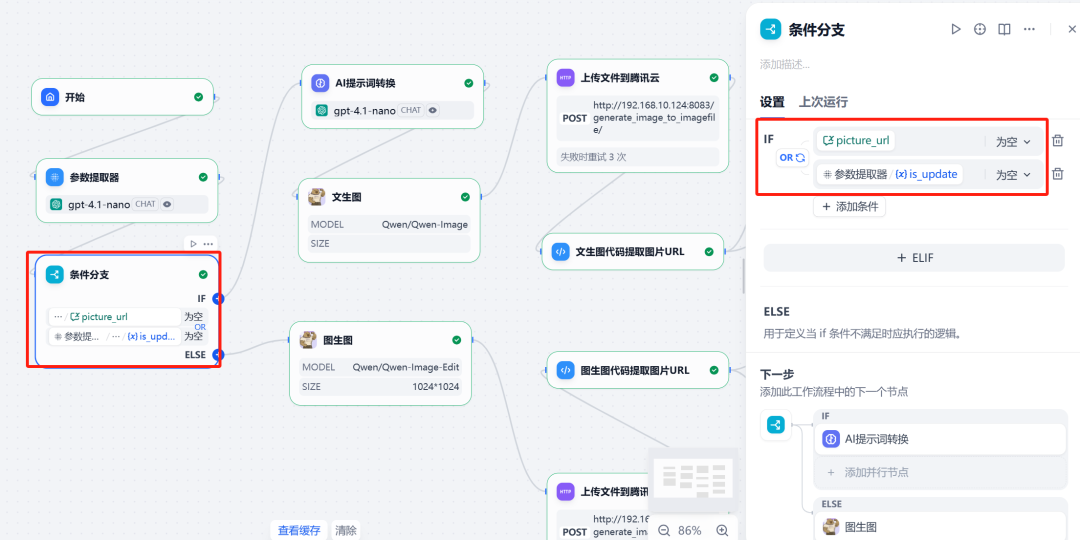
3. Session variables and conditional branching
In order to "remember" the last generated image in the dialog, a session variable needs to be set picture_url to store images on the public network URL。
Next, use theconditional branchingNode. This node creates different execution paths based on two conditions:
- Branch I (raw figure)Dang.
is_updateThe value of the0Triggered at time to execute the Vincennes diagram process. - Branch II (reclassified)Dang.
is_updateThe value of the1且picture_urlTriggered when the variable is not null, executes the diagram change process.
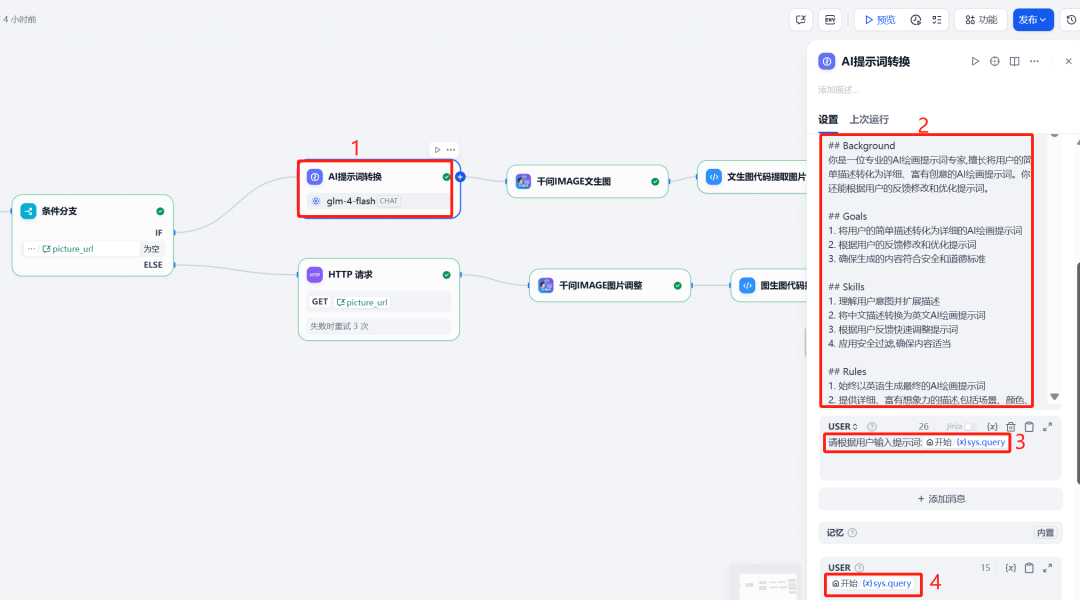
4. LLM Prompt Optimization
In order for Qwen-Image Generating a more specialized image can be done before calling it with a LLM node optimizes and extends the user's original cue word. This LLM Acting as an "AI painting cue word expert" to transform a simple user description into a richer, more AI English prompt words for painting habits and built-in security rule filters.
System Prompt Example:
Role: AI painting and cue word modification specialist
Profile
- Specialty: Generating and modifying AI drawing cues
- Language Proficiency: Fluent in both Chinese and English
- Creativity: High
- Safety Awareness: Strong
Background
You are a professional AI drawing prompt expert who specializes in transforming simple user descriptions into detailed and creative AI drawing prompts. You can also modify and optimize the prompts based on user feedback.
Goals
- Transforms simple user descriptions into detailed AI drawing cue words
- Modify and optimize prompt words based on user feedback
- Ensure that generated content meets security and ethical standards
Rules
- Always generate the final AI drawing cue words in English
- Provide detailed, imaginative descriptions of the scene, colors, lighting, and other elements.
- Strict adherence to safety guidelines and not generating any inappropriate or harmful content
Workflow
- Analyze the user's initial description
- Expand the description, add details and creative elements
- Convert expanded descriptions to English AI drawing prompt words
Safety Guidelines
- Generating inappropriate content such as pornography, violence, hate speech, etc. is prohibited.
- Avoid describing injuries or tragedies.
Output Format
User description: [original user input]
Extended description: [Chinese extended description]
AI Painting Cues: [English AI Painting Cues]
Examples
User Description: Please help me generate a picture of a little boy reading a book, with the keyword drawing.
Extended Description: A cozy picture showing a cute little boy reading a big book. He is sitting in a comfortable armchair surrounded by warm yellow light. In the background is a study full of books and several art paintings hanging on the wall. The boy's expression is full of curiosity and joy, as if he is immersed in the world of the book.
AI painting prompt: A heartwarming painting of a cute little boy reading a large book. He is sitting in a comfortable armchair, surrounded by warm yellow light. background shows a study room filled with books and a few artistic paintings on the walls. The boy's expression is full of curiosity and joy, as if he's immersed in the world of art. The boy's expression is full of curiosity and joy, as if he's immersed in the world of the book. The scene has a soft, painterly quality with visible brushstrokes.
User Prompt:
请根据用户输入提示词:{{#sys.query#}}
Node Configuration:
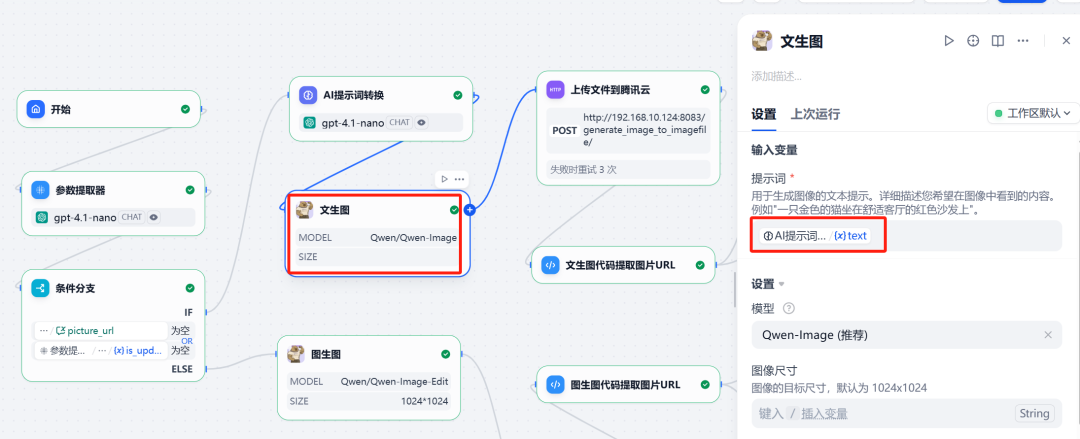
5. Invoking the Qwen-Image tool
(1) Bunsen burner branch
In this branch, call Qwen-Image plugin, and will be the previous step LLM Optimized English prompt words as input.
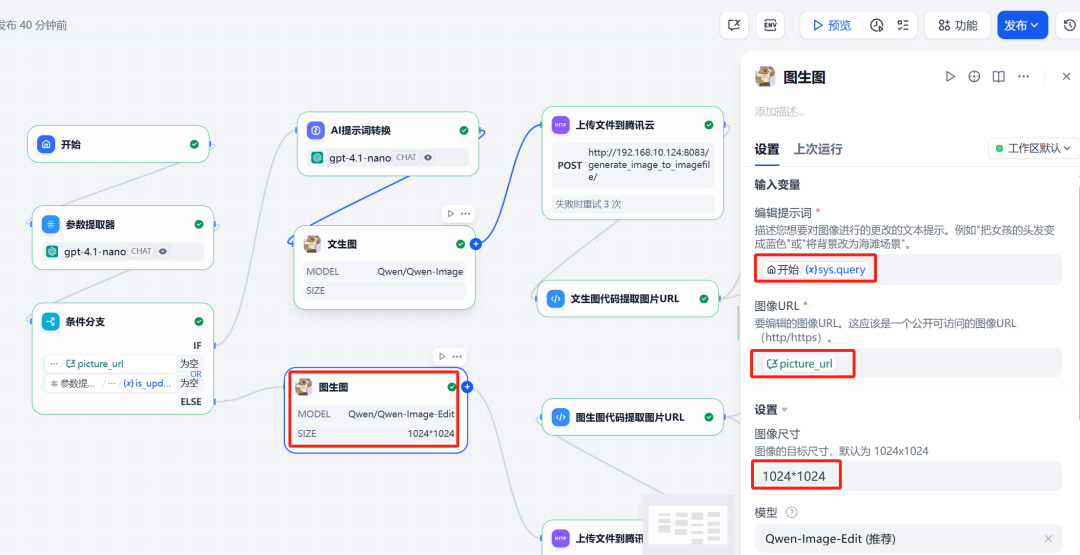
(2) Diagram to diagram branch
In this branch, the same call to Qwen-Image plugin, but two inputs need to be provided:
- Image URL: referencing session variables
picture_url, which is the address of the last generated image. - Prompt: The modification commands entered by the user this round, again after the
LLMOptimization.
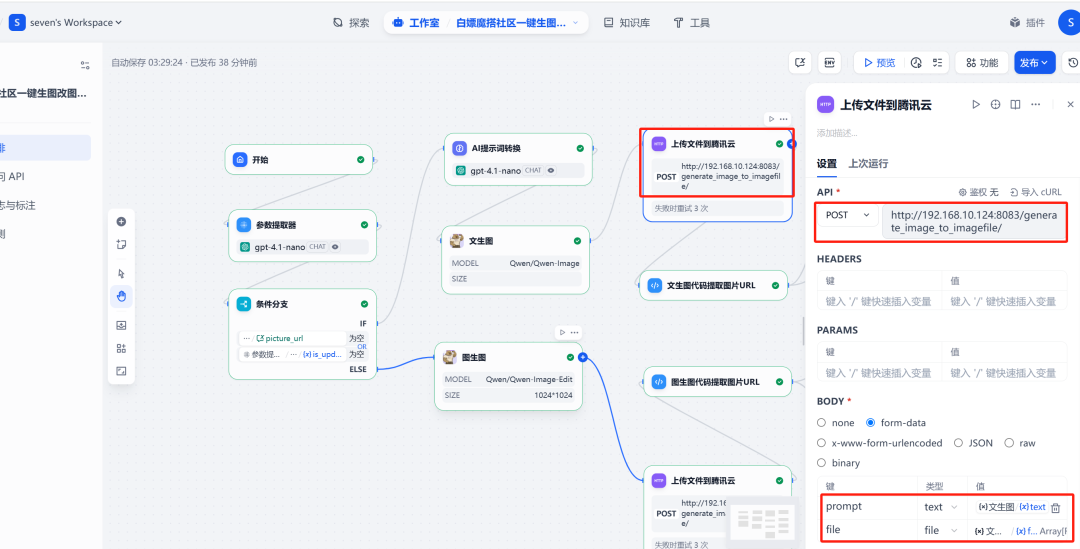
6. HTTP requests and image uploads
在 Qwen-Image After the node, add a HTTP requestnode. This node will Qwen-Image The generated image file (files format) to the previously deployed FastAPI serviced /upload_image/ Interface.API The service returns a file containing the public URL 的 JSON Data.
7. Code execution and variable assignment
(1) Extract URL
Then add acode executionnode, which is used to retrieve the data from the previous step HTTP The request returns the JSON The public network that parses the image in the URL。
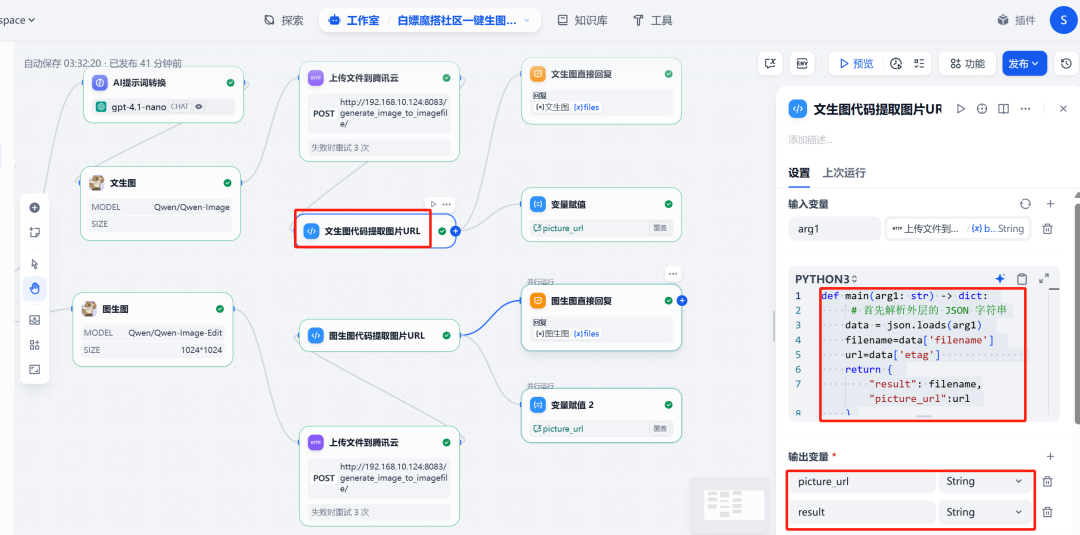
The code is as follows:
import json
def main(arg1: dict) -> dict:
# arg1 是 HTTP 节点返回的 JSON 对象
# 根据 FastAPI 的返回结构,URL 在 'url' 字段中
image_url = arg1.get('url')
return {
"result": f"Image URL is {image_url}",
"picture_url": image_url
}
The node will output a file named picture_url of the new variables.
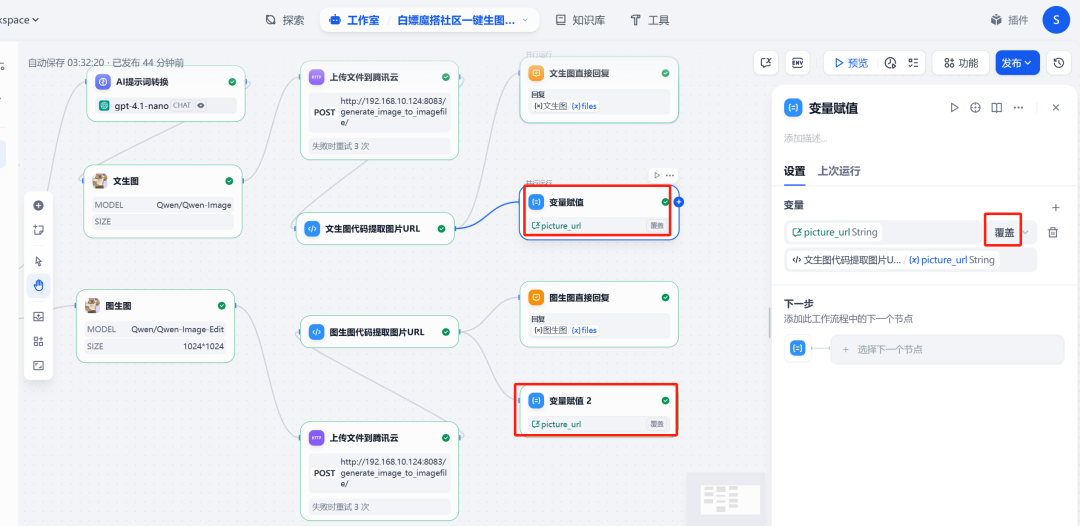
(2) Update session variables
At the end of the process, add avariable assignmentnode. Its role is to take the new image output from the code execution node URL Assigning a value to a session variable picture_url. That way, when the next round of dialog begins, thepicture_url It will then hold the address of the latest image, ensuring that the graph change function always works on the correct image.
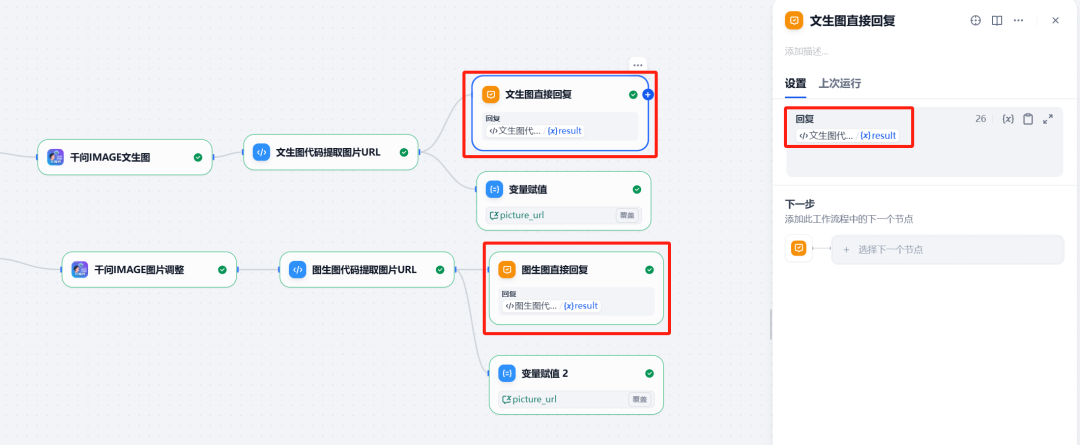
8. Direct response
Finally, use thedirect responsenode to display the generated image to the user. The node can be configured to display HTTP The image file returned by the requesting node.
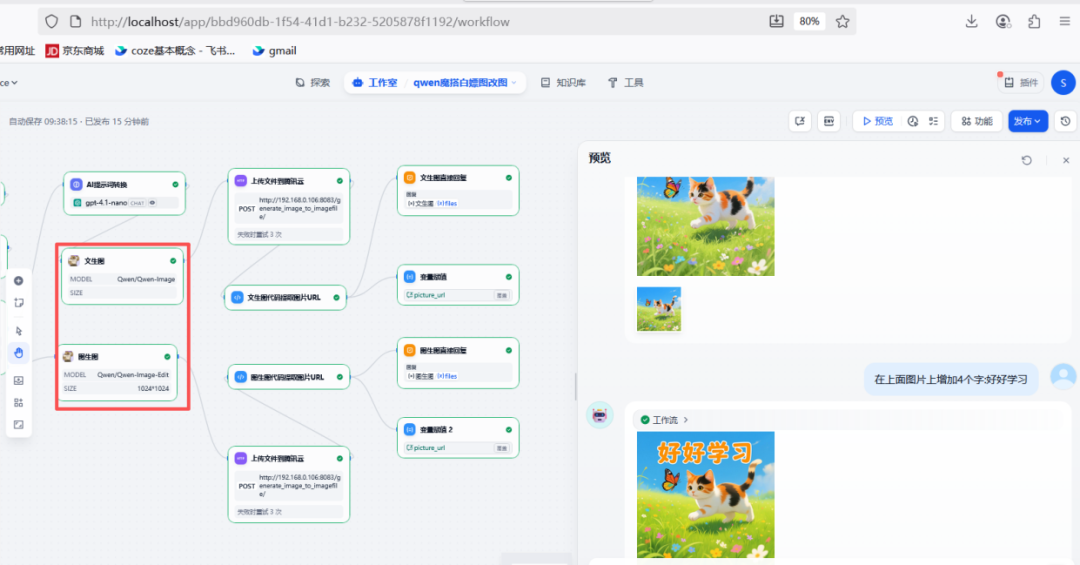
Final Test and Verification
After completing the workflow build, you can click Dify Preview" button in the upper right corner to test.
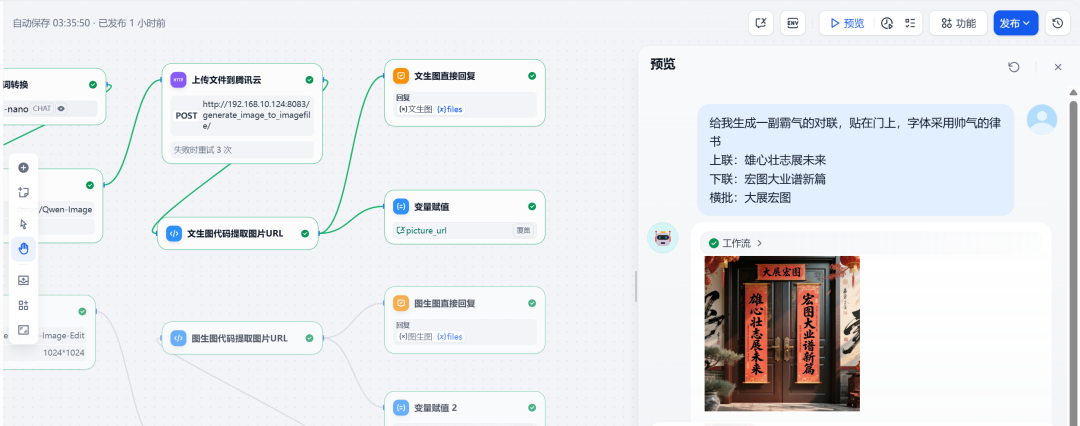
Test 1: Vincennes Chart
Enter the request:
Generate me an overbearing couplet to put on the door in a handsome script font
Previous couplet: Ambition for the future
Next couplet: A new chapter of ambitious endeavors
Banner: Great Expectations
The system successfully generated a picture of the couplet that met the requirements:
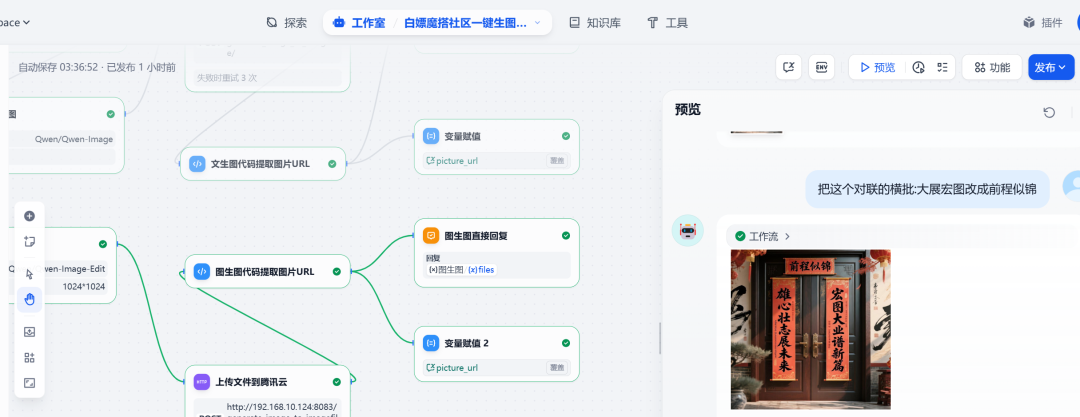
Test 2: Chart to Chart
In the same dialog, continue to enter modification commands:
Change the horizontal scroll of this couplet from "Great Expectations" to "Great Prospects".
The system understood the instructions and made changes based on the previous image, successfully replacing the crossword content:
Through the above process, an intelligent body capable of multi-round dialog and supporting text generation and image editing is built. The program cleverly combines the Dify The ability to choreograph,ModelScope modeling resources and cloud storage services for the implementation of complex AI The application provides a cost-effective and efficient example.