DeepSearch AI Agent is an advanced AI content creation assistant. It is built using LangGraph and FastAPI technologies. This tool is not like a typical Q&A bot. It mimics the workflow of a team of experts, and through the cycle of "thinking-planning-researching-writing", it can turn a simple request from a user into a fully structured, in-depth professional article, tutorial or technical blog. The whole system is separated from the front-end and back-end, the back-end through FastAPI processing logic, the front-end using React to display the interface, the two through the real-time streaming technology to communicate, the user can see the process of article generation in real time. The design of this project is highly scalable, and it is easy to add new functional nodes, such as adding manual review or auto-correction links to realize more complex intelligent agent logic.
Function List
- Dynamic narrative planning: Before putting pen to paper, the AI analyzes the topic, determines the type of content (e.g., whether it's technical or historical), and then devises an optimal narrative structure, avoiding the use of rigid templates.
- Expert outline generation: The tool generates outlines of articles with natural, engaging chapter headings that look like they were written by real-life experts, rather than cold task descriptions.
- Supervisor-executor workflow: There are two main roles within the system, the "Research Supervisor" and the "Writing Supervisor". They dispatch executives to accomplish specific research and writing tasks, respectively. This design makes the whole process clear and easy to control.
- Accurate citation and retrieval of information: The Writing AI will use a scoped RAG tool, which means it will only query the most relevant research material to the current chapter, ensuring the accuracy of the information.
- Academic-level citation format: The system automatically handles citing sources. It generates clickable citation tags in the body of the article (e.g.
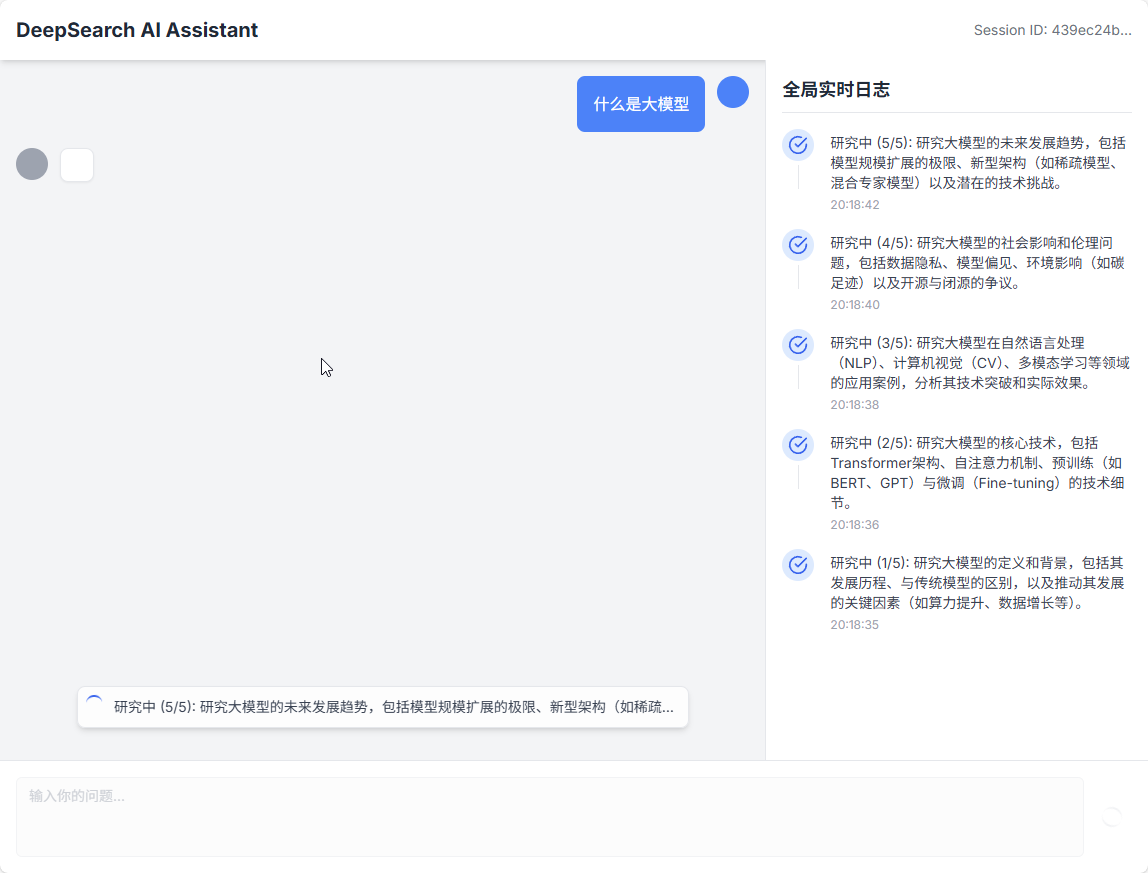
[1]), and a standardized list of references in a standardized format is generated at the end of the article. - Real-time progress updates: The back-end will push information about the progress of the task, the content of newly written chapters and references to the front-end interface in real time through Server-Sent Events (SSE) technology.
- modernized technology stack: The project uses current popular front-end and back-end technologies, with the back-end relying heavily on Python's FastAPI and LangGraph, and the front-end using React and TypeScript.
Using Help
DeepSearch AI Agent is a front-end and back-end separated project, you need to set up and launch the back-end and front-end separately. Here are the detailed steps to follow so that you can run it successfully from scratch.
Step 1: Preparation
Before you begin, make sure you have the following software installed on your computer:
Python(version 3.9 or higher)Node.js和npm(for running the front end)Git(for cloning code repositories)
Step 2: Get the project code
Open your terminal (Command Prompt or PowerShell on Windows, Terminal on macOS or Linux) and clone the code repository to your local computer.
git clone https://github.com/LordFoxFairy/deepseek_deepsearch_quickstart.git
Once the cloning is complete, go to the project directory:
cd deepseek_deepsearch_quickstart
Step 3: Backend Setup
The back-end is responsible for all AI logic processing, including planning, research and writing.
- Go to the backend directory
In the project root directory (deepseek_deepsearch_quickstart), first enter thebackendCatalog.cd backend - Create and activate a Python virtual environment
In order not to pollute the global Python environment on your computer, we strongly recommend creating a virtual environment.python -m venv venvThis command creates a file named
venvfolder. Next, you need to activate it:- 在 Windows On the system, run:
.\venv\Scripts\activate - 在 macOS 或 Linux On the system, run:
source venv/bin/activate
After successful activation, you will see in front of the command prompt in the terminal the
(venv)The words. - 在 Windows On the system, run:
- Installation of dependency packages
All Python libraries required for the backend are documented in therequirements.txtfile. Run the following command to install them:pip install -r requirements.txt - Configuring the API Key
This project requires the API keys for the AI model to work. You need to configure two key API keys.
First, in thebackend/src/directory, find a file named.env.exampleof the file. You need to copy it and rename it.env。- 在 Windows Up:
copy .\src\.env.example .\src\.env - 在 macOS 或 Linux Up:
cp src/.env.example src/.env
Then, use your code editor to open this new
.envfile, you will see the following:# backend/src/.env # 用于 RAG 嵌入 DASH_SCOPE_API_KEY=sk-your-dashscope-api-key # 用于 LLM 推理 DEEPSEEK_API_KEY=sk-your-deepseek-api-key DEEPSEEK_BASE_URL=https://api.deepseek.comYou'll need to set the
sk-your-dashscope-api-key和sk-your-deepseek-api-keyReplace it with your own real key.DASH_SCOPE_API_KEYfor text embedding (RAG function).DEEPSEEK_API_KEYReasoning for large language models. - 在 Windows Up:
Step 4: Front End Setup
The front-end is responsible for providing the interface for user interaction.
- Go to the front-end directory
Open a new terminal window, or return to the project root directory first in the previous terminal (cd ..), and then go to thefrontendCatalog.cd frontend - Installation of dependency packages
The front-end uses a Node.js environment and the required dependencies are documented in thepackage.jsonfile. Run the following command to install it:npm installThis process may take a few minutes.
Step 5: Run the application
Now that the front and back end preparations are complete, we can launch the application. You need to keep both terminal windows running at the same time.
- Start the backend service (in the first terminal)
Make sure you are currently in thebackenddirectory and the Python virtual environment is activated. Then run the following command:uvicorn src.api.main:app --host 0.0.0.0 --port 8000 --reloaduvicornis an ASGI server for running FastAPI applications.--host 0.0.0.0Make the service accessible on your LAN.--port 8000Specifies the port number of the service.--reloadparameter indicates that the service will restart automatically when the code file changes, ideal for development environments.
- Start the front-end service (in a second terminal)
Make sure you are currently in thefrontenddirectory. Then run the following command:npm run devThis command starts a local development server, which usually listens on the
5173Ports.
Step 6: Start the experience
When both services have started successfully, open your browser and visit the following address:
http://localhost:5173
Now you should be able to see the interface of DeepSearch AI Agent. Enter a topic you want to generate an article about in the input box and click send, the AI will start its "Think-Plan-Research-Write" process and display its work progress and final article in real time on the interface.
application scenario
- content creator
For individuals or teams who need to write in-depth articles, tutorials or blogs, this tool can serve as a powerful starting point. Users only need to provide a core topic, and the AI can automate the research of information, structural planning and first draft writing, greatly improving the efficiency and quality of content creation. - Technical Documentation
Software developers or technical writers can use it to quickly generate first drafts of technical documentation. For example, enter a request for "how to use a certain API" and the system can automatically generate a complete tutorial with background, installation steps, functionality details and code samples. - Education and training
Teachers or trainers can use this tool to quickly create learning materials for their courses. Whether it's a detailed presentation of a historical event or a layman's explanation of a complex scientific concept, AI generates clearly structured and informative articles to be used as teaching materials or supplementary reading.
QA
- Is there a fee for this program?
The project itself is open source and free to use. However, it relies on third-party AI modeling services (e.g. DeepSeek and DashScope), and you need to have API keys for these services and pay for API calls based on the pricing strategy of these service providers. - Can I replace it with another large language model?
Can. The architecture of this project is designed to be flexible and compatible with all kinds of large language models. You can modify the part of the backend code that calls the model to replace it with your preferred model, such as OpenAI's GPT family or other models. - How is the quality of the generated articles ensured?
The system ensures quality through a "supervisor-performer" model. It begins with in-depth research planning and then utilizes RAG (retrieval augmentation generation) technology to ensure that the content is based on accurate sources. At the same time, it automatically handles citations and references, ensuring traceability of the content.